> ## Documentation Index
> Fetch the complete documentation index at: https://interceptor-docs.requestly.com/llms.txt
> Use this file to discover all available pages before exploring further.
# Android Simulator Interception
> Learn how to set up Requestly Interceptor to intercept, monitor, and debug HTTP requests on your Android Simulator for Android app development and testing.
***
When working with Android apps, debugging HTTP Requests can be a challenge. Requestly Interceptor provides an easy-to-use solution for everyone who needs to monitor, modify, or debug HTTP requests and responses during development or QA testing. This section outlines step-by-step instructions, guiding you on how to set up Requestly Interceptor for your Android emulator.
By the end of this guide, you will have a fully functional interception setup tailored to your Android development needs.
## **Step-by-Step Guide**
### Video Guide
For a visual walkthrough, check out our YouTube video guide:
## Automatic Setup
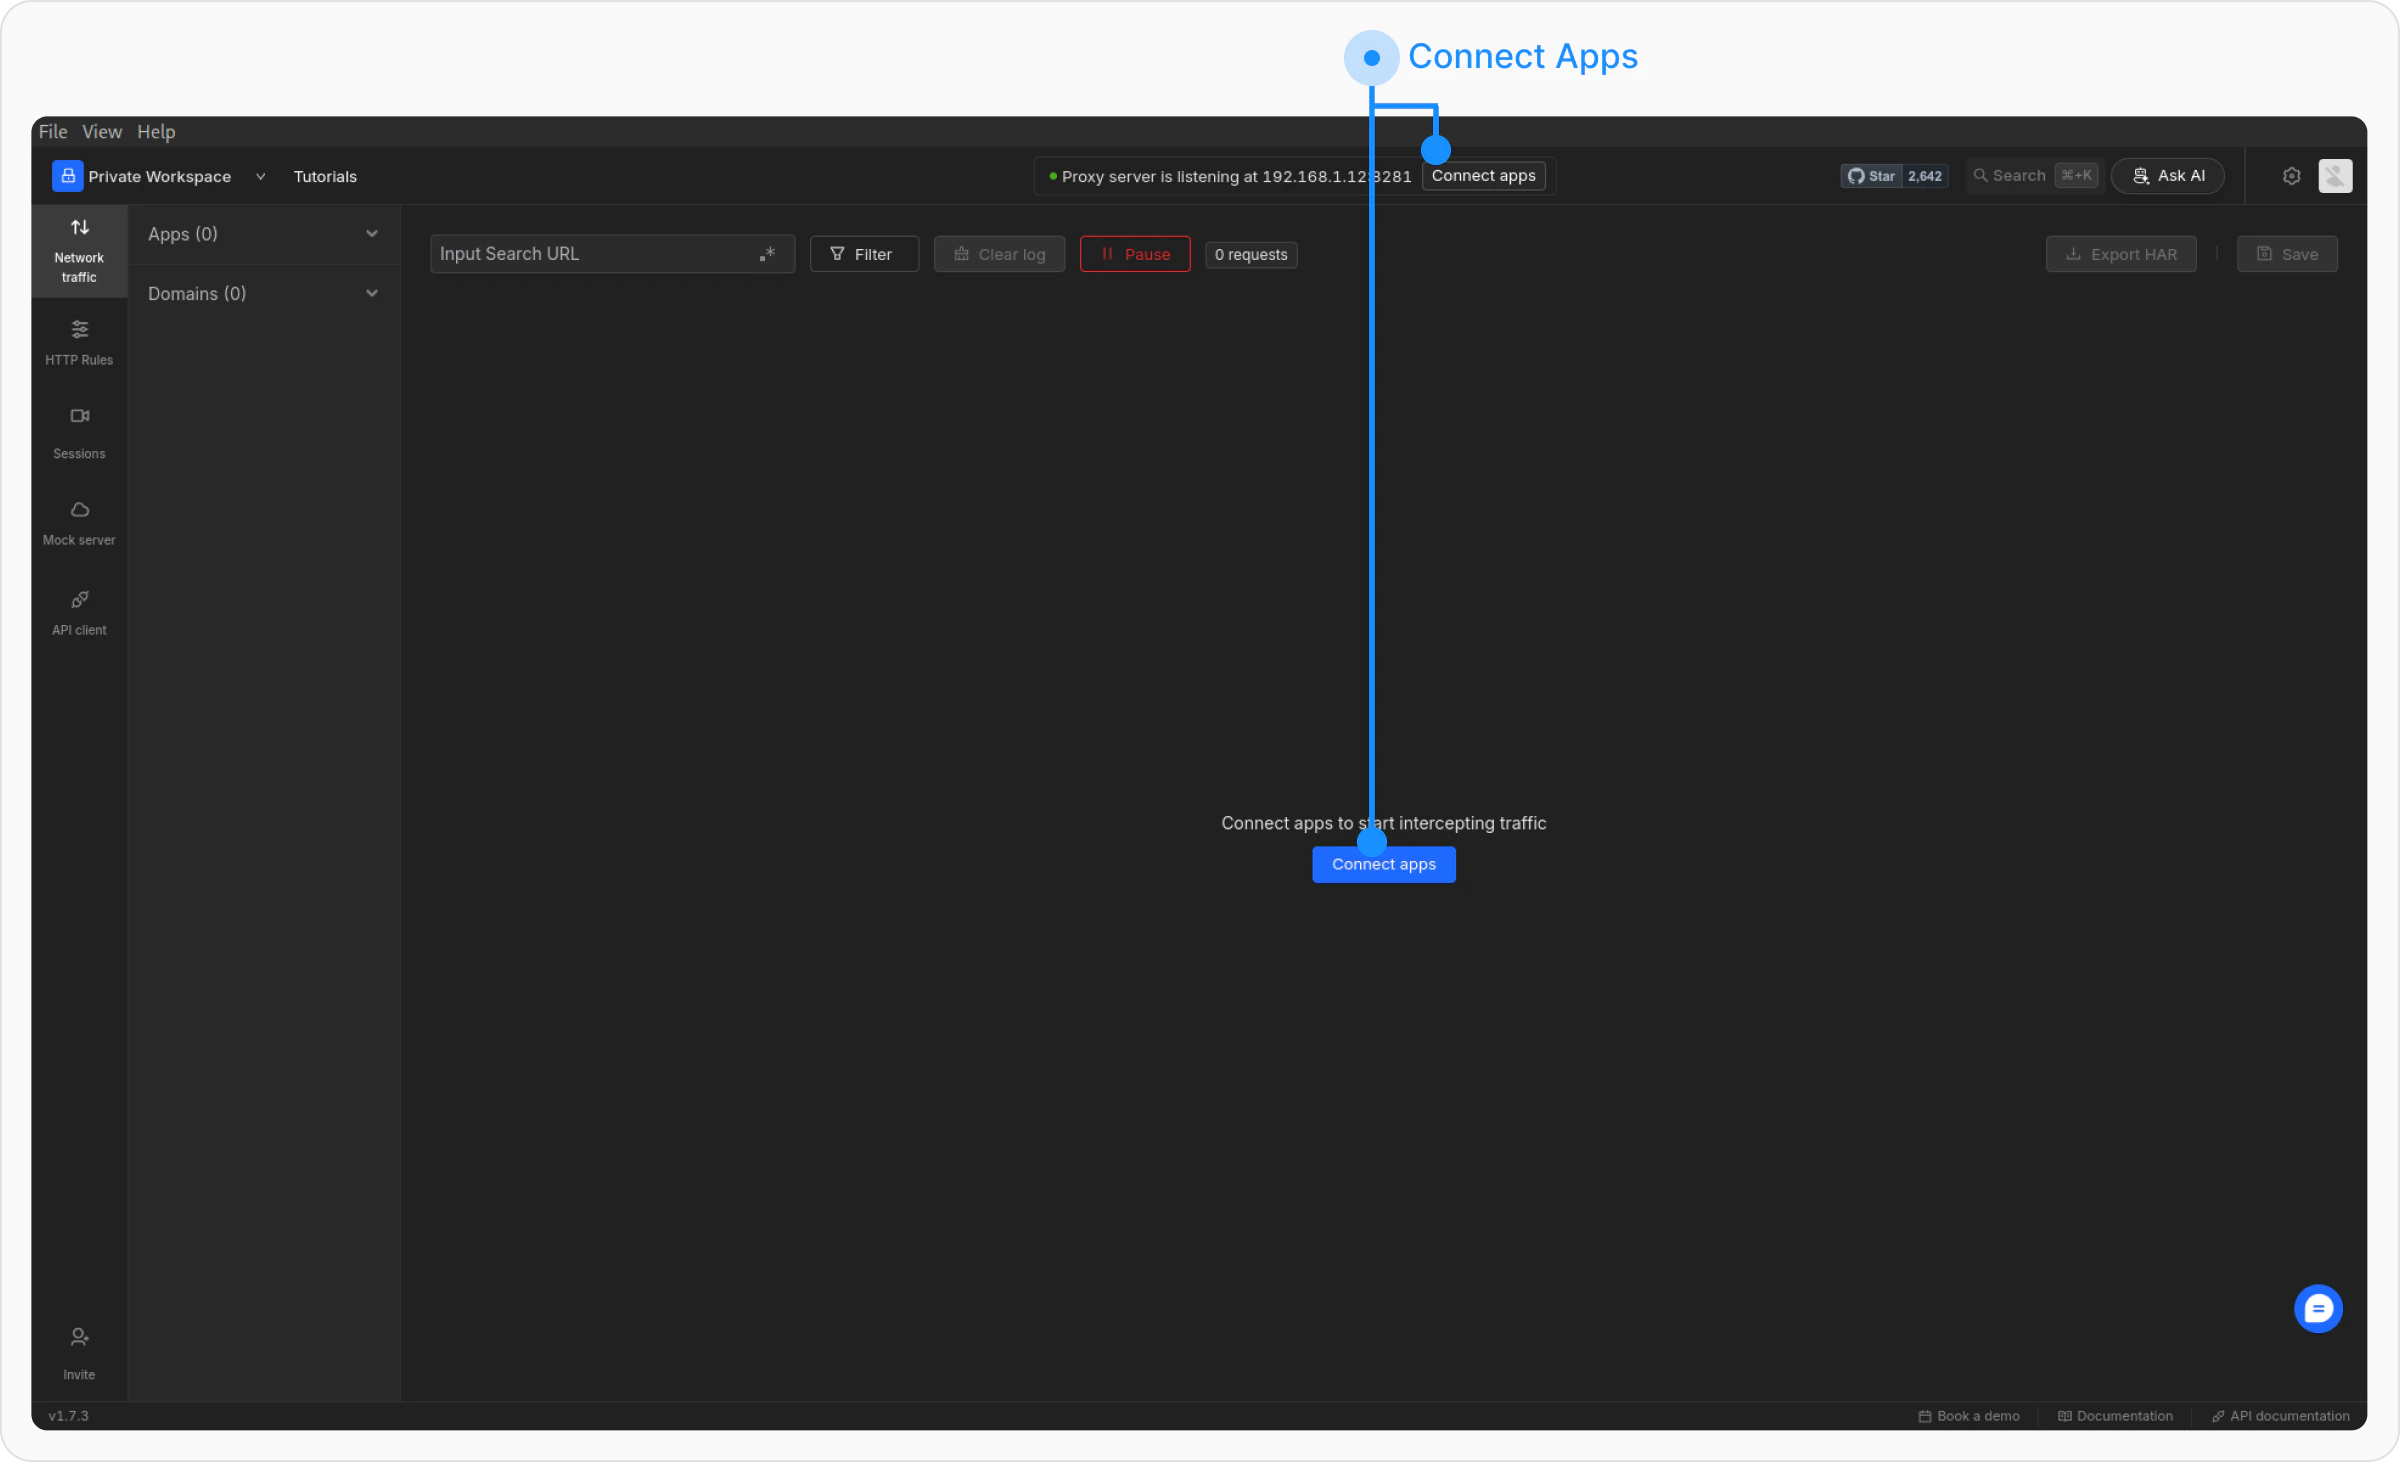
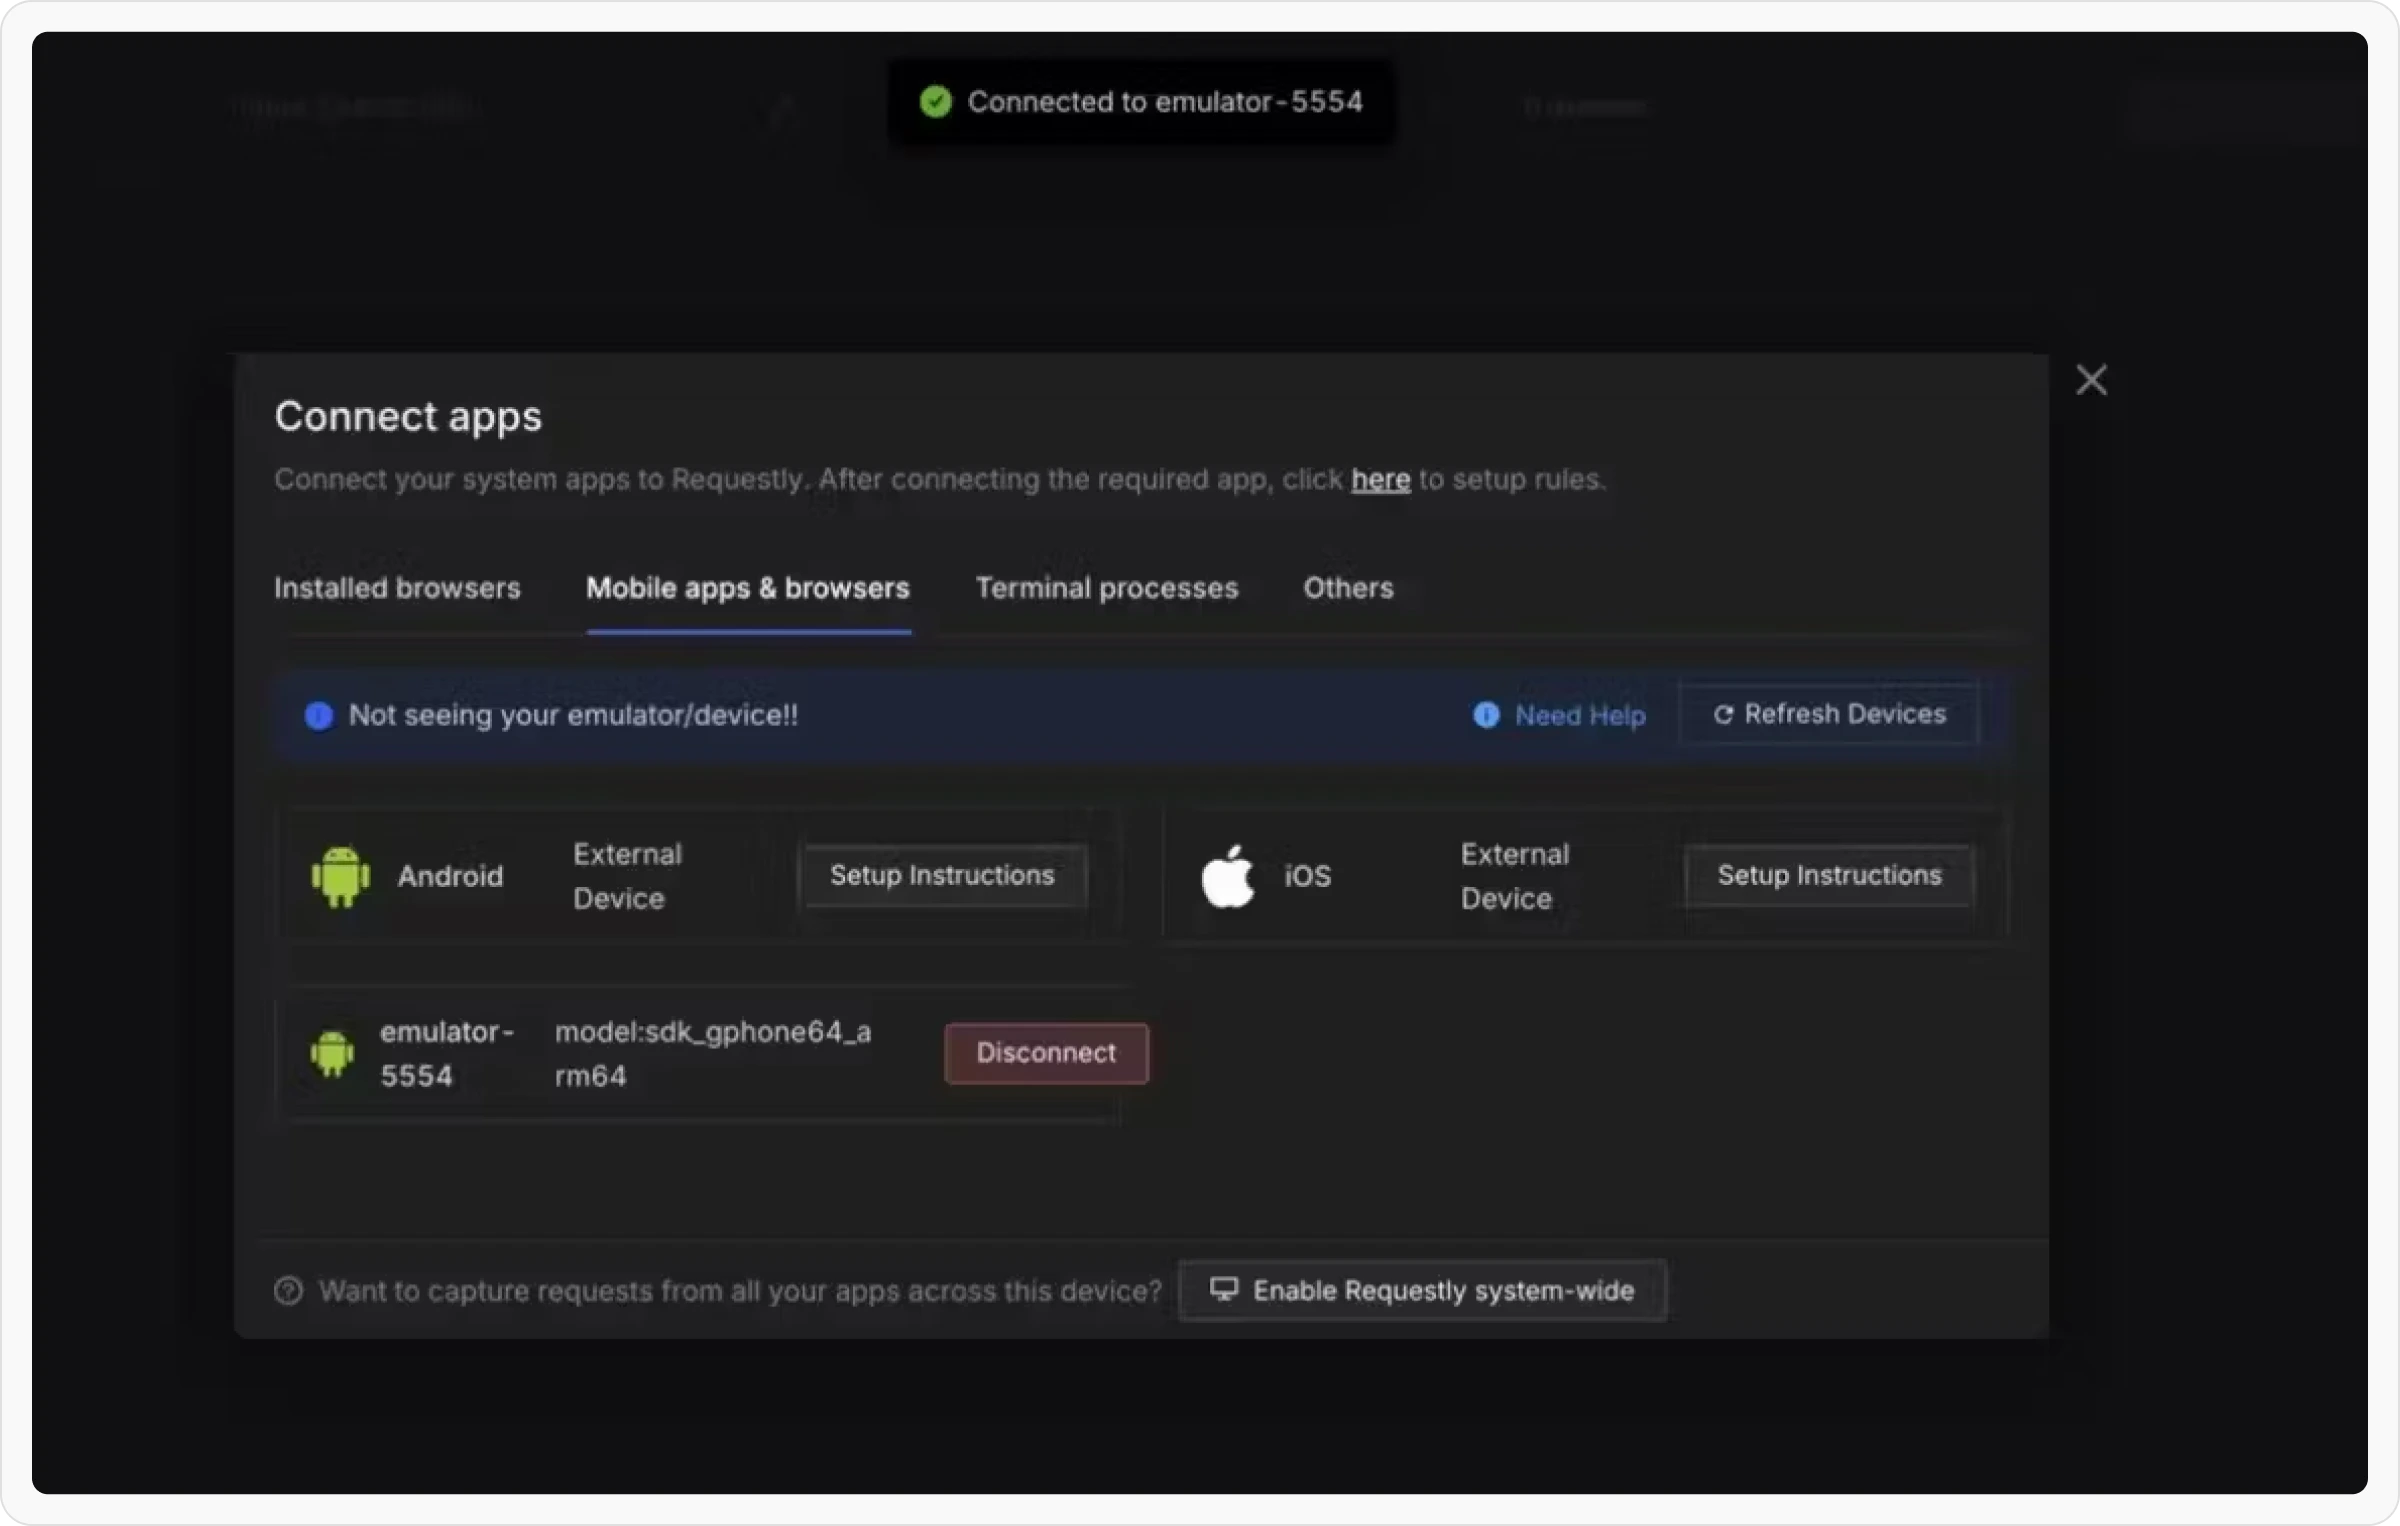
Requestly Interceptor offers a one-click setup for Android emulators using Desktop App version **1.7.0+**. Here's how:
Ensure your emulator is up and running before proceeding
Launch the Requestly Interceptor desktop application on your computer.
## Manual Setup
If the automatic setup does not work for you, you can manually configure the proxy by following these steps:
If you have ADB installed, you can skip the proxy setup through the emulator's UI by running the following command in your Android studio terminal:
```bash theme={null}
adb shell settings put global http_proxy ":"
```
Make sure to change the: in the above command to the one mentioned in the header of the Requestly Interceptor desktop app
Otherwise, follow these steps to configure the proxy manually:
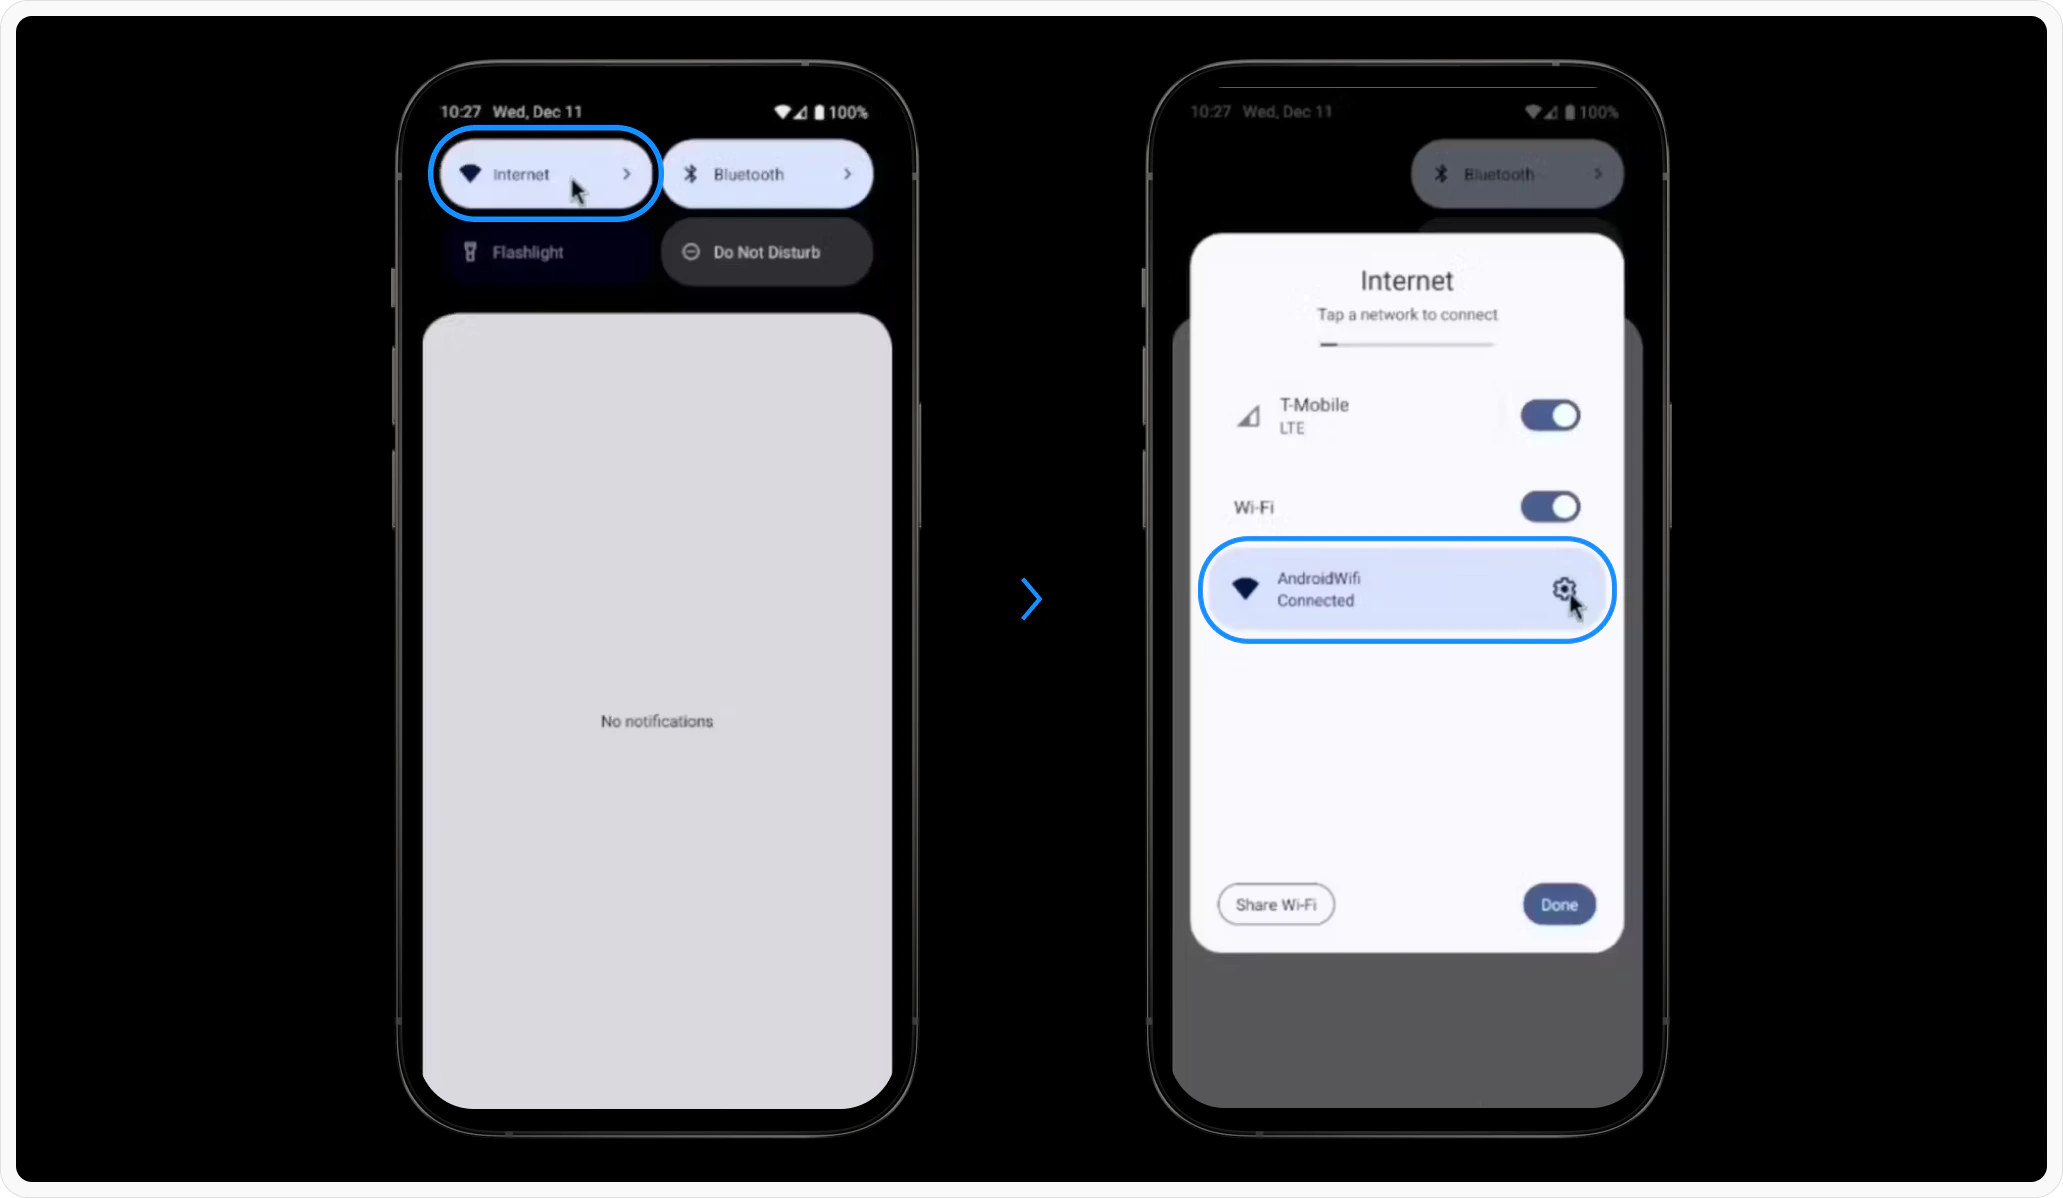
Tap on the Internet and click on the gear icon on the connected network name to open its settings.
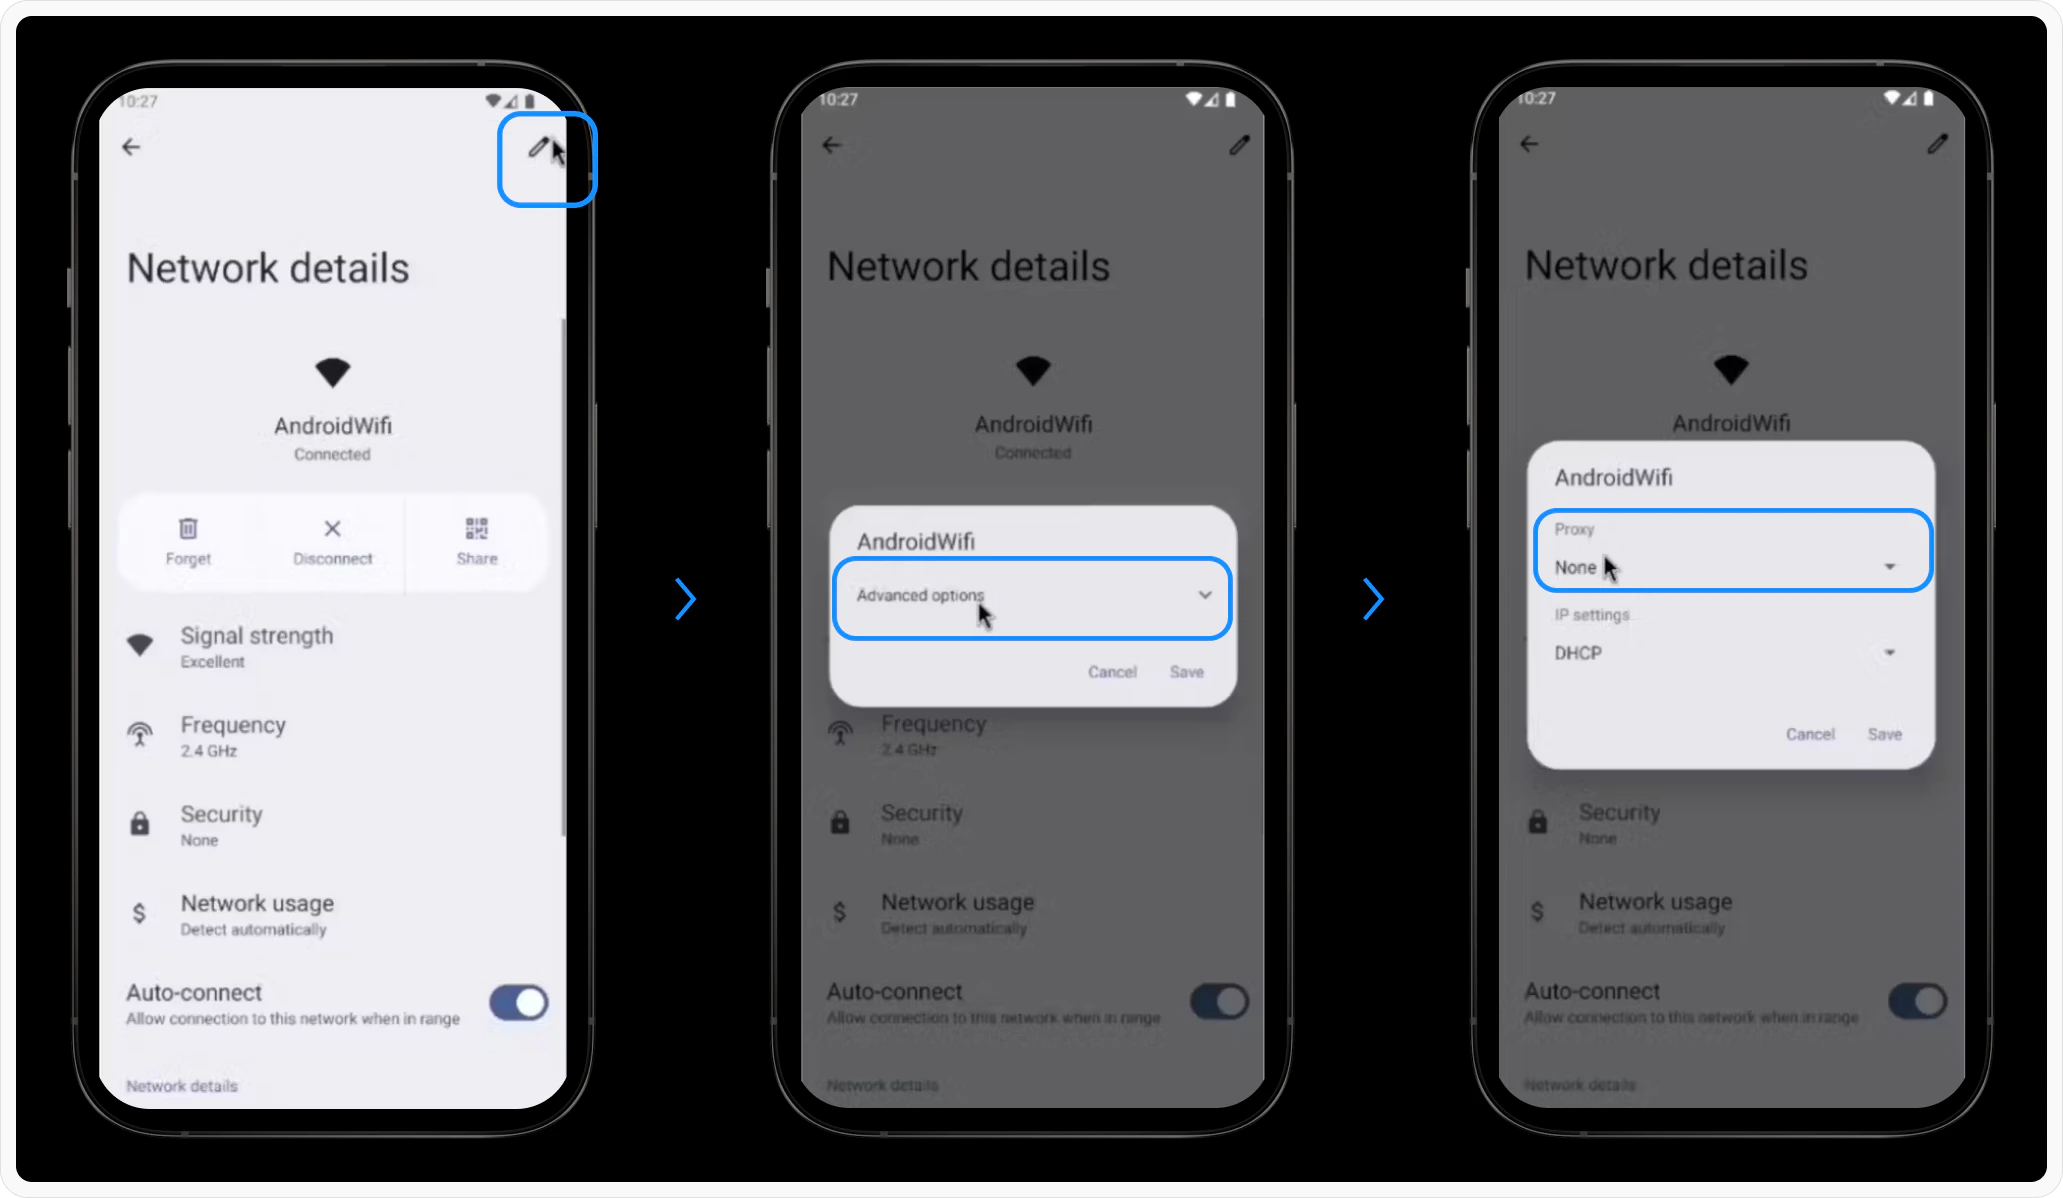
* At the top right of the screen click the edit icon
* Enable "Advanced Options" if needed.
* Set the **Proxy** to "Manual."
* **Proxy Hostname:** Use the IP shown in the Requestly Interceptor Desktop App (e.g., `192.168.1.10`).
* **Proxy Port:** Use the port displayed in the Requestly Interceptor Desktop App (e.g., `8080`).
Apply the settings and continue with the certificate installation
## CA Certificate Installation
To intercept HTTPS traffic, you need to install Requestly Interceptor's root CA certificate on the emulator. You can do this in two ways:
**Option 1: From the Desktop:**
* Open the Requestly Interceptor Desktop App.
* Navigate to **Connect Apps > Others > Manual Setup > Save Certificate** to download the root CA certificate.
After the certificate is downloaded on your PC, Run this script in **Android Studio** to push it to the emulator using the following script:
```bash theme={null}
#!/bin/bash
subjectHash=`openssl x509 -inform PEM -subject_hash_old -in **** | head -n 1`
openssl x509 -in **** -inform PEM -outform DER -out $subjectHash.0
adb root
adb push ./$subjectHash.0 /data/misc/user/0/cacerts-added/$subjectHash.0
adb shell "su 0 chmod 644 /data/misc/user/0/cacerts-added/$subjectHash.0"
adb reboot
```
> ***Replace \ with the path to the downloaded certificate***
**Option 2: Directly on the Emulator:**
* Open Chrome in an incognito tab
* Go to [**http://requestly.io/ssl**](http://requestly.io/ssl) (⚠️ Use HTTP here, not HTTPS)
* This will download RQProxyCA.pem.cert
* Go to **Settings > Search "CA Certificate" > Install Anyway**.
* Select the downloaded certificate and install it.
After installation, confirm your setup by going to [**amiusing.requestly.io**](http://amiusing.requestly.io/)
## **SSL Pinning \[if-required]**
From Android API level 23 (Android 6.0+), many apps enforce SSL pinning for security. To intercept HTTPS traffic, setting up SSL pinning is required.
Make sure to remove these in production builds
Add these configs to your app codebase for it to work
**Step 1:** Add **res/xml/network\_security\_config.xml**
```xml theme={null}
```
**Step 2:** Add to **AndroidManifest.xml**
```xml theme={null}
...
```
## **Deactivate Proxy (After done debugging)**
Please make sure to revert the proxy after you are done testing using Requestly Interceptor
```bash theme={null}
adb shell settings put global http_proxy :0
```
# **Troubleshooting**
### **Emulator not detected?**
* Check if your emulator is running.
* Check if `adb` is installed. If not, install it from [**here**](https://developer.android.com/tools/releases/platform-tools)
* Try Restarting your emulator.
# **How does it work?**
Here's the code that makes this happen in a single click
[**https://github.com/requestly/requestly-desktop-app/blob/fb1f321a3d2431cfcd9d95d1396bcd39820a4ec9/src/renderer/actions/apps/mobile/android.js#L63-L74**](https://github.com/requestly/requestly-desktop-app/blob/fb1f321a3d2431cfcd9d95d1396bcd39820a4ec9/src/renderer/actions/apps/mobile/android.js#L63-L74)
1. Searches for online ADB devices
2. On `Connect`
1. Root the device (To install Requestly Interceptor CA)
2. Inject Requestly Interceptor CA (if not already)
3. Setup Proxy on Emulator
4. Restart the Emulator (Only first time)
3. On `Disconnect` - Removes the Proxy
 Tap on the Internet and click on the gear icon on the connected network name to open its settings.
 * At the top right of the screen click the edit icon
* Enable "Advanced Options" if needed.
* Set the **Proxy** to "Manual."
* At the top right of the screen click the edit icon
* Enable "Advanced Options" if needed.
* Set the **Proxy** to "Manual."
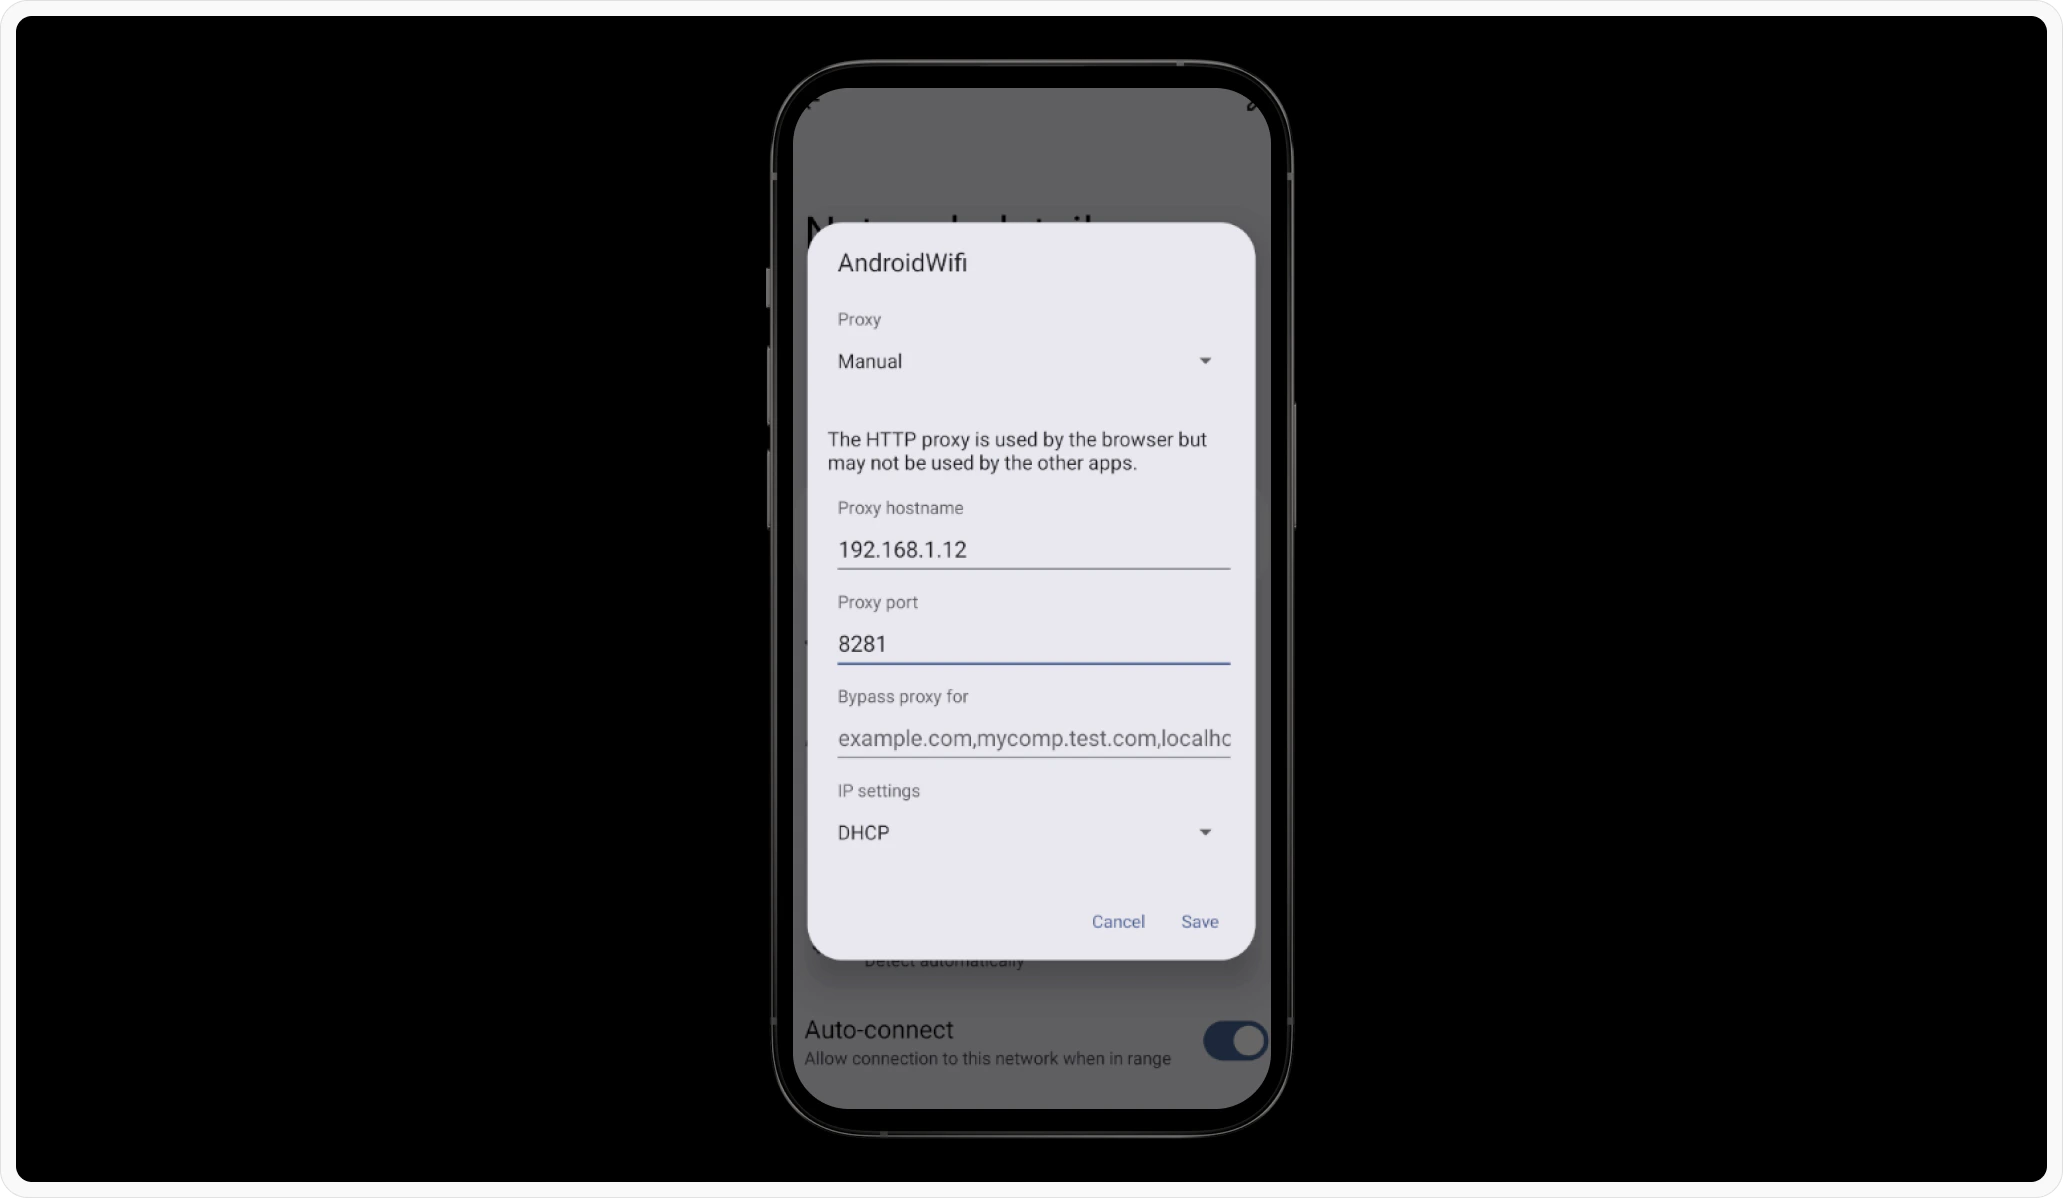 * **Proxy Hostname:** Use the IP shown in the Requestly Interceptor Desktop App (e.g., `192.168.1.10`).
* **Proxy Port:** Use the port displayed in the Requestly Interceptor Desktop App (e.g., `8080`).
* **Proxy Hostname:** Use the IP shown in the Requestly Interceptor Desktop App (e.g., `192.168.1.10`).
* **Proxy Port:** Use the port displayed in the Requestly Interceptor Desktop App (e.g., `8080`).
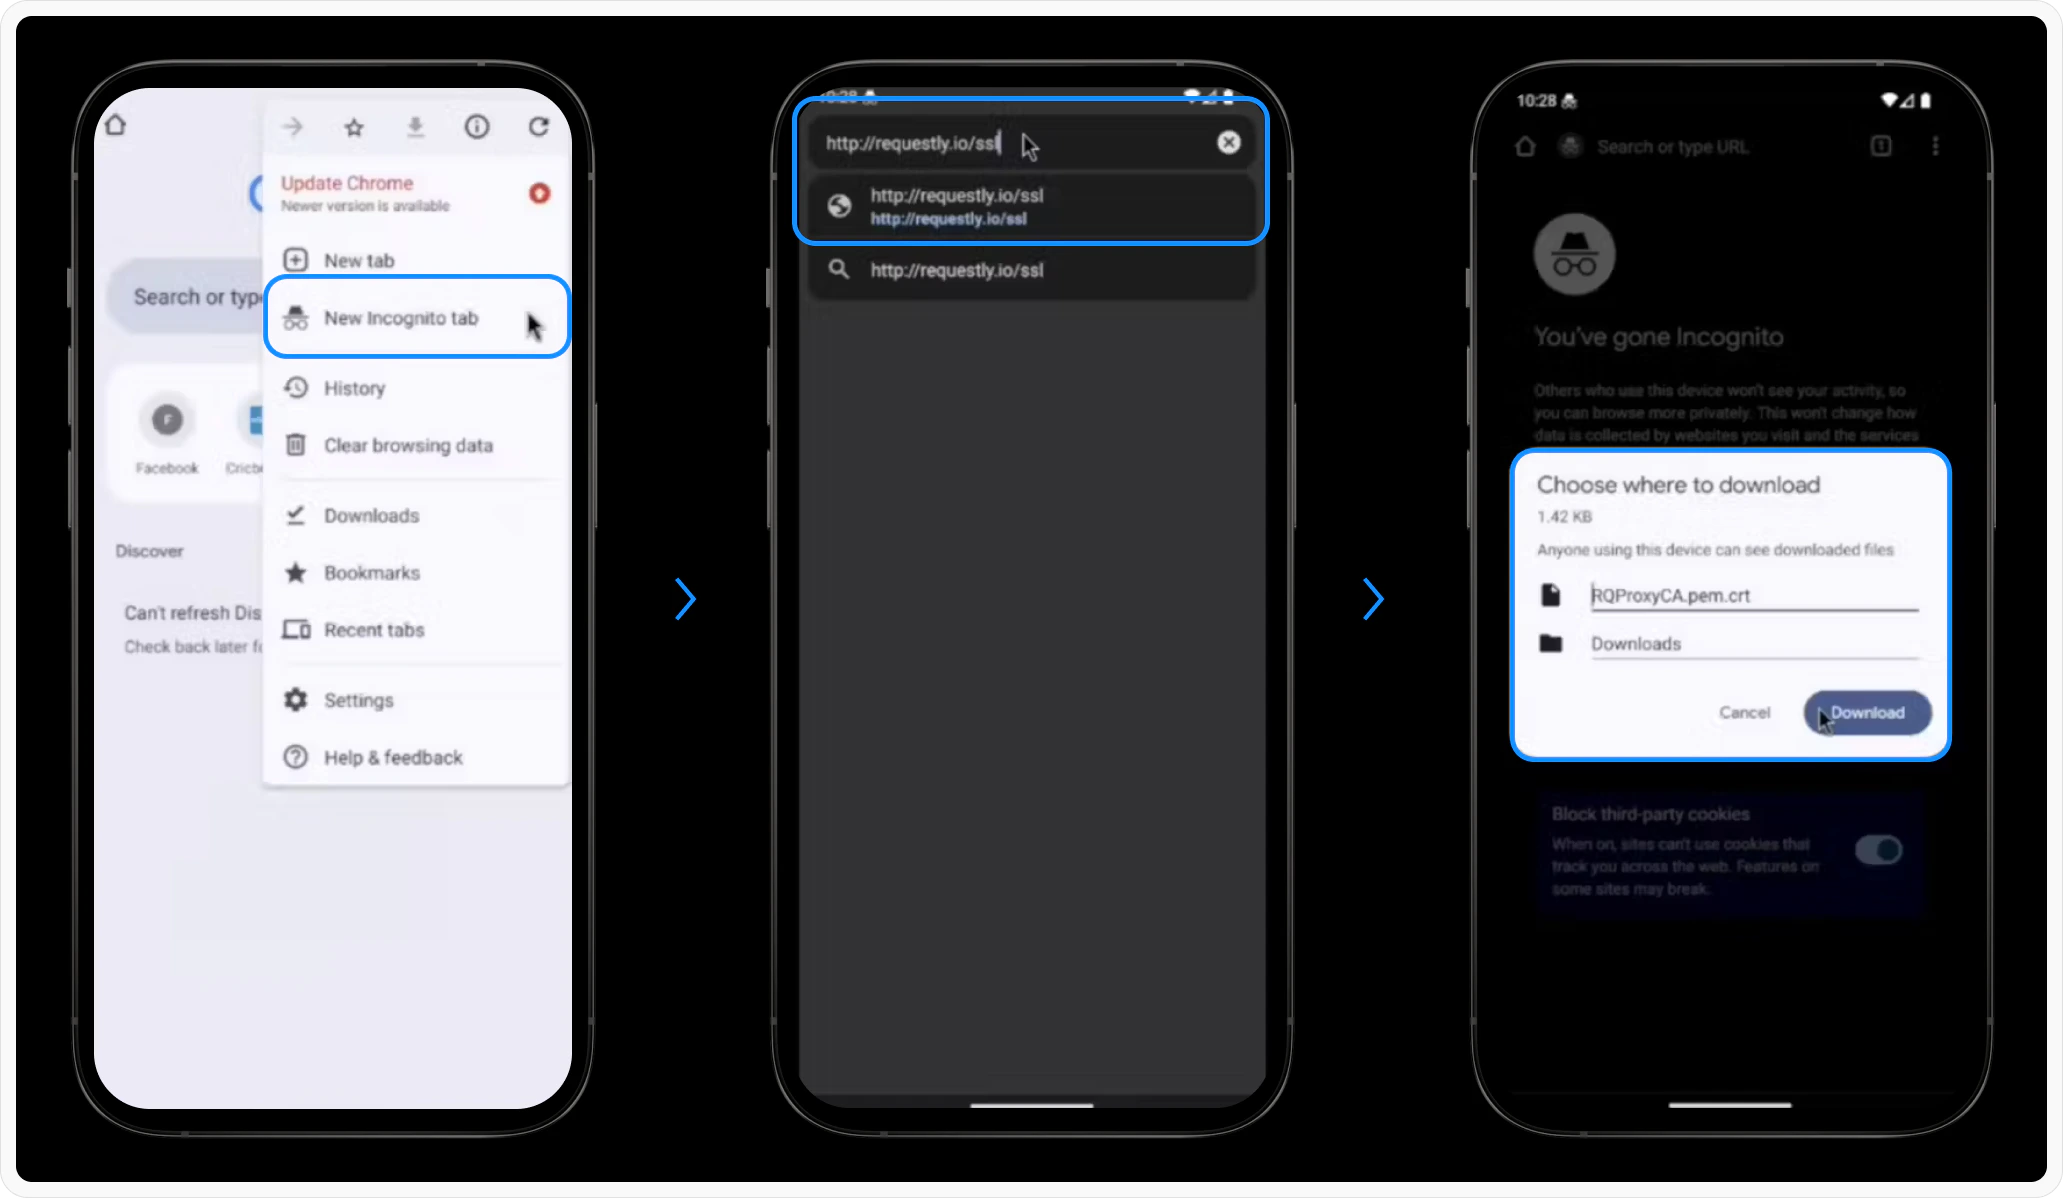 * Open Chrome in an incognito tab
* Go to [**http://requestly.io/ssl**](http://requestly.io/ssl) (⚠️ Use HTTP here, not HTTPS)
* This will download RQProxyCA.pem.cert
* Open Chrome in an incognito tab
* Go to [**http://requestly.io/ssl**](http://requestly.io/ssl) (⚠️ Use HTTP here, not HTTPS)
* This will download RQProxyCA.pem.cert
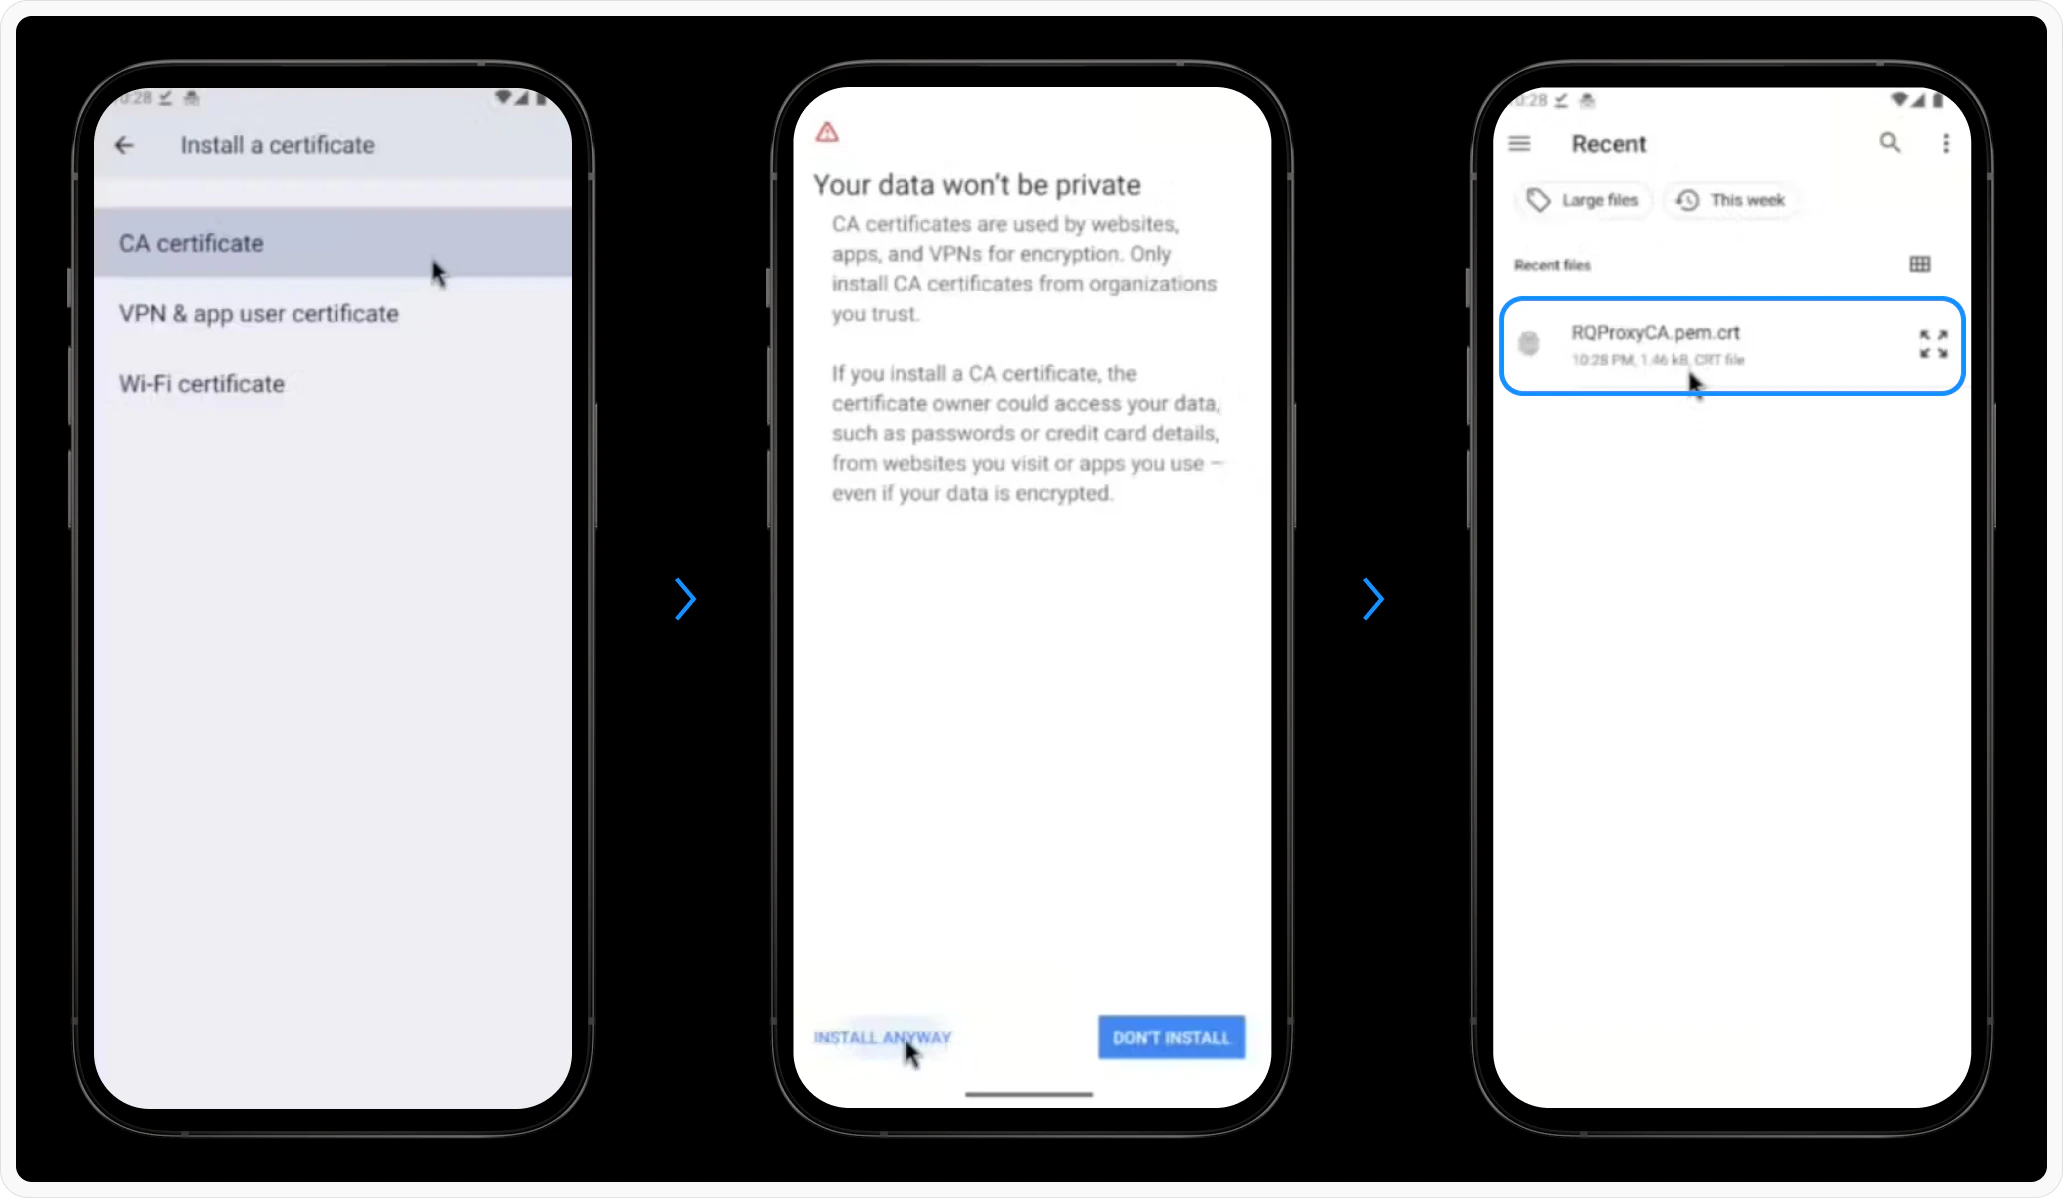 * Go to **Settings > Search "CA Certificate" > Install Anyway**.
* Select the downloaded certificate and install it.
* Go to **Settings > Search "CA Certificate" > Install Anyway**.
* Select the downloaded certificate and install it.
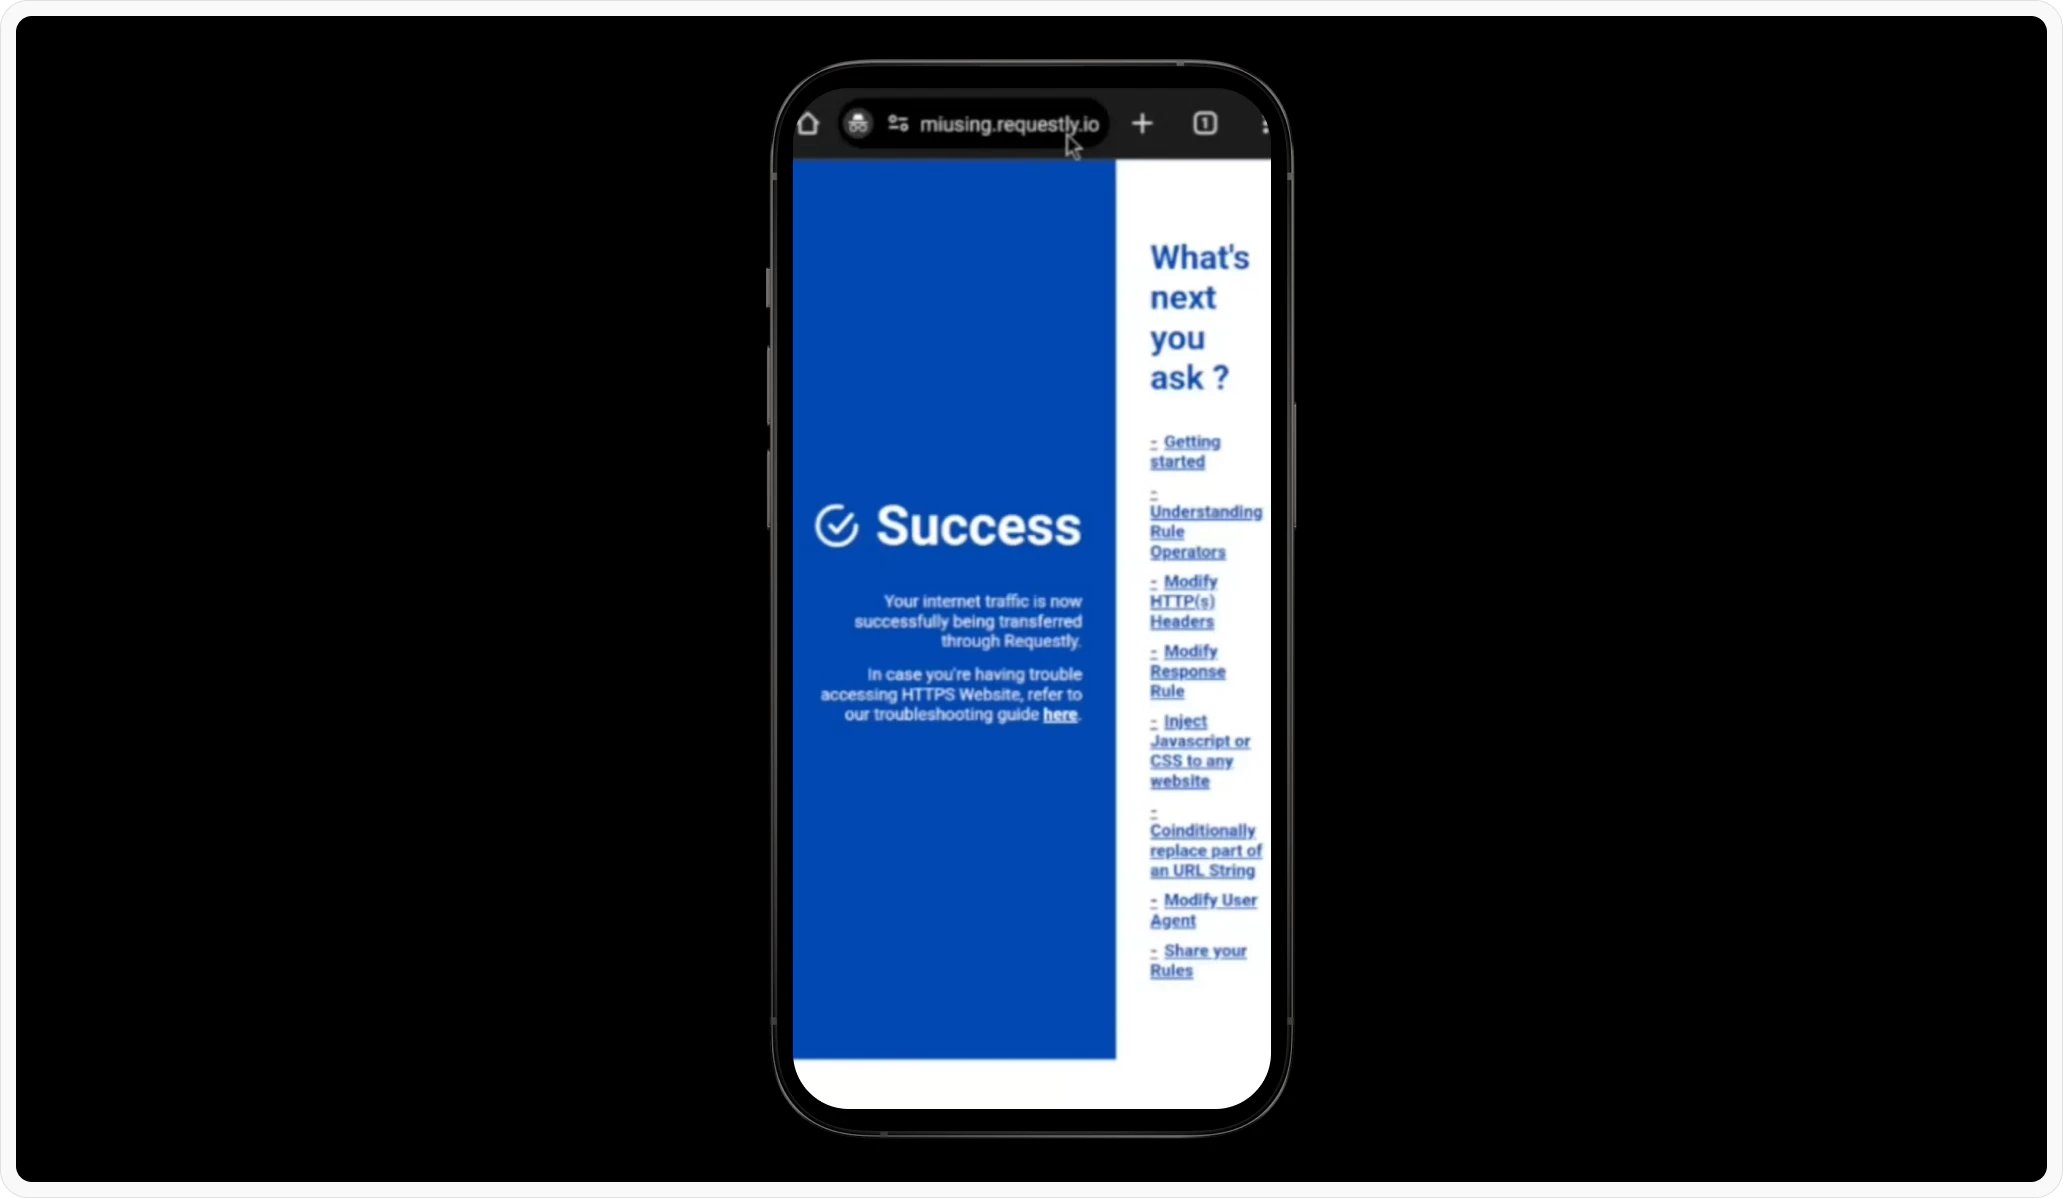 After installation, confirm your setup by going to [**amiusing.requestly.io**](http://amiusing.requestly.io/)