> ## Documentation Index
> Fetch the complete documentation index at: https://interceptor-docs.requestly.com/llms.txt
> Use this file to discover all available pages before exploring further.

# Insert Scripts

> Learn how to use Requestly Interceptor's Insert Script Rule to inject JavaScript or CSS into web pages without changing the original code

***

The **Insert Scripts** Rule allows you to inject JavaScript/CSS into web pages before/after they load. This means you can modify the DOM, change styles, or even add new functionality without altering the source code directly. It’s important for testing hypotheses or debugging during development and quality assurance processes.

To see how the Insert Script Rule can be configured and applied in different scenarios, watch the video below, where we demonstrate its usage and potential

<iframe className="w-full aspect-video rounded-xl" src="https://www.youtube.com/embed/b3TzuxkNdgM" />

## Why Use the Insert Script Rule?

* Inject popular libraries or hosted scripts or execute custom code snippets on or after page load using a simple rule builder.\
  [Learn more →](https://requestly.com/blog/how-to-inject-a-script-before-page-load-on-a-website/)

* Test & demonstrate SaaS applications like website widgets and monitoring scripts on target websites.\
  <a target="_blank" href="https://requestly.com/blog/how-to-test-saas-products-without-actual-integration-on-live-websites/">Learn more →</a>

<img src="https://mintcdn.com/interceptor/fhZRboFseopn8ocm/images/insert-scripts/a7b83b25-1861-4cf5-a9f2-5142468fe129.png?fit=max&auto=format&n=fhZRboFseopn8ocm&q=85&s=6c46e68705cd11b516015305644ca863" align="center" fullwidth="false" width="2400" height="1556" data-path="images/insert-scripts/a7b83b25-1861-4cf5-a9f2-5142468fe129.png" />

## **How to Configure the Rule**

<Steps>
  <Step title="Open HTTP Rules and Create a New Rule">
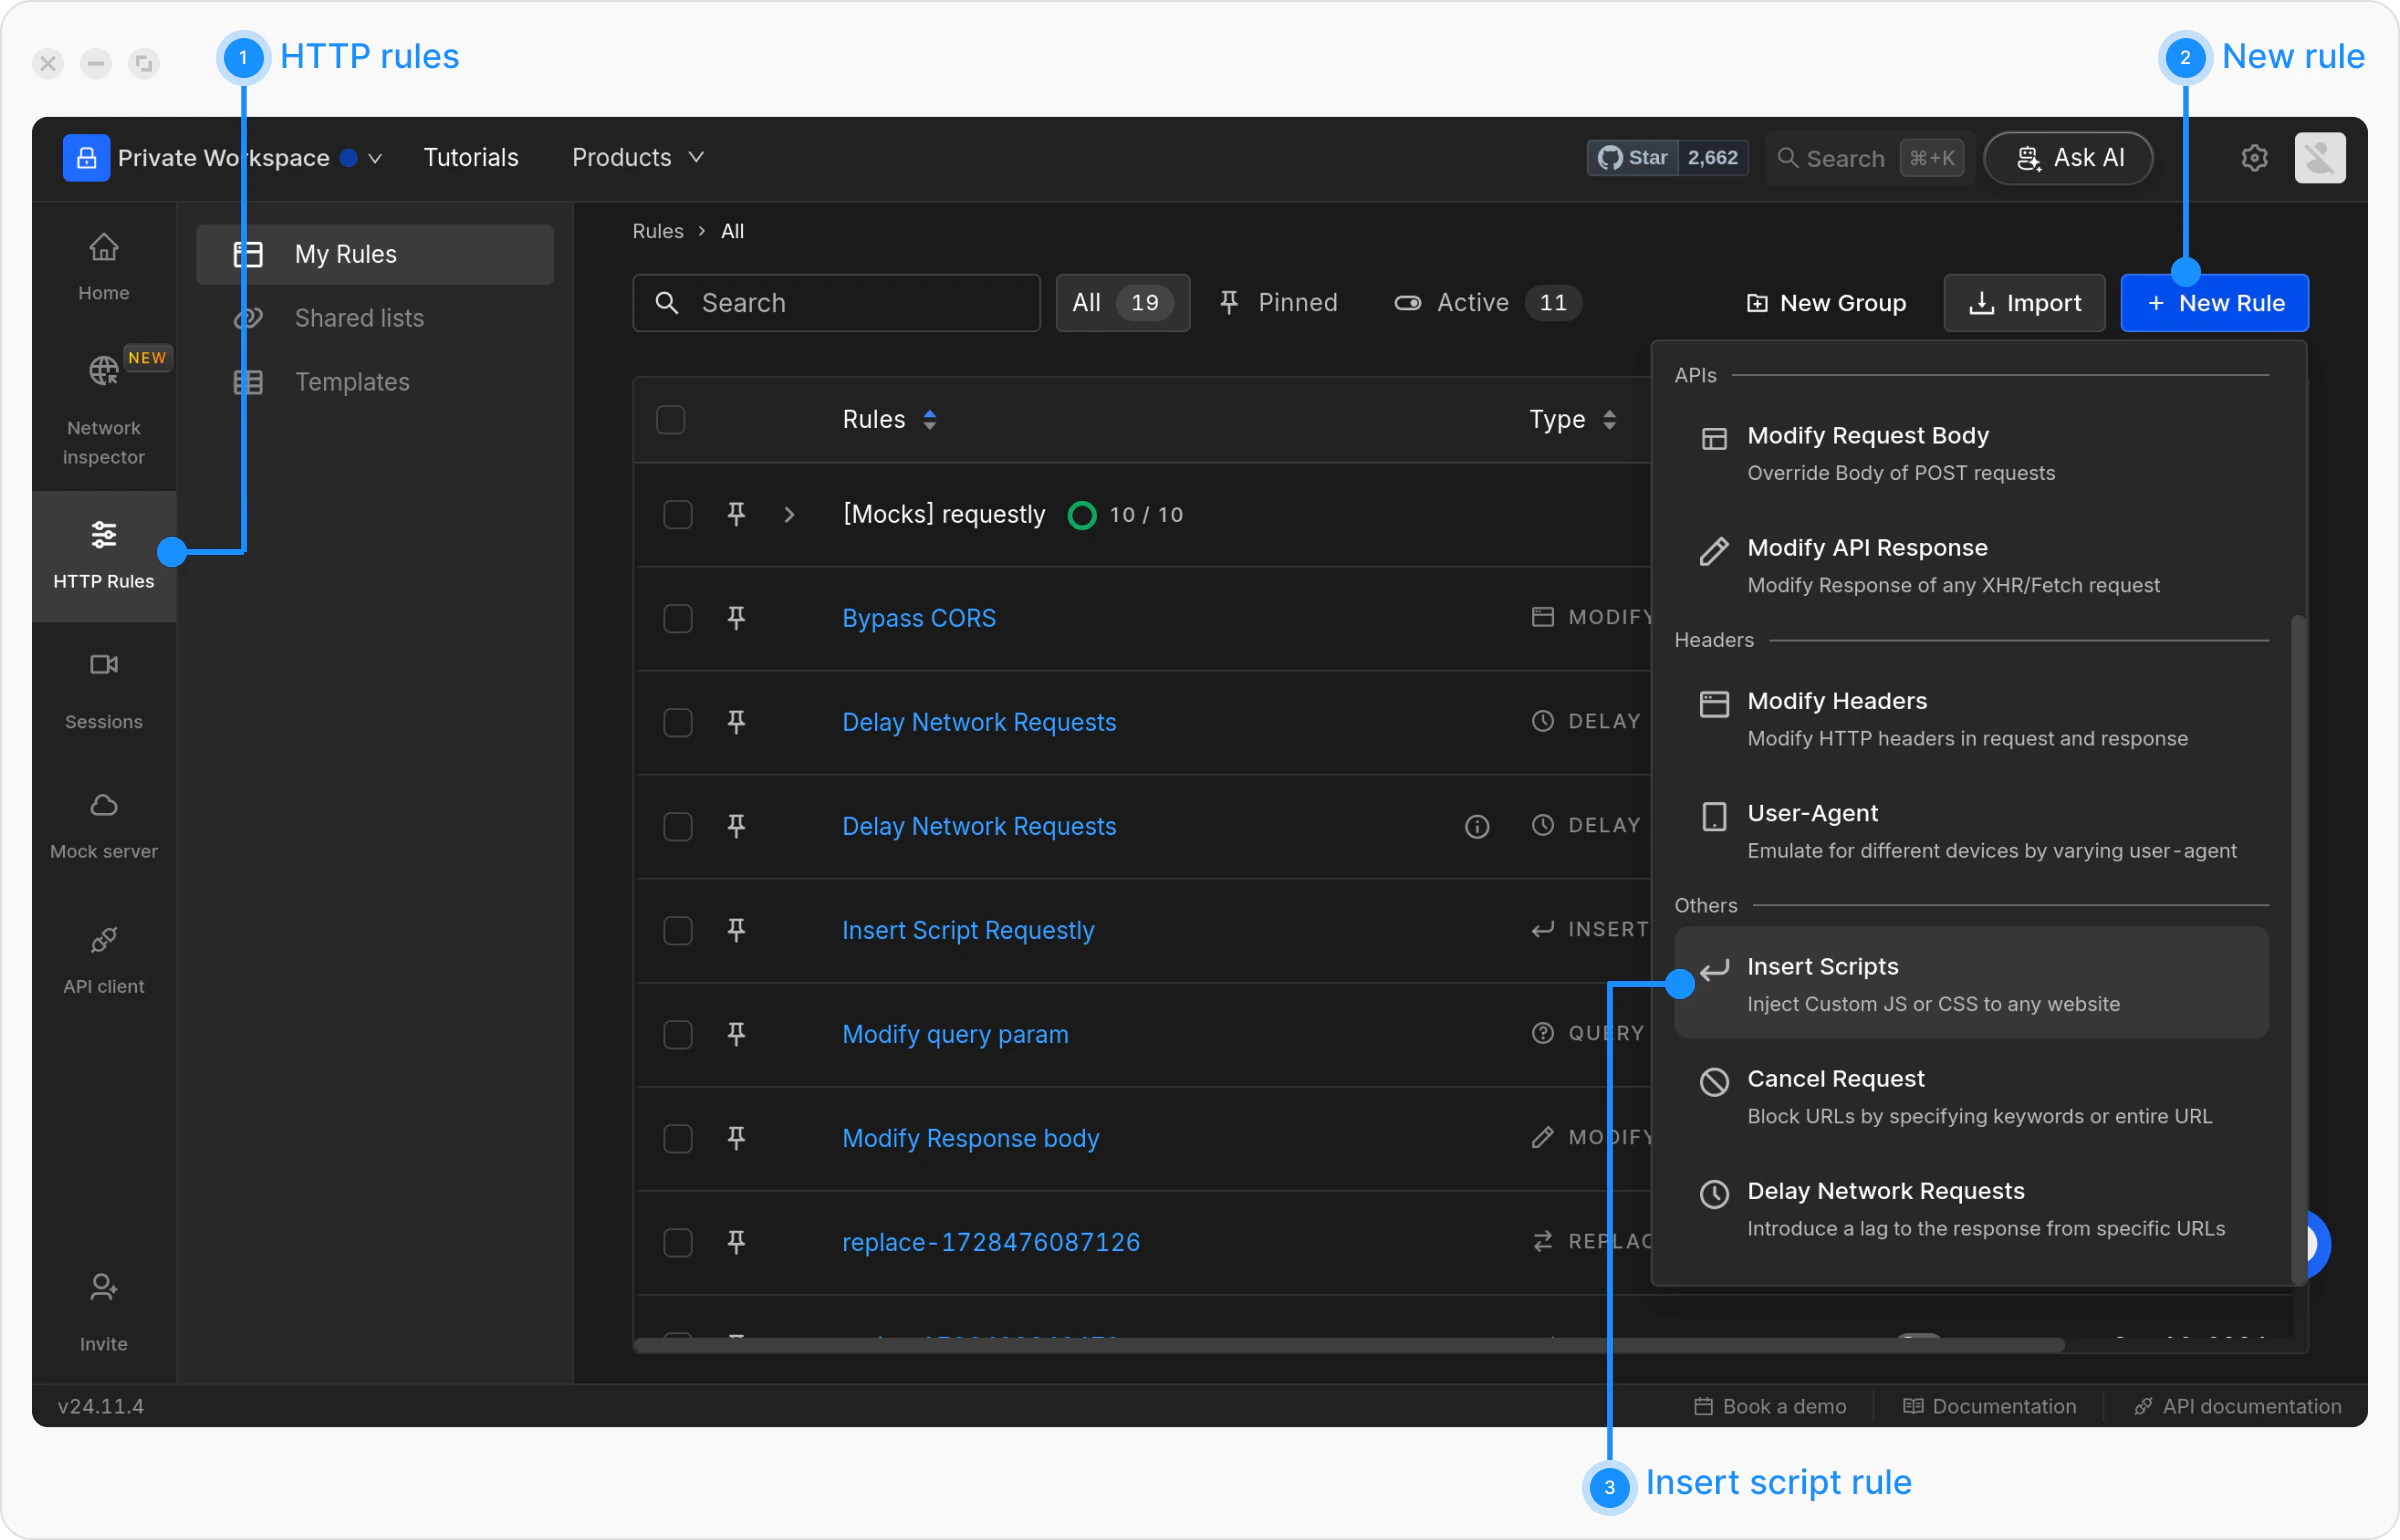
    Navigate to the `HTTP Rules` tab in the web or desktop app. Click on `+ New Rule` and select `Insert Script` from the options.

    <img src="https://mintcdn.com/interceptor/fhZRboFseopn8ocm/images/insert-scripts/3d75cdf9-3da8-4a08-837d-14989f9ee43e.png?fit=max&auto=format&n=fhZRboFseopn8ocm&q=85&s=f86b6bbb13995784bce2e6e433a5ea51" align="center" fullwidth="false" width="2400" height="1540" data-path="images/insert-scripts/3d75cdf9-3da8-4a08-837d-14989f9ee43e.png" />
  </Step>

  <Step title="Name and Describe Your Rule">
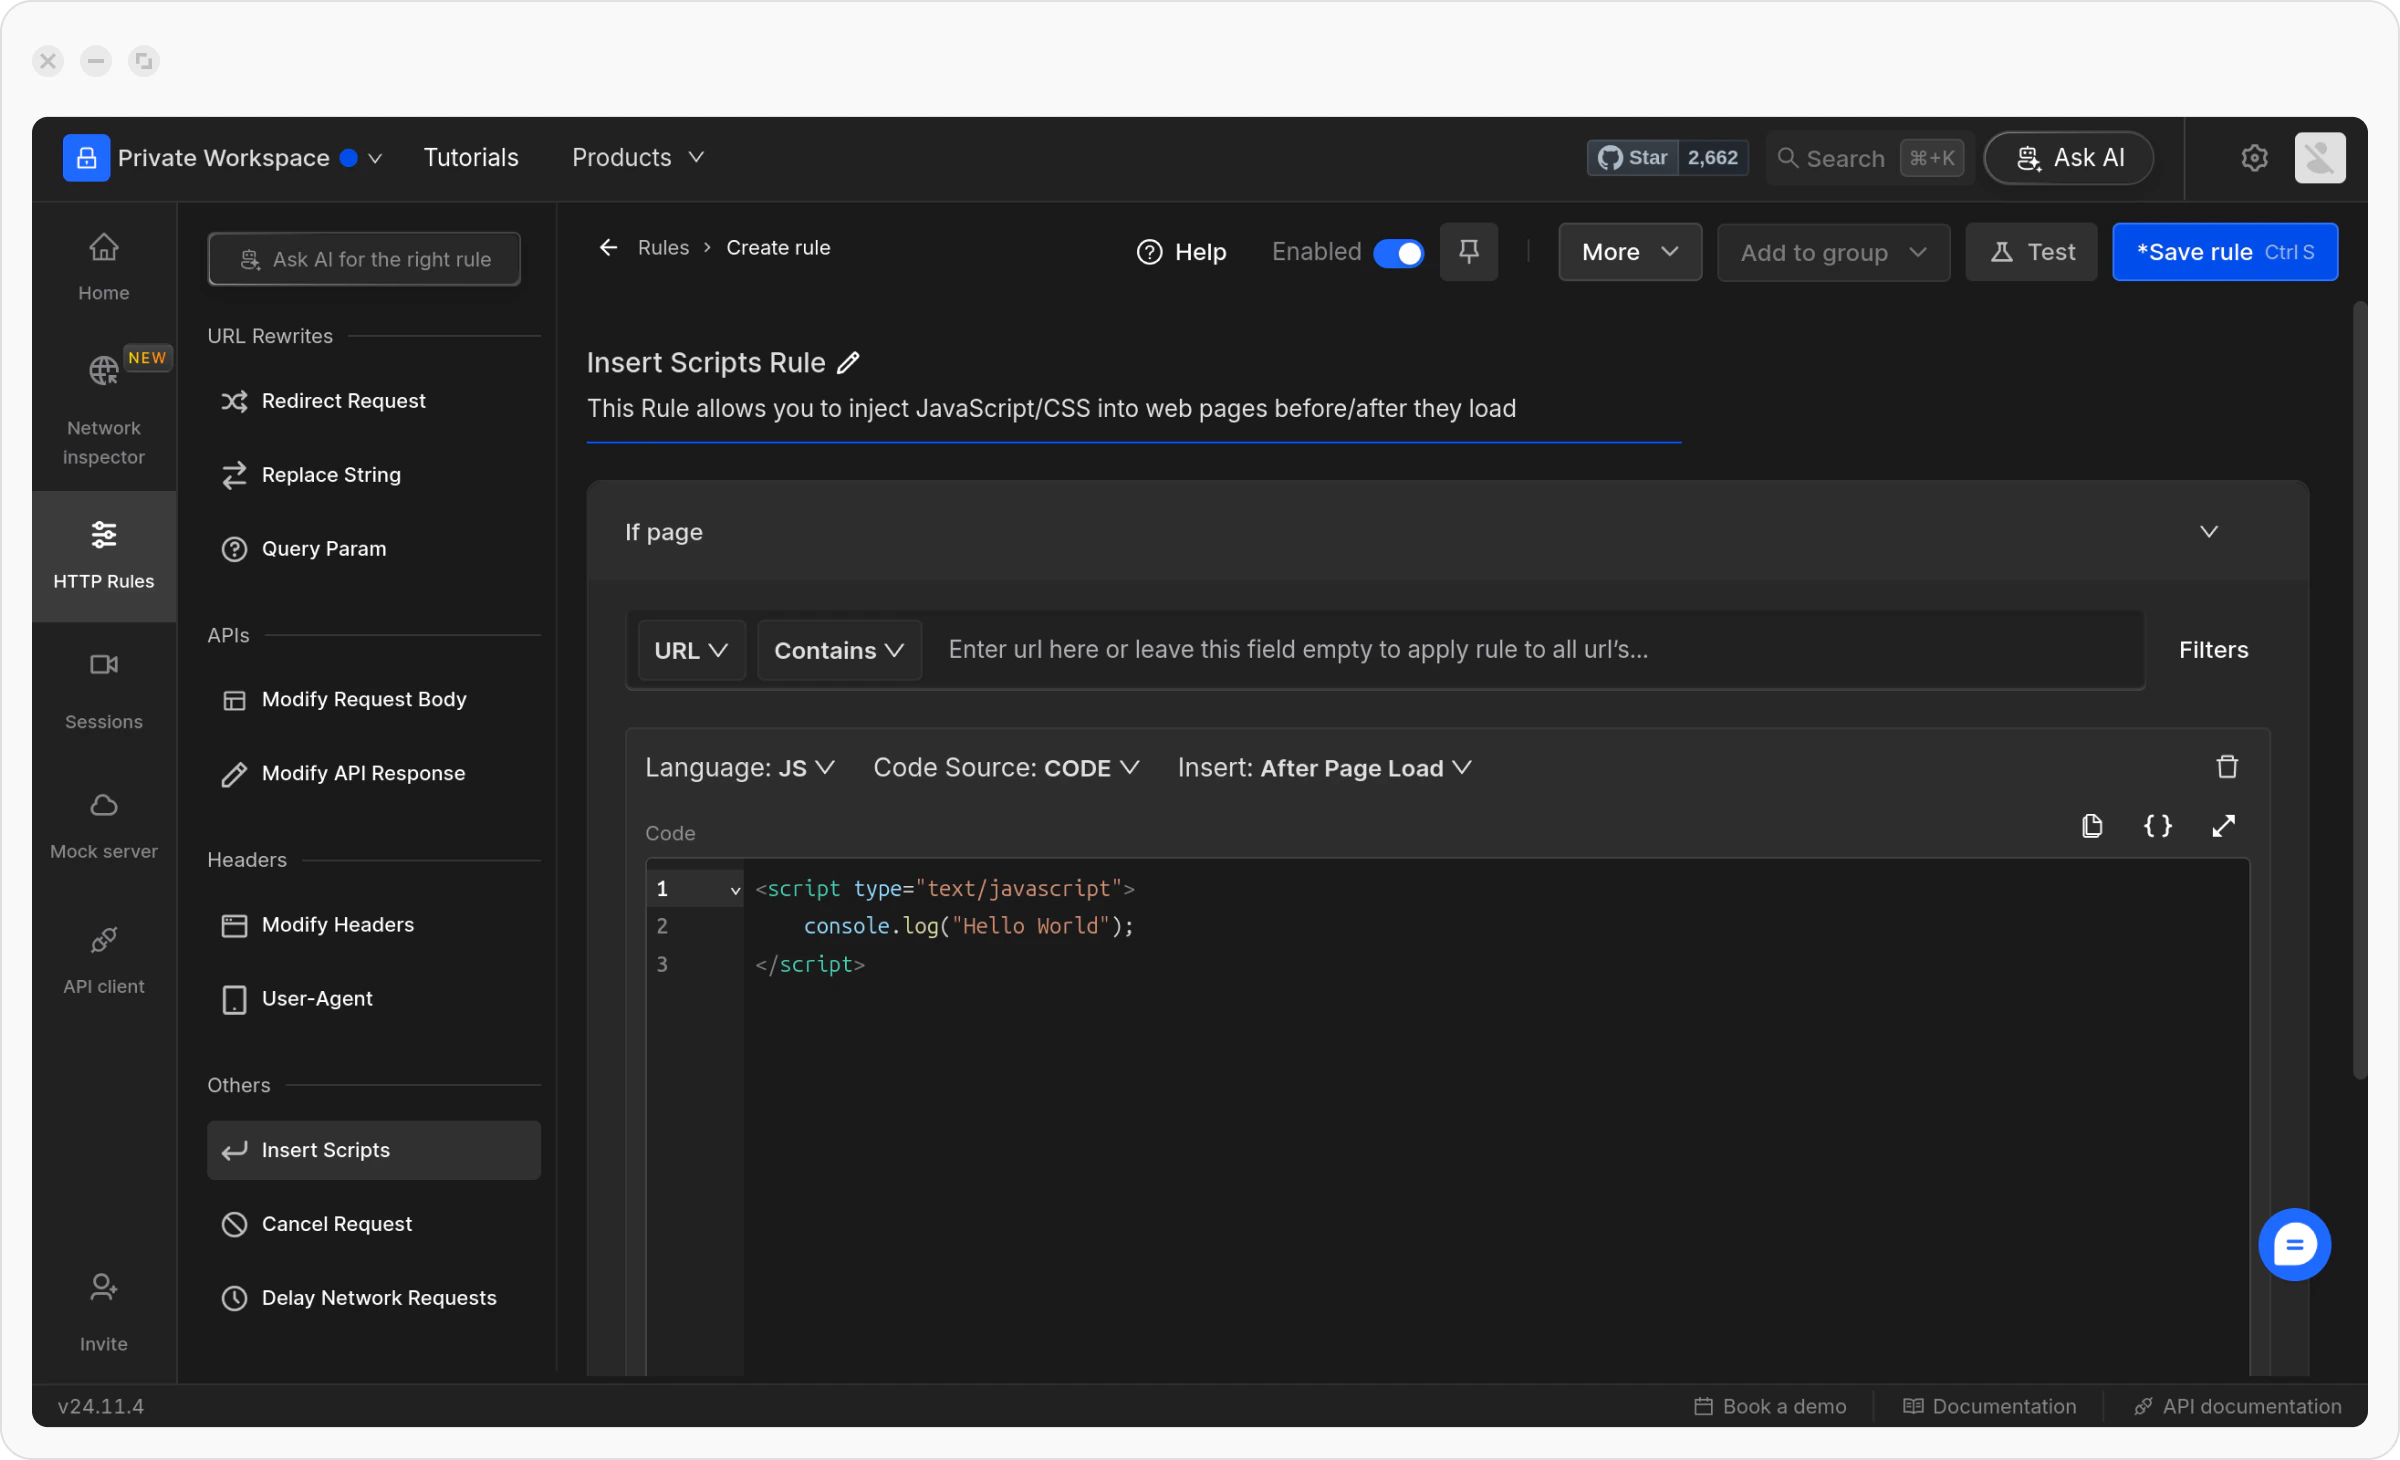
    Provide a **descriptive name** for the rule to keep your setup organized. Optionally, add a **brief description** explaining its purpose for easier identification later.

    <img src="https://mintcdn.com/interceptor/fhZRboFseopn8ocm/images/insert-scripts/9832de41-bfaf-4537-9261-95d1f71ae1f1.png?fit=max&auto=format&n=fhZRboFseopn8ocm&q=85&s=2f42278d719d08062a5e727eee0f8c59" align="center" fullwidth="false" width="2400" height="1460" data-path="images/insert-scripts/9832de41-bfaf-4537-9261-95d1f71ae1f1.png" />
  </Step>

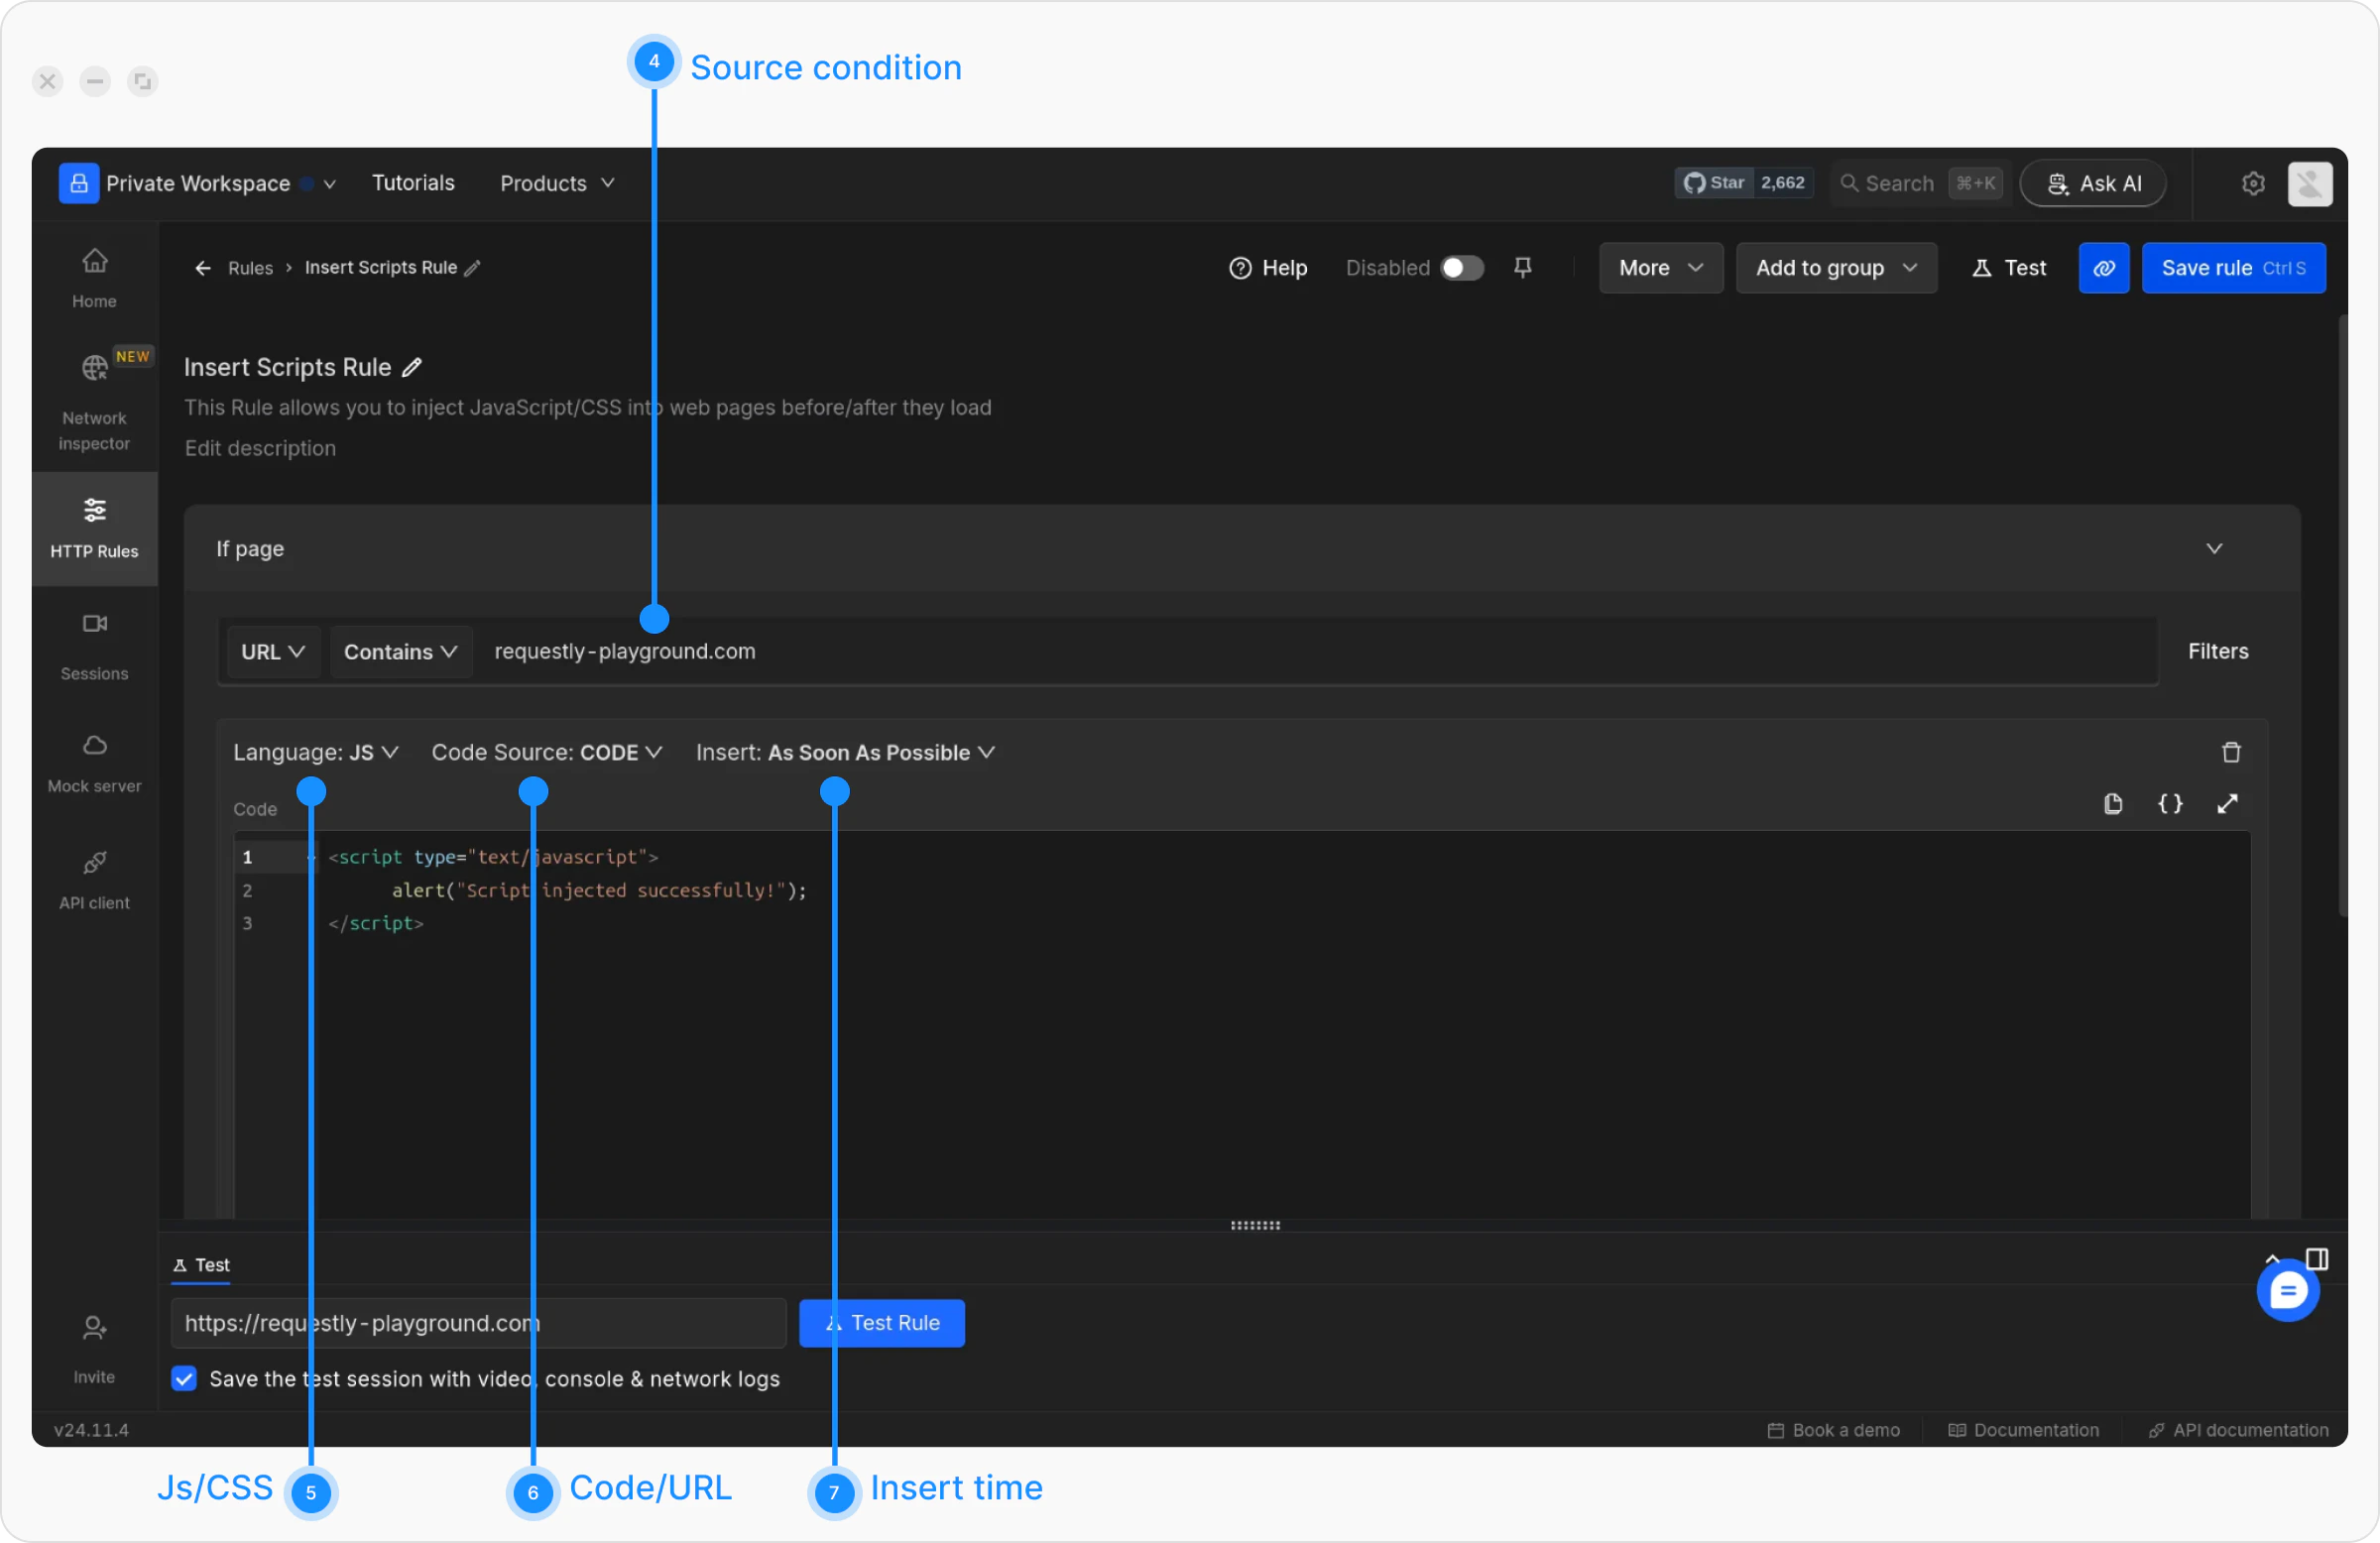
  <Step title="Define the Source Condition">
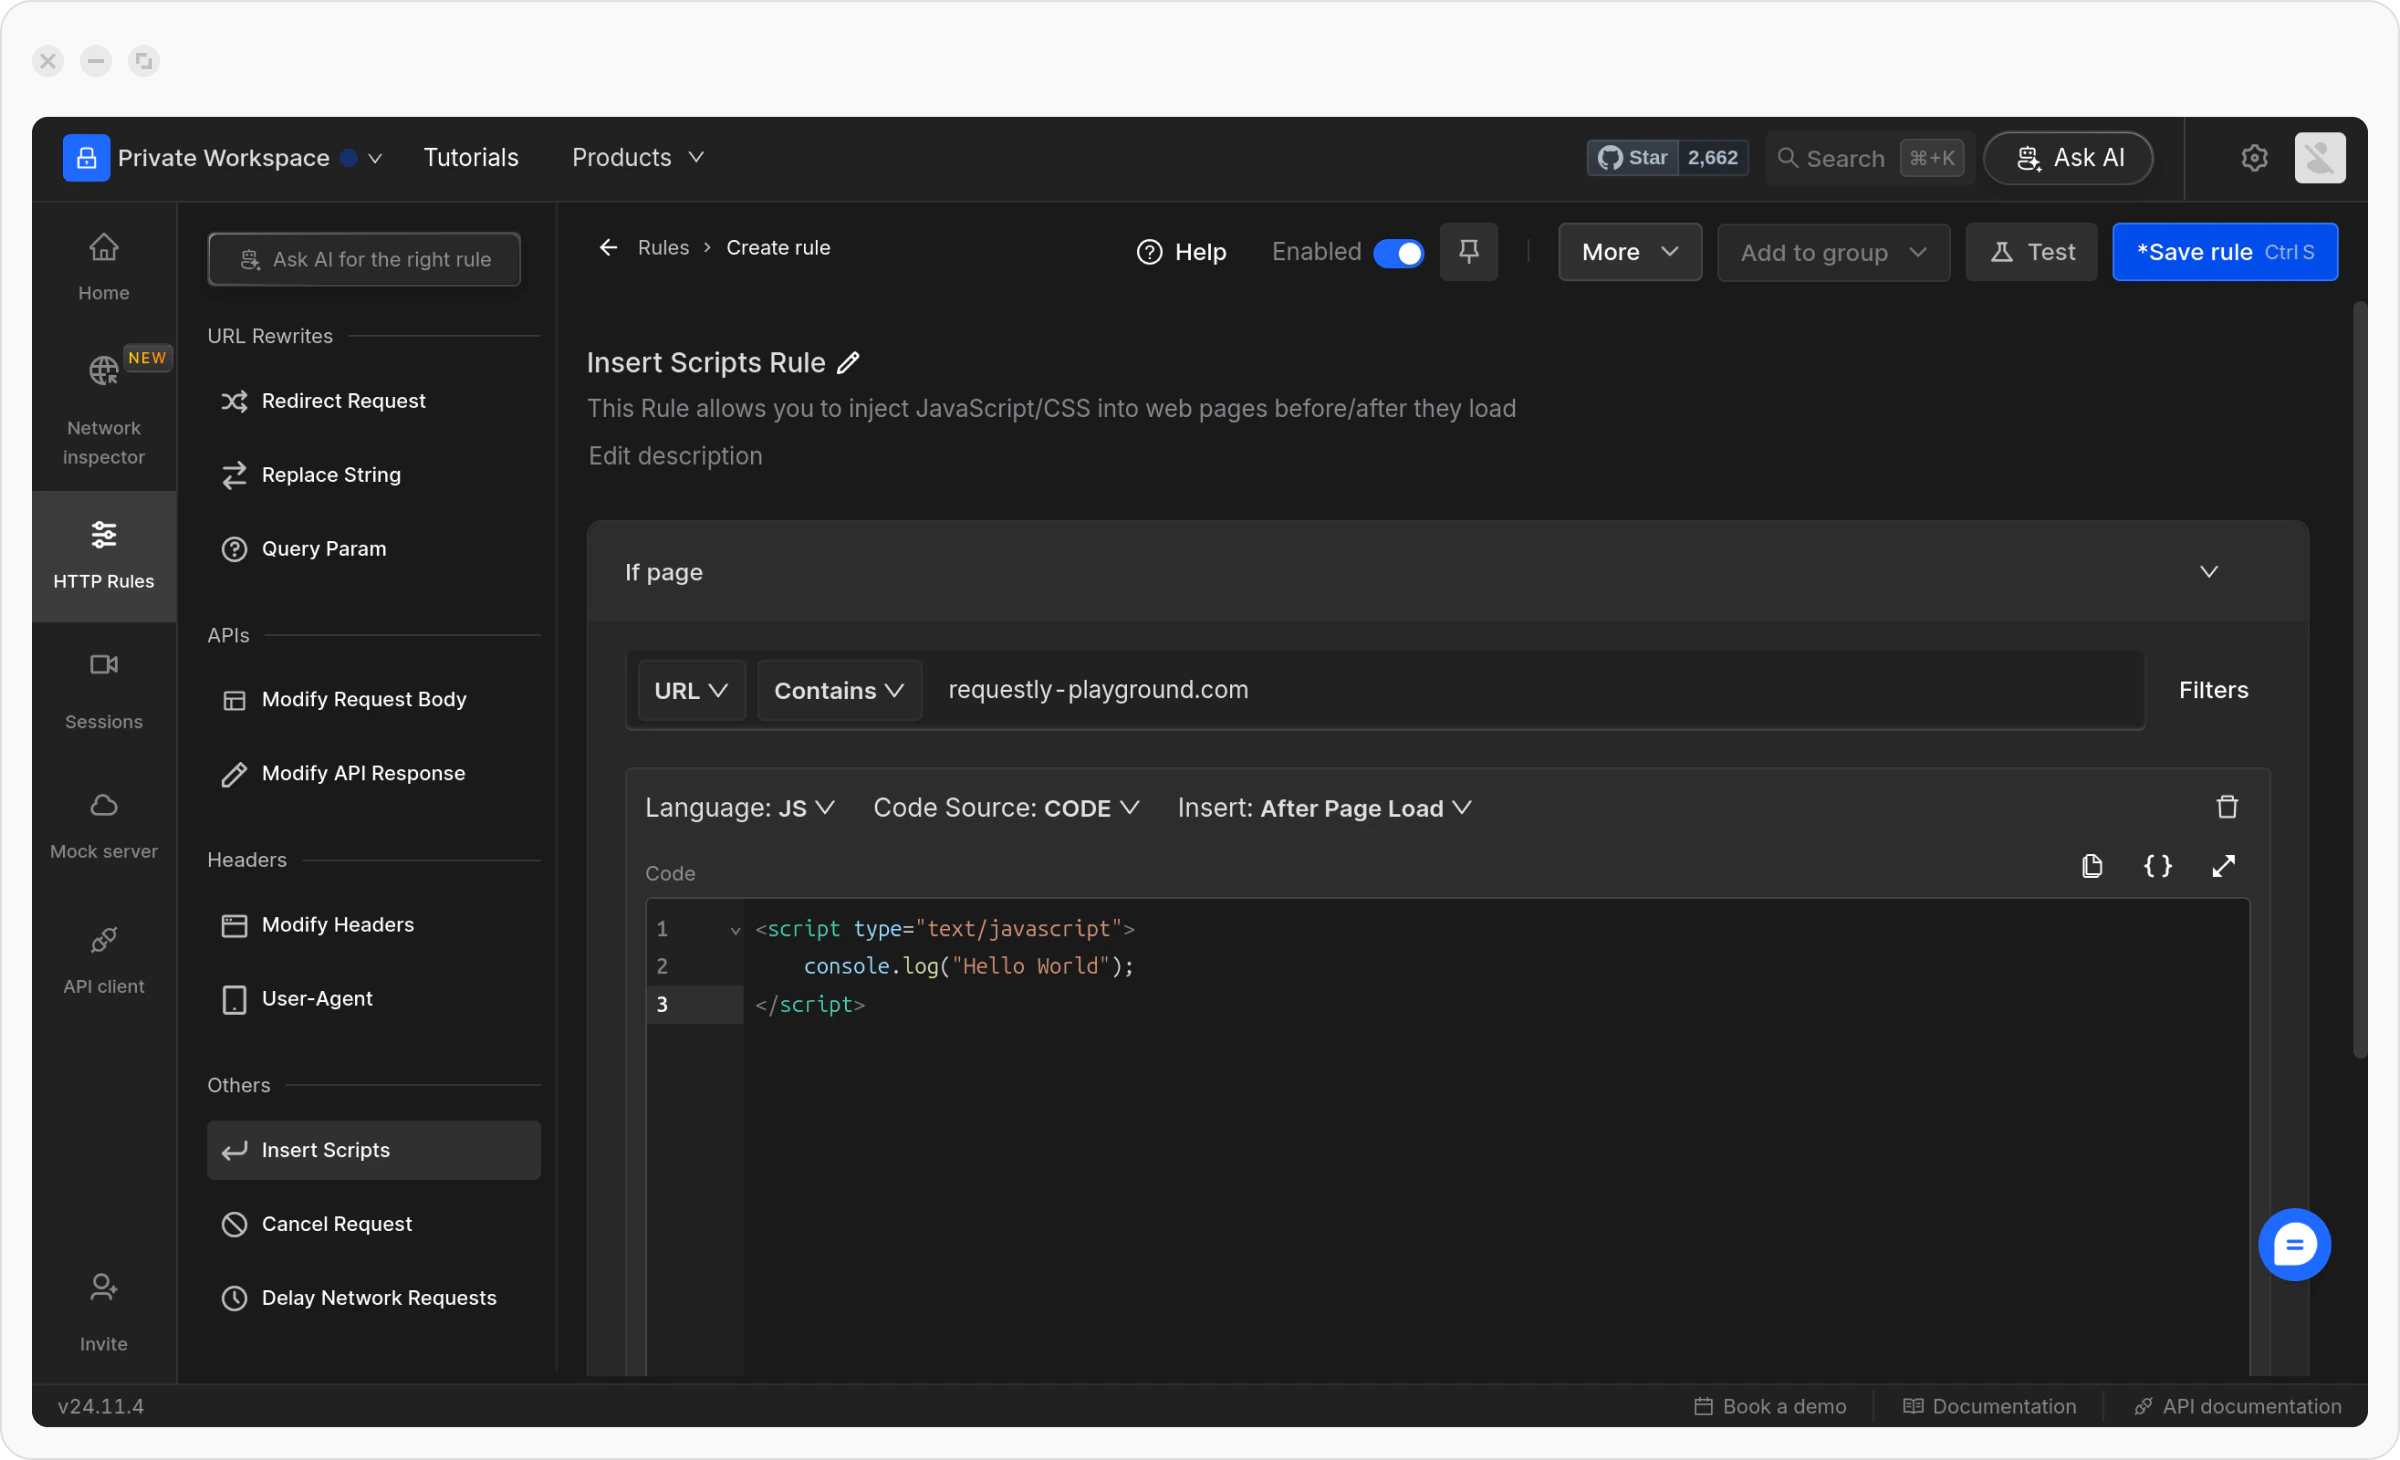
    Define where the rule should be applied by specifying criteria such as **URL**, **Host**, or **Path**. You can choose from options like **Regex**, **Contains**, **Wildcard**, or **Equals**, or use <a target="_blank" href="/http-rules/advanced-usage/advance-filters">**Advance Filters**</a> for more precise conditions.

    For more details on source conditions, [**read this guide**.](/http-rules/advanced-usage/advance-targeting)

    <Card title="Example:">
      To apply a rule on [our demo website](https://www.requestly-playground.com/), use the following configuration:

      * **Condition Type:** URL

      * **Operator:** Contains

      * **Value:** `requestly-playground.com`

      This example targets any requests made to the [**Requestly Interceptor Play**](/http-rules/advanced-usage/advance-targeting)[**ground**](https://requestly-playground.com), ensuring the script is applied wherever the URL contains `requestly-playground.com`.
    </Card>

    <img src="https://mintcdn.com/interceptor/fhZRboFseopn8ocm/images/insert-scripts/d2288634-9de2-4f48-bbdf-6e4e8be99a3a.png?fit=max&auto=format&n=fhZRboFseopn8ocm&q=85&s=fc897a762fcdb073444eef32ffb11aed" align="center" fullwidth="false" width="2400" height="1460" data-path="images/insert-scripts/d2288634-9de2-4f48-bbdf-6e4e8be99a3a.png" />
  </Step>

  <Step title="Select the Code Source">
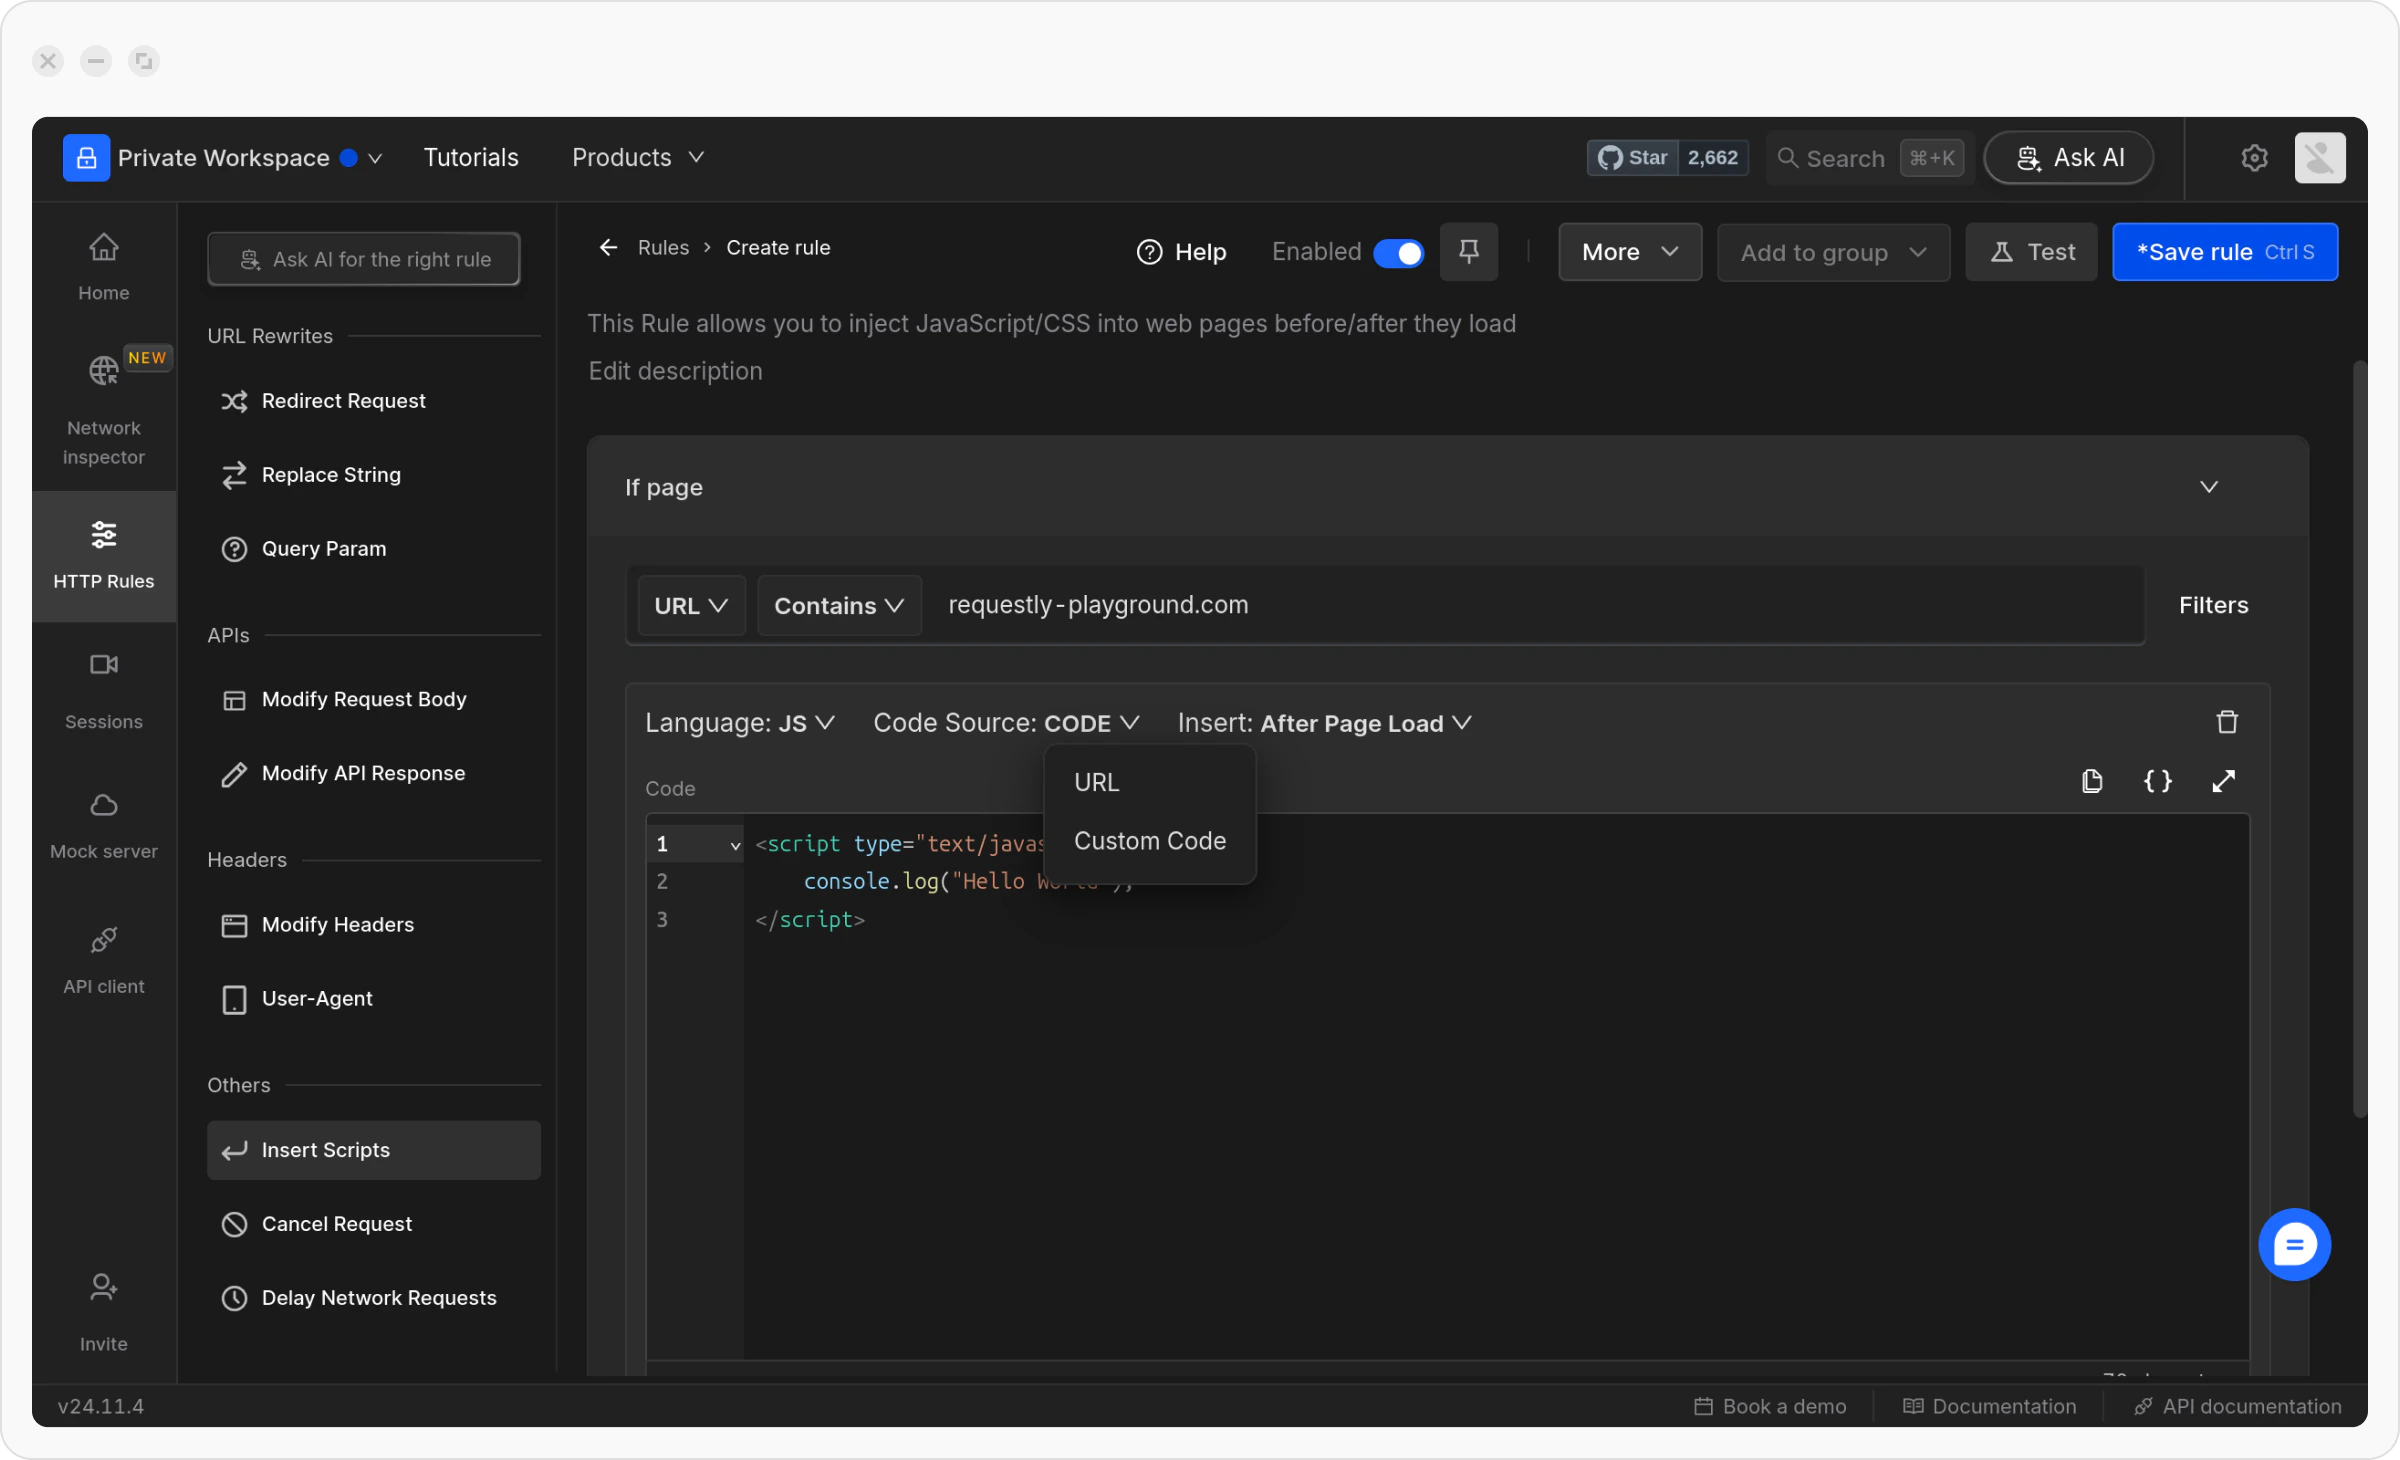
    You have **two options** for the code source:

    1. **Custom Code:** Directly paste your script or CSS into the editor (used in the examples below).

    2. **URL:** Provide a link to an external file containing the script or CSS.

    <img src="https://mintcdn.com/interceptor/fhZRboFseopn8ocm/images/insert-scripts/4d40db6c-1557-4ec4-8e25-636f2a1a79df.png?fit=max&auto=format&n=fhZRboFseopn8ocm&q=85&s=2831695863f07ead445b2745550b2423" align="center" fullwidth="false" width="2400" height="1460" data-path="images/insert-scripts/4d40db6c-1557-4ec4-8e25-636f2a1a79df.png" />

    <Tabs>
      <Tab title="URL">
        In the **URL** option, add a link to an external file containing the script or CSS.

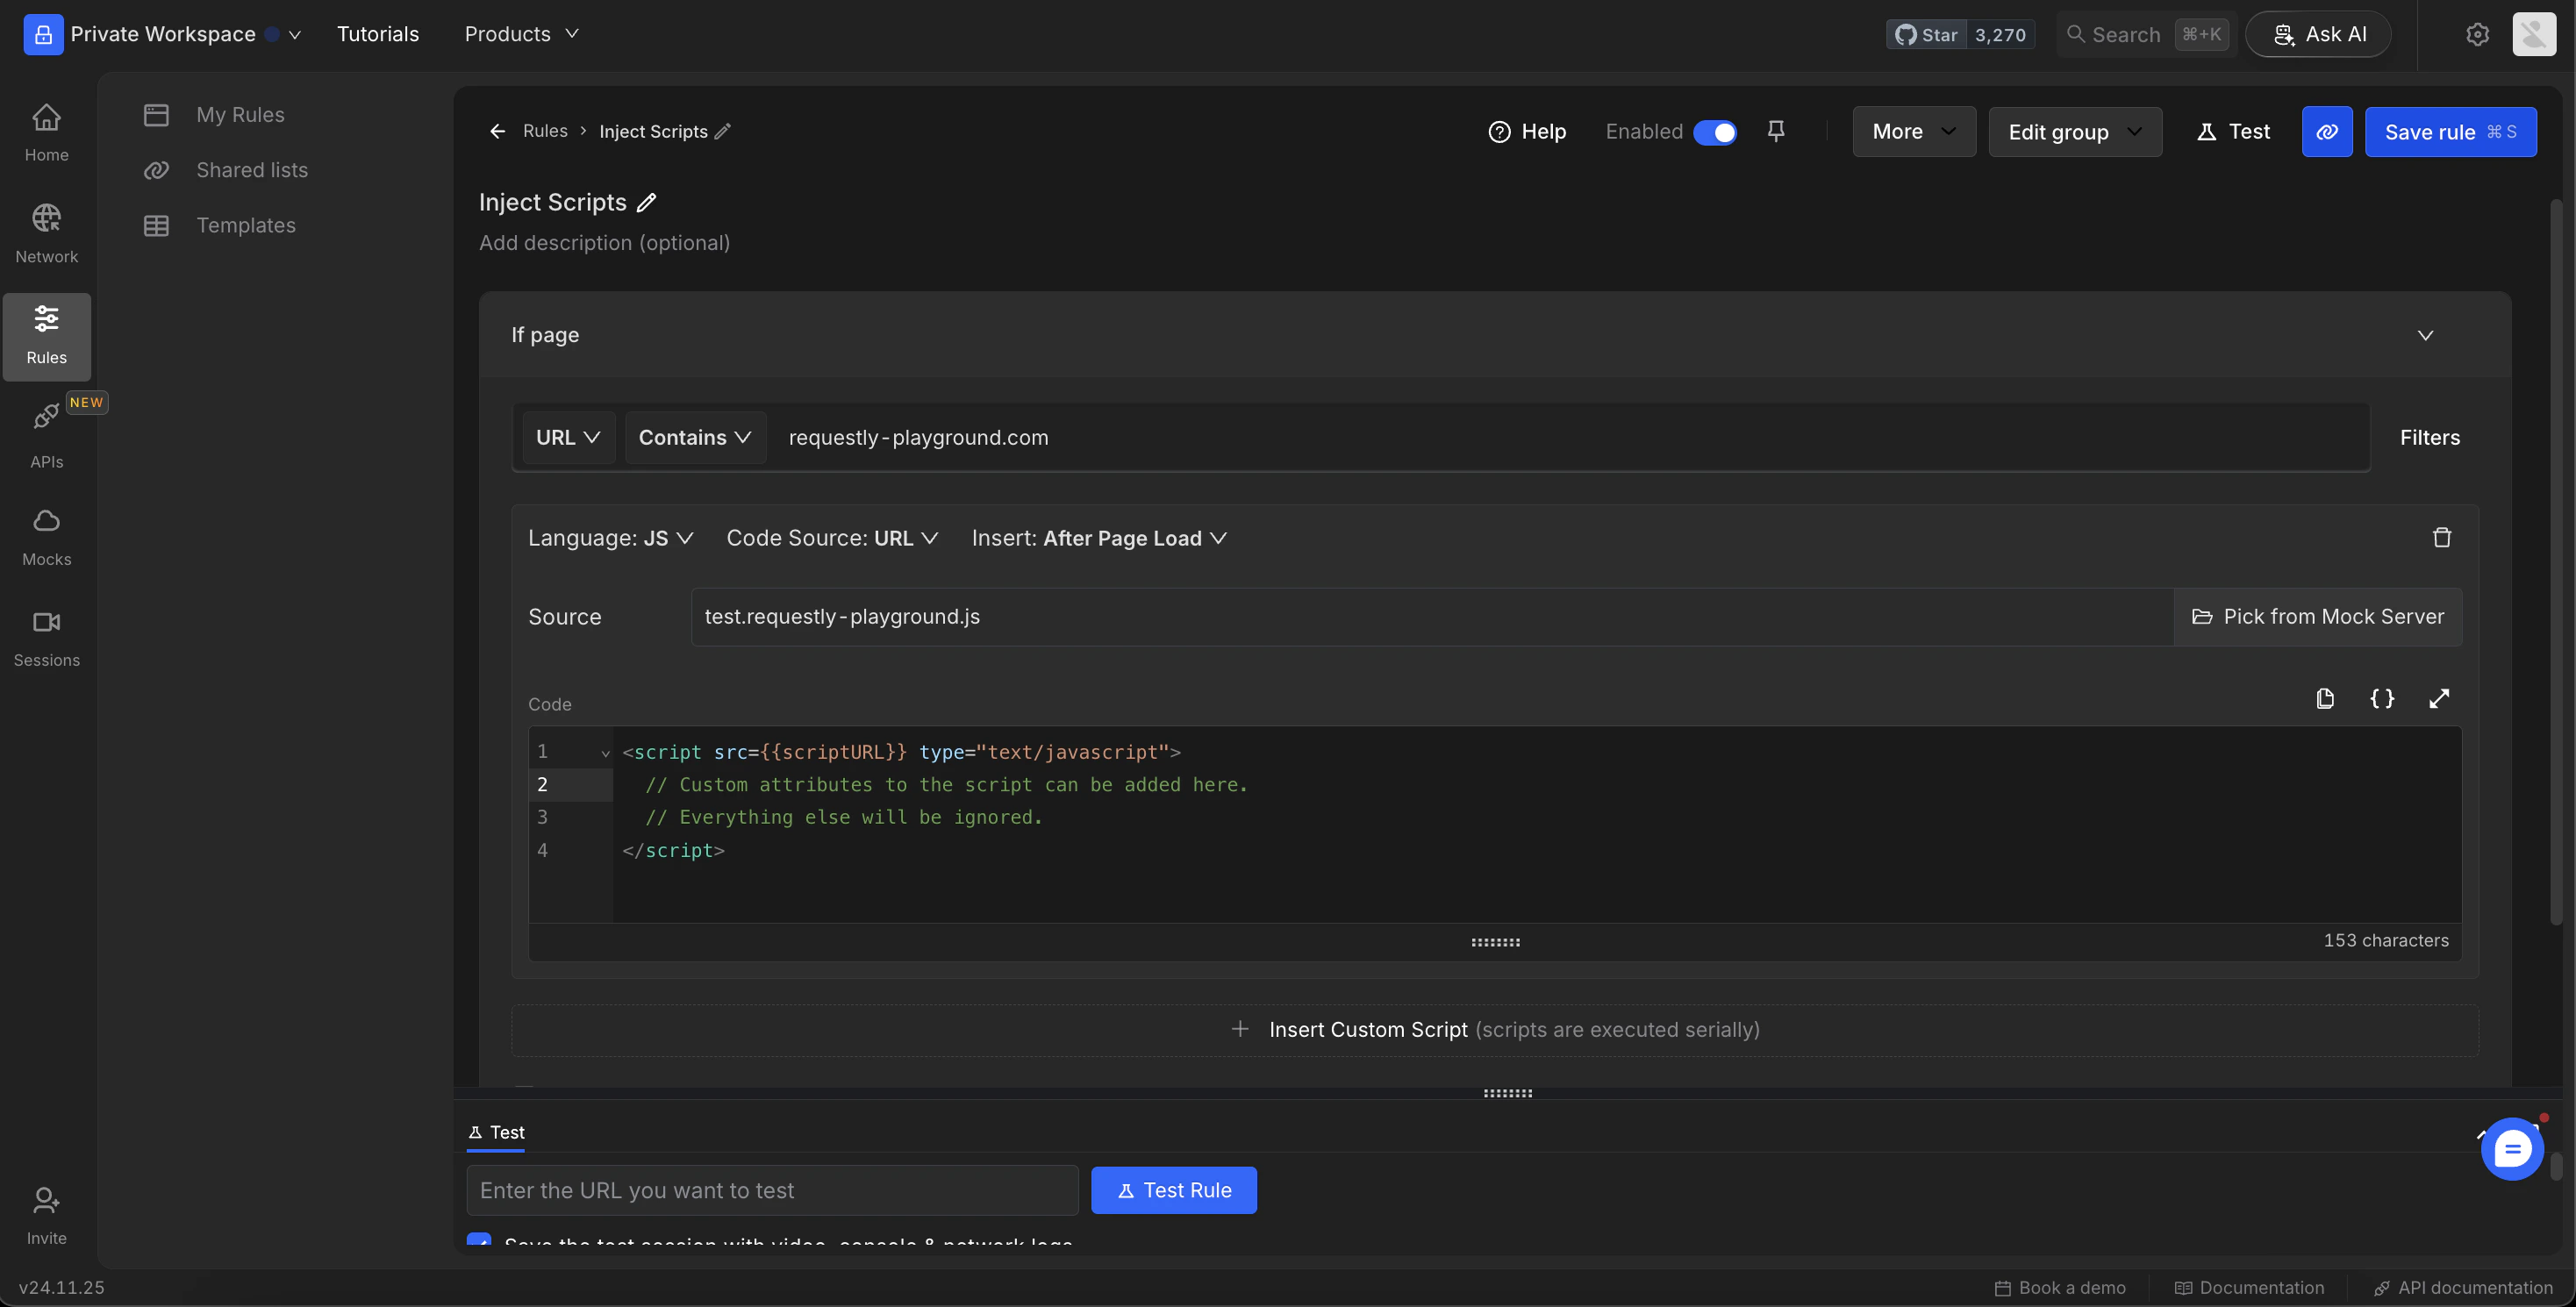
        > **You can also pick the response from the Requestly Interceptor File Server using the** `Pick from File Server` **feature.** This allows you to inject scripts or JSON responses hosted on the File Server directly into your rule.

        <img src="https://mintcdn.com/interceptor/fhZRboFseopn8ocm/images/insert-scripts/3c7bff65-3c15-498c-8b32-c2698eb9b09f.png?fit=max&auto=format&n=fhZRboFseopn8ocm&q=85&s=7be28e0cedffbe83ec952b1e310f96cf" align="center" fullwidth="false" width="2936" height="1490" data-path="images/insert-scripts/3c7bff65-3c15-498c-8b32-c2698eb9b09f.png" />
      </Tab>

      <Tab title="Custom Code">
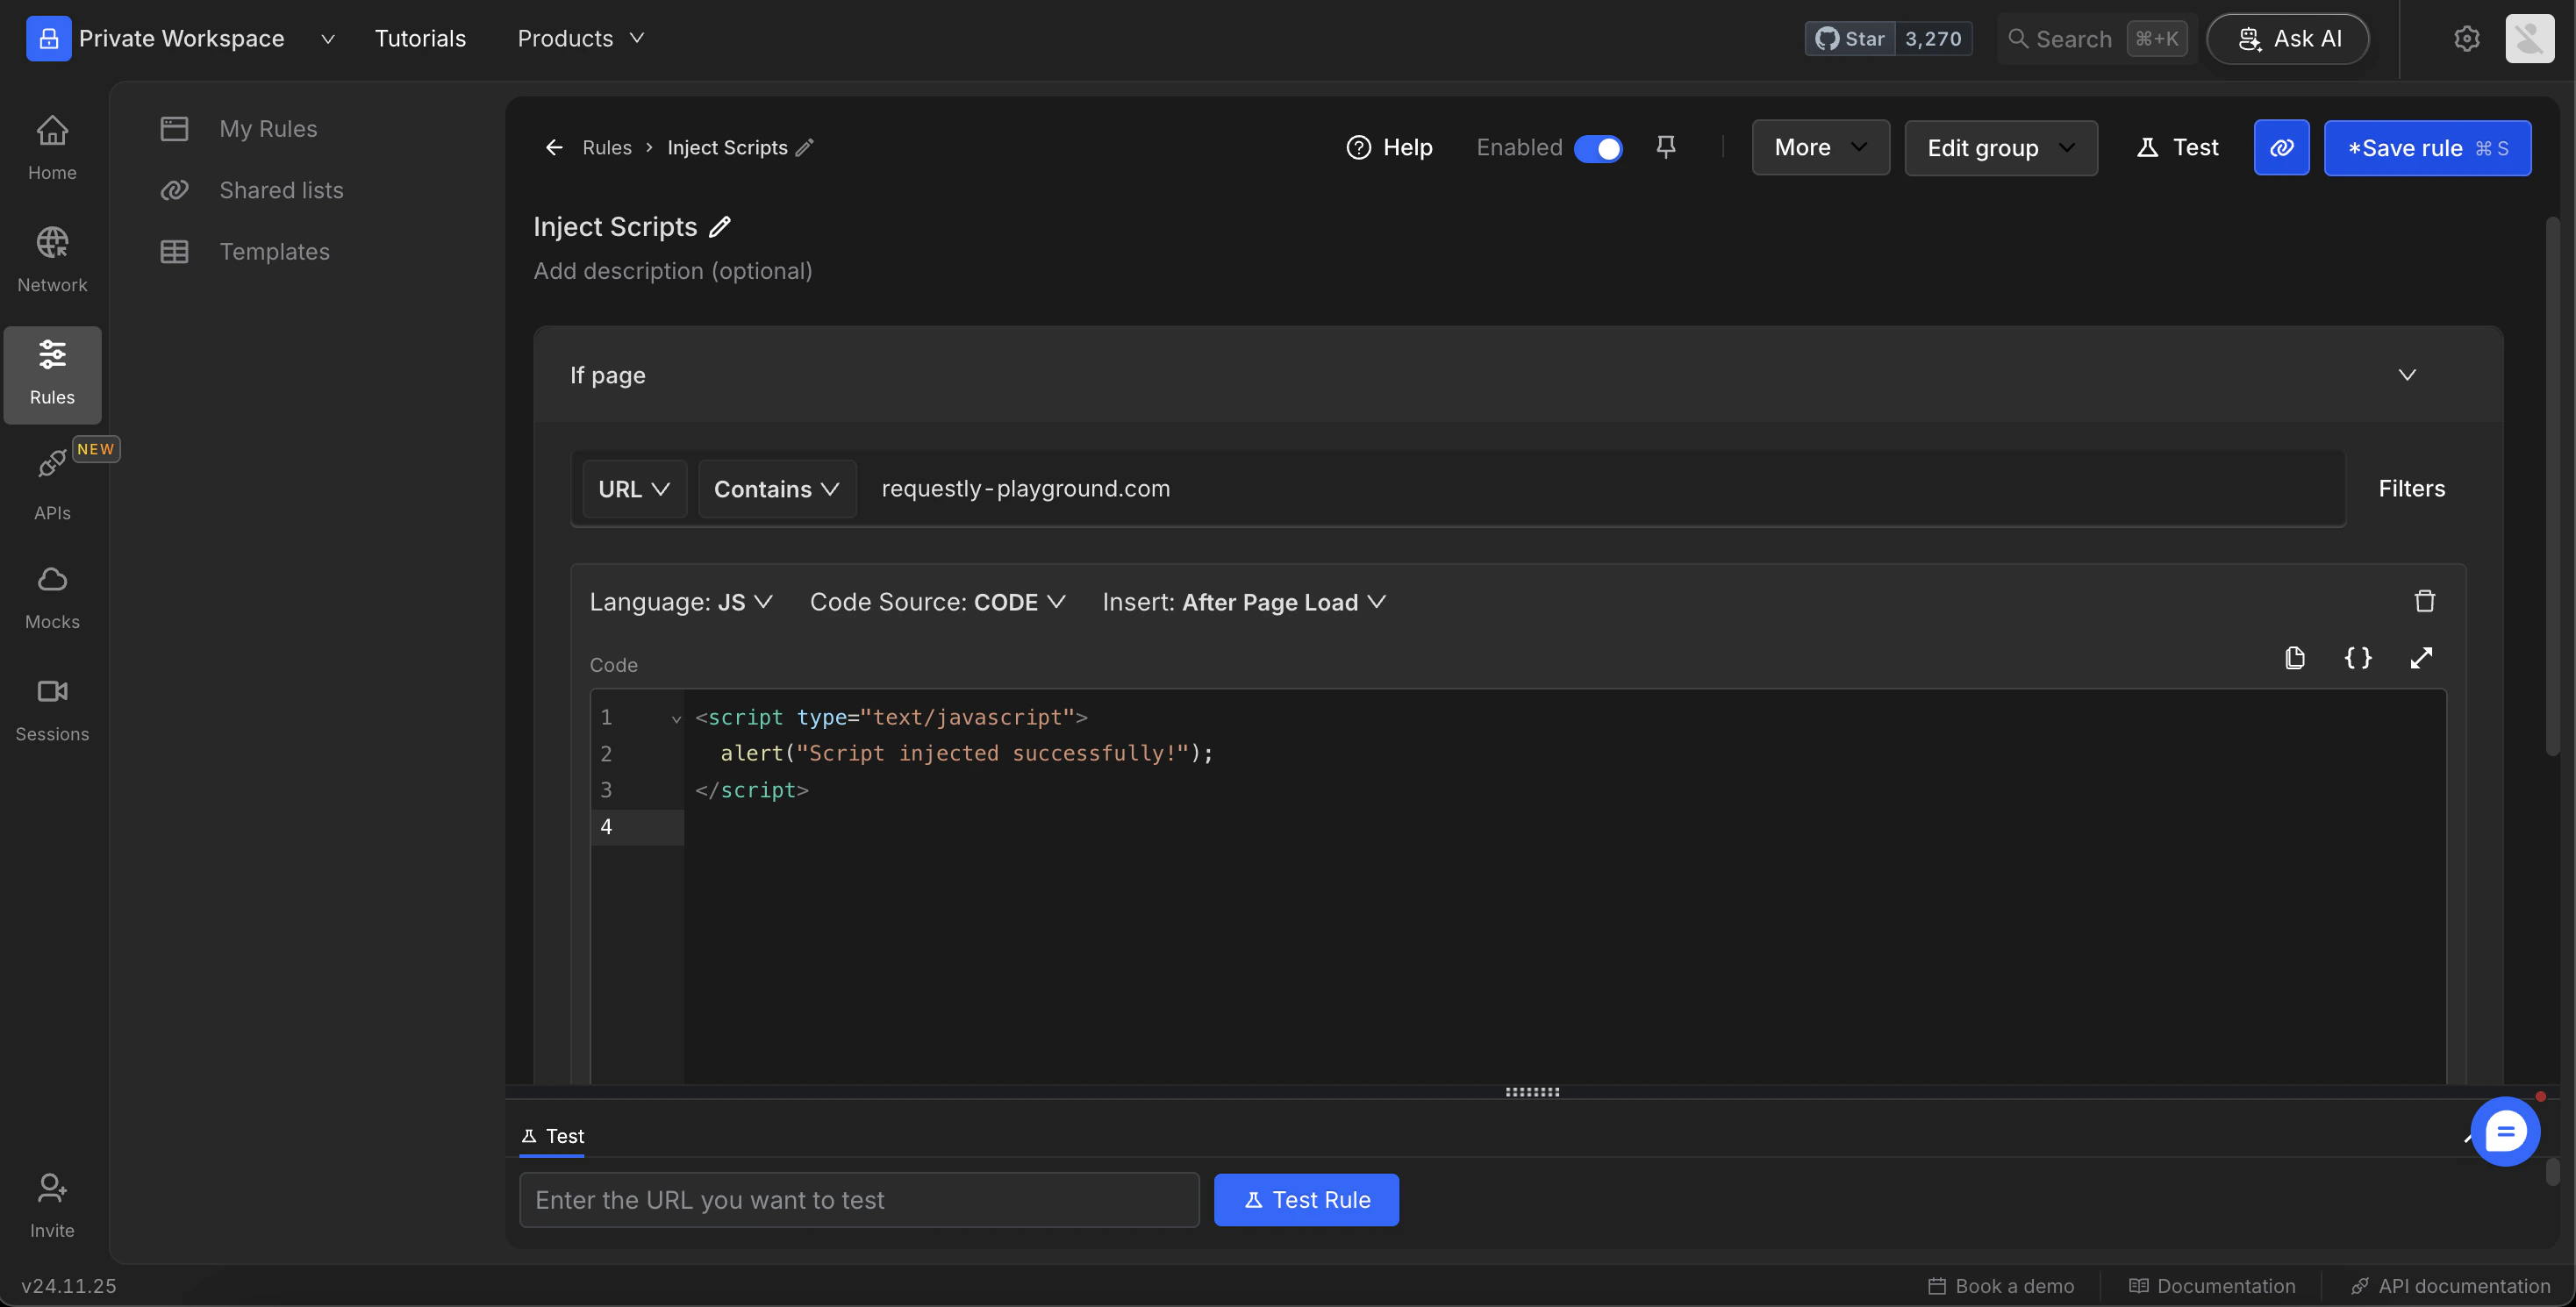
        In the **Custom Code** option, you can directly paste your script or CSS into the editor.

        Here, we are using **Custom Code** as it allows you to easily add and test your code directly.

        <img src="https://mintcdn.com/interceptor/fhZRboFseopn8ocm/images/insert-scripts/2c3d129e-38cc-4d50-adef-c68d08a902d8.png?fit=max&auto=format&n=fhZRboFseopn8ocm&q=85&s=a22ecec35a986c6e74e16faebc302226" align="center" fullwidth="false" width="2936" height="1490" data-path="images/insert-scripts/2c3d129e-38cc-4d50-adef-c68d08a902d8.png" />
      </Tab>
    </Tabs>
  </Step>

  <Step title="Choose whether to inject CSS styles or JavaScript code">
    You can add either CSS styles or JavaScript code:

    <Tabs>
      <Tab title="CSS">
        **To Add CSS Styles→** Insert the following code to modify the web page's styling:

        ```xml theme={null}
        <style type="text/css">
          .product-card {
            background-color: #e0ffe5;
          }
          .product-image {
            mix-blend-mode: darken;
          }
        </style>
        ```

        This code changes the background colour of product cards to a light green (`#e0ffe5`) and adjusts the product images' blend mode.

        You can also import this rule and apply it directly by using this\
        <a target="_blank" href="https://app.requestly.io/rules/shared-lists/viewer/85b6ef44ba6b412998797b9fe22fb0e9-Inject-Scripts">→**shared list**</a>
      </Tab>

      <Tab title="JavaScript">
        **Add JavaScript Code →** Insert the following script to display an alert message:

        ```xml theme={null}
        <script type="text/javascript">
          alert("Script injected successfully!");
        </script>
        ```

        This JavaScript code triggers an alert with the message `Script injected successfully!` to confirm the rule is active.

        You can also import this rule and apply it directly by using this\
        <a target="_blank" href="https://app.requestly.io/rules#sharedList/99a92c91eb4d419bb0cf89ca27295780-Insert-Scripts-Rule-">→ **shared list**</a>
      </Tab>
    </Tabs>
  </Step>

  <Step title="[Optional] Add Custom Attributes to Scripts">
    While injecting JavaScript, you can enhance the `<script>` tag by adding custom attributes. This is useful when you want to fine-tune how the script behaves in the browser, improve debugging, support conditional handling, or pass configuration data.

    Requestly Interceptor lets you define these attributes directly in the Insert Script Rule interface. You can specify standard or custom attributes like `defer`, `async`, `crossorigin`, `data-*`, and more all depending on your use case.

    ```javascript theme={null}
    <script 
      src="https://example.com/script.js" 
      id="custom-script"
      defer 
      crossorigin="anonymous" 
      data-source="requestly" 
      data-widget-id="tracking-xyz">   
    </script>
    ```
  </Step>

  <Step title="Decide whether to insert the script before or after the page load.">
    <Tip>
      If you are injecting **CSS**, it is applied automatically as soon as the rule is executed.
    </Tip>

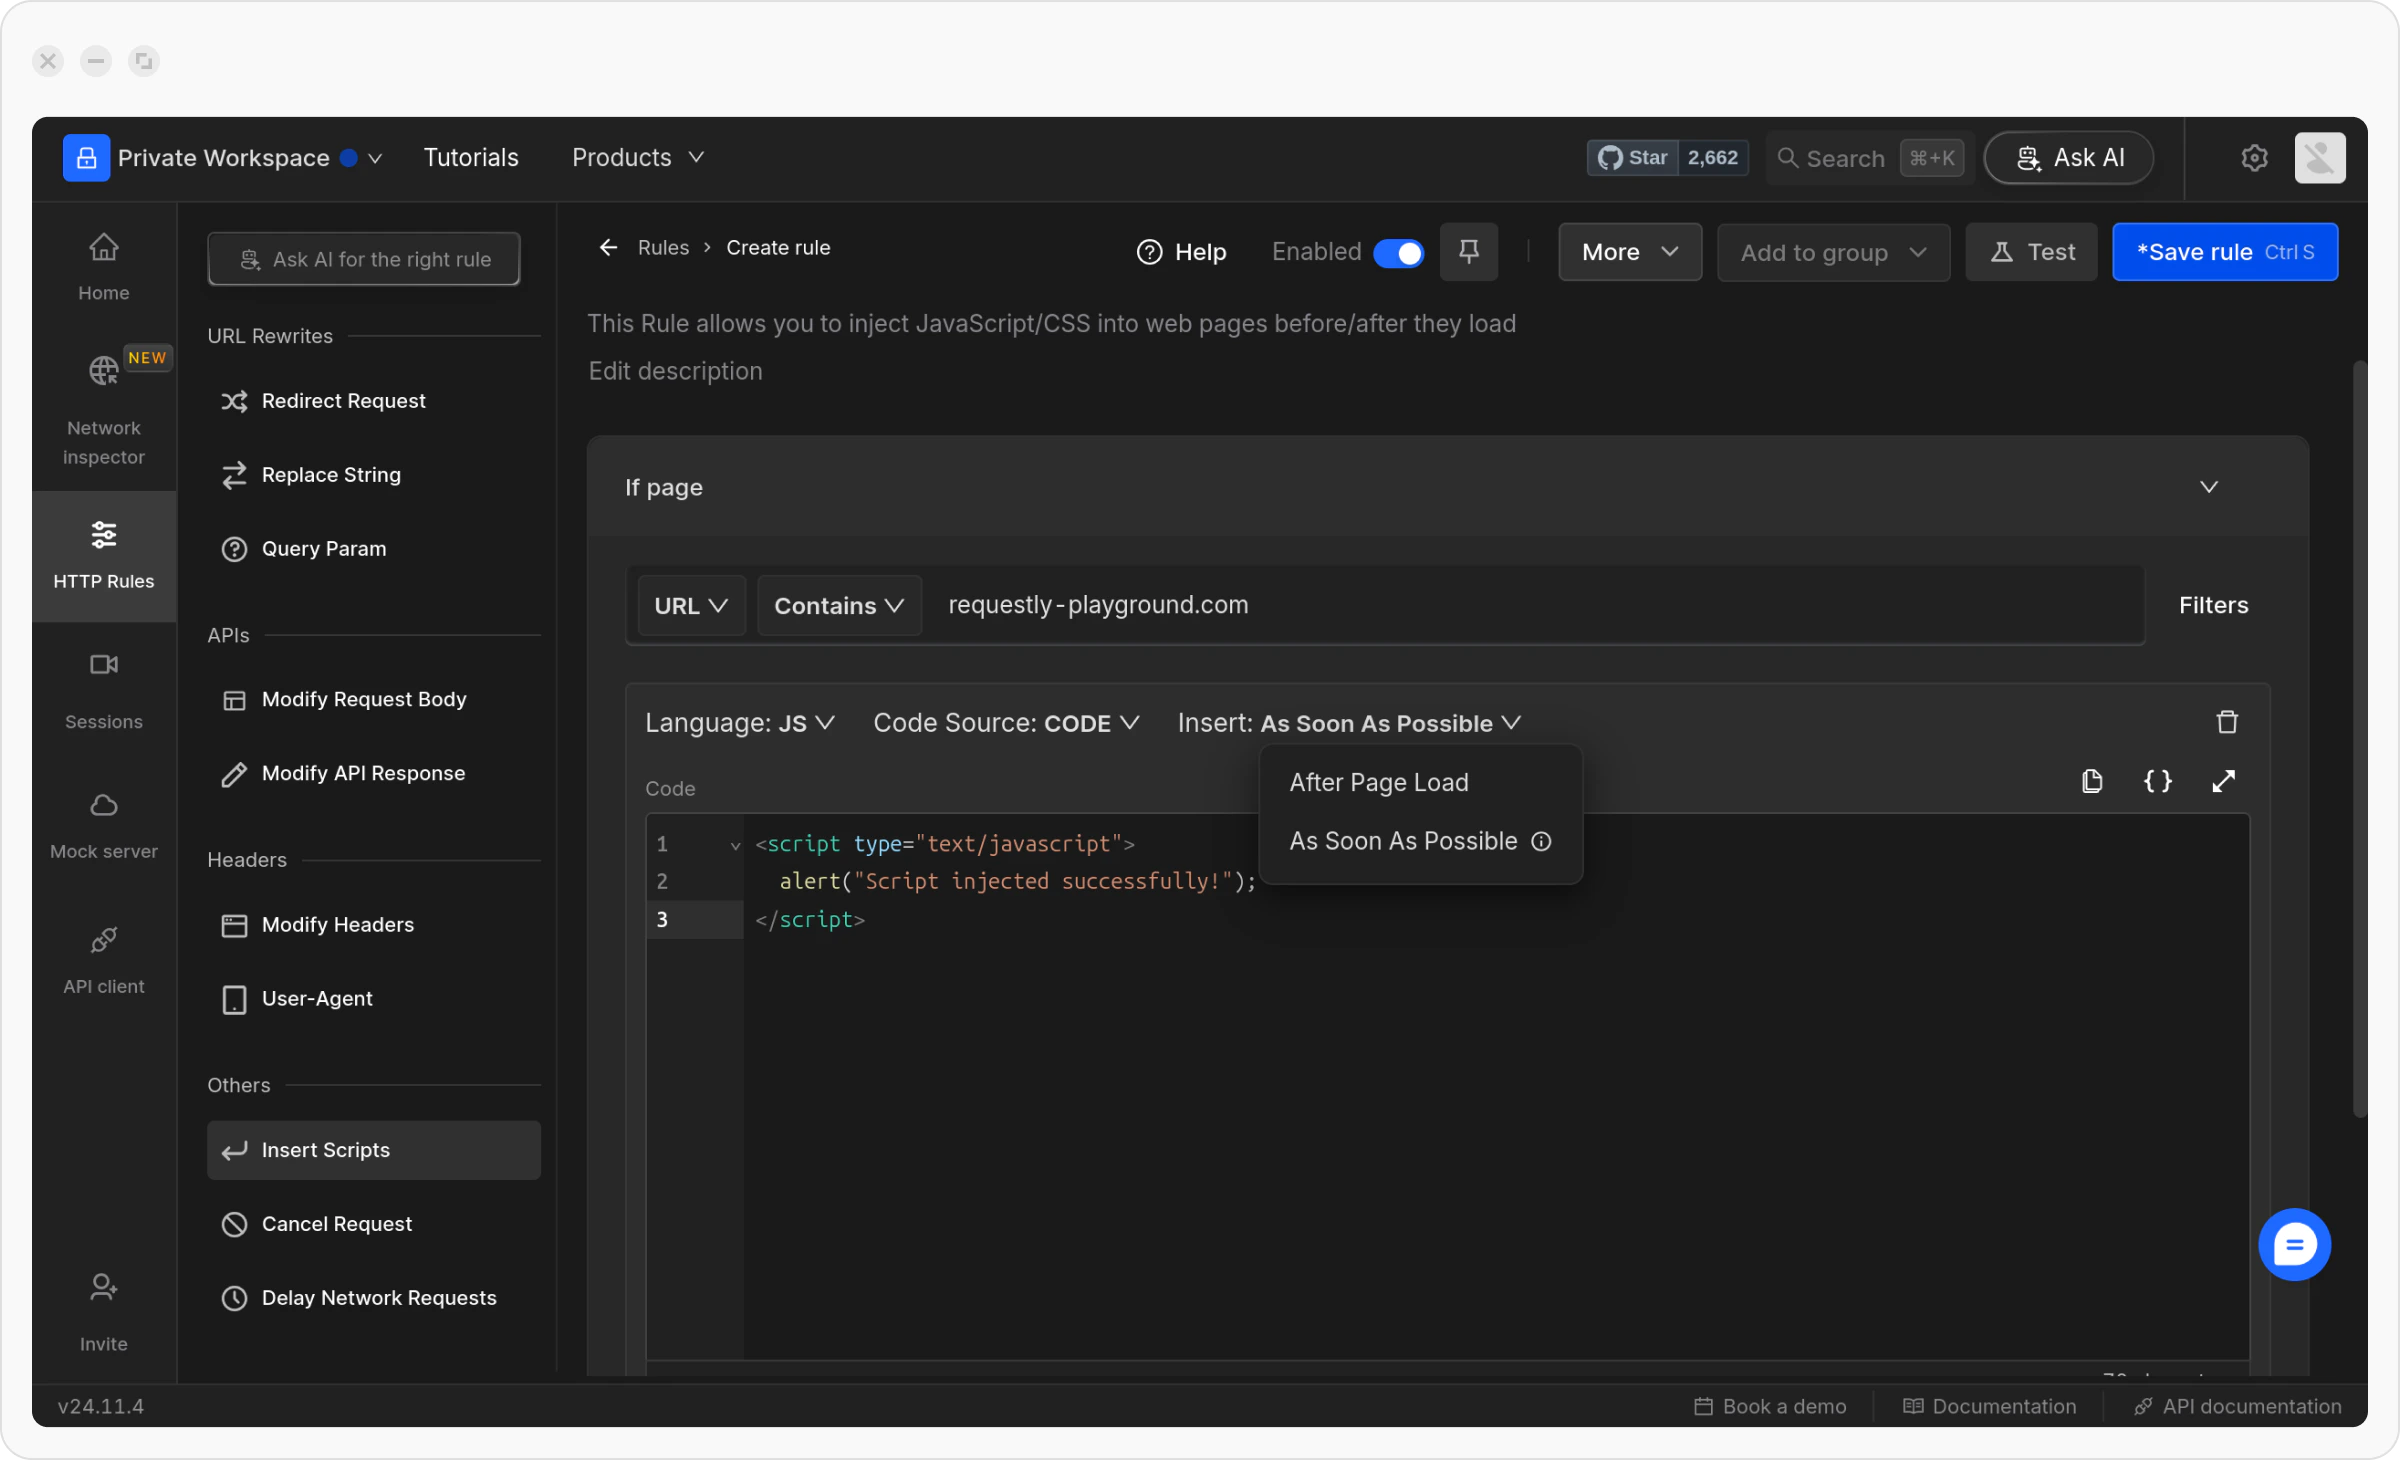
    This option is available **only when injecting JavaScript**

    * **As Soon As Possible:** The script will be injected as soon as the page starts loading.

    * **After Page Load:** The script will be injected after all page content has fully loaded

    <img src="https://mintcdn.com/interceptor/fhZRboFseopn8ocm/images/insert-scripts/7df23200-ee03-44eb-b5e7-c97dc38d41ae.png?fit=max&auto=format&n=fhZRboFseopn8ocm&q=85&s=00d1f13519a905442ffe5ff421fc56d1" align="center" fullwidth="false" width="2400" height="1460" data-path="images/insert-scripts/7df23200-ee03-44eb-b5e7-c97dc38d41ae.png" />
  </Step>

  <Step title="Save and Activate the Rule">
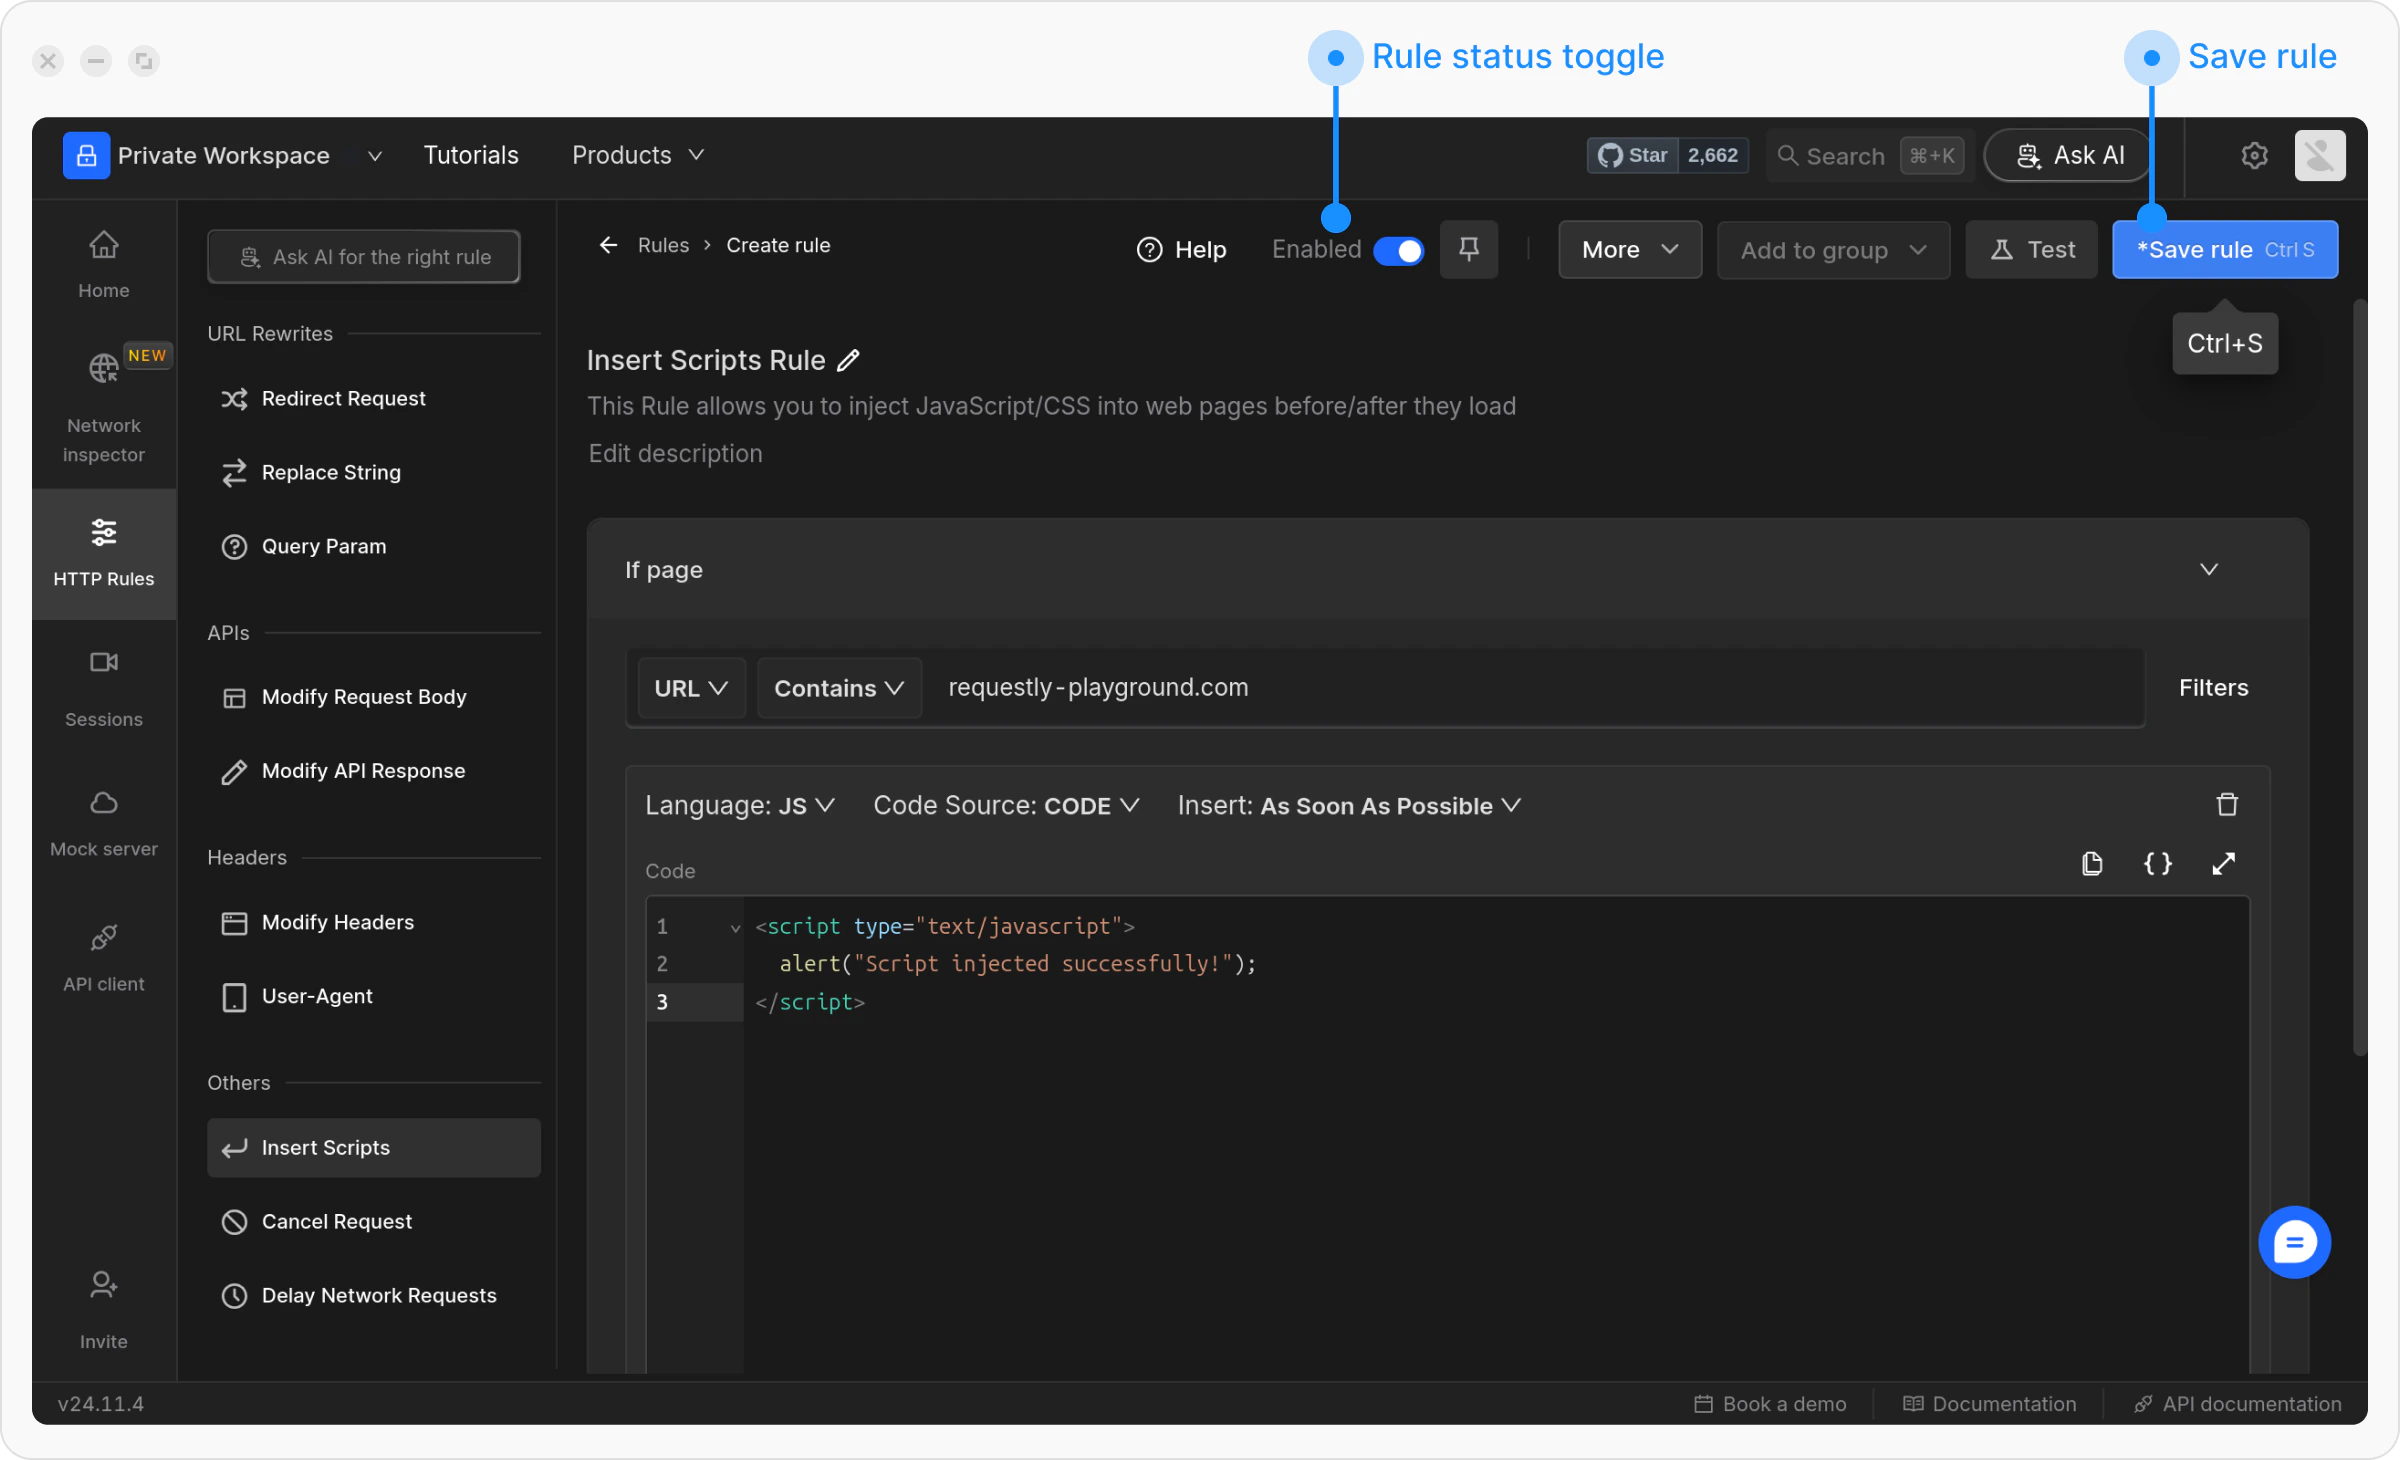
    Once you are satisfied with your configuration, click **Save** to store the rule. After saving, make sure to toggle the rule **ON** to activate it. This will apply the rule.

    <img src="https://mintcdn.com/interceptor/fhZRboFseopn8ocm/images/insert-scripts/6c2ce452-bd2e-4bb2-9683-d9cadfa8e9eb.png?fit=max&auto=format&n=fhZRboFseopn8ocm&q=85&s=408a125625d4e737458b4da8ee4107cd" align="center" fullwidth="false" width="2400" height="1460" data-path="images/insert-scripts/6c2ce452-bd2e-4bb2-9683-d9cadfa8e9eb.png" />
  </Step>

  <Step title="Test the Rule">
    <Tip>
      There are multiple ways to validate if a rule is applied or not, learn more about how to <a target="_blank" href="/http-rules/advanced-usage/validate-rules-execution">`validate rule execution`</a>**.**
    </Tip>

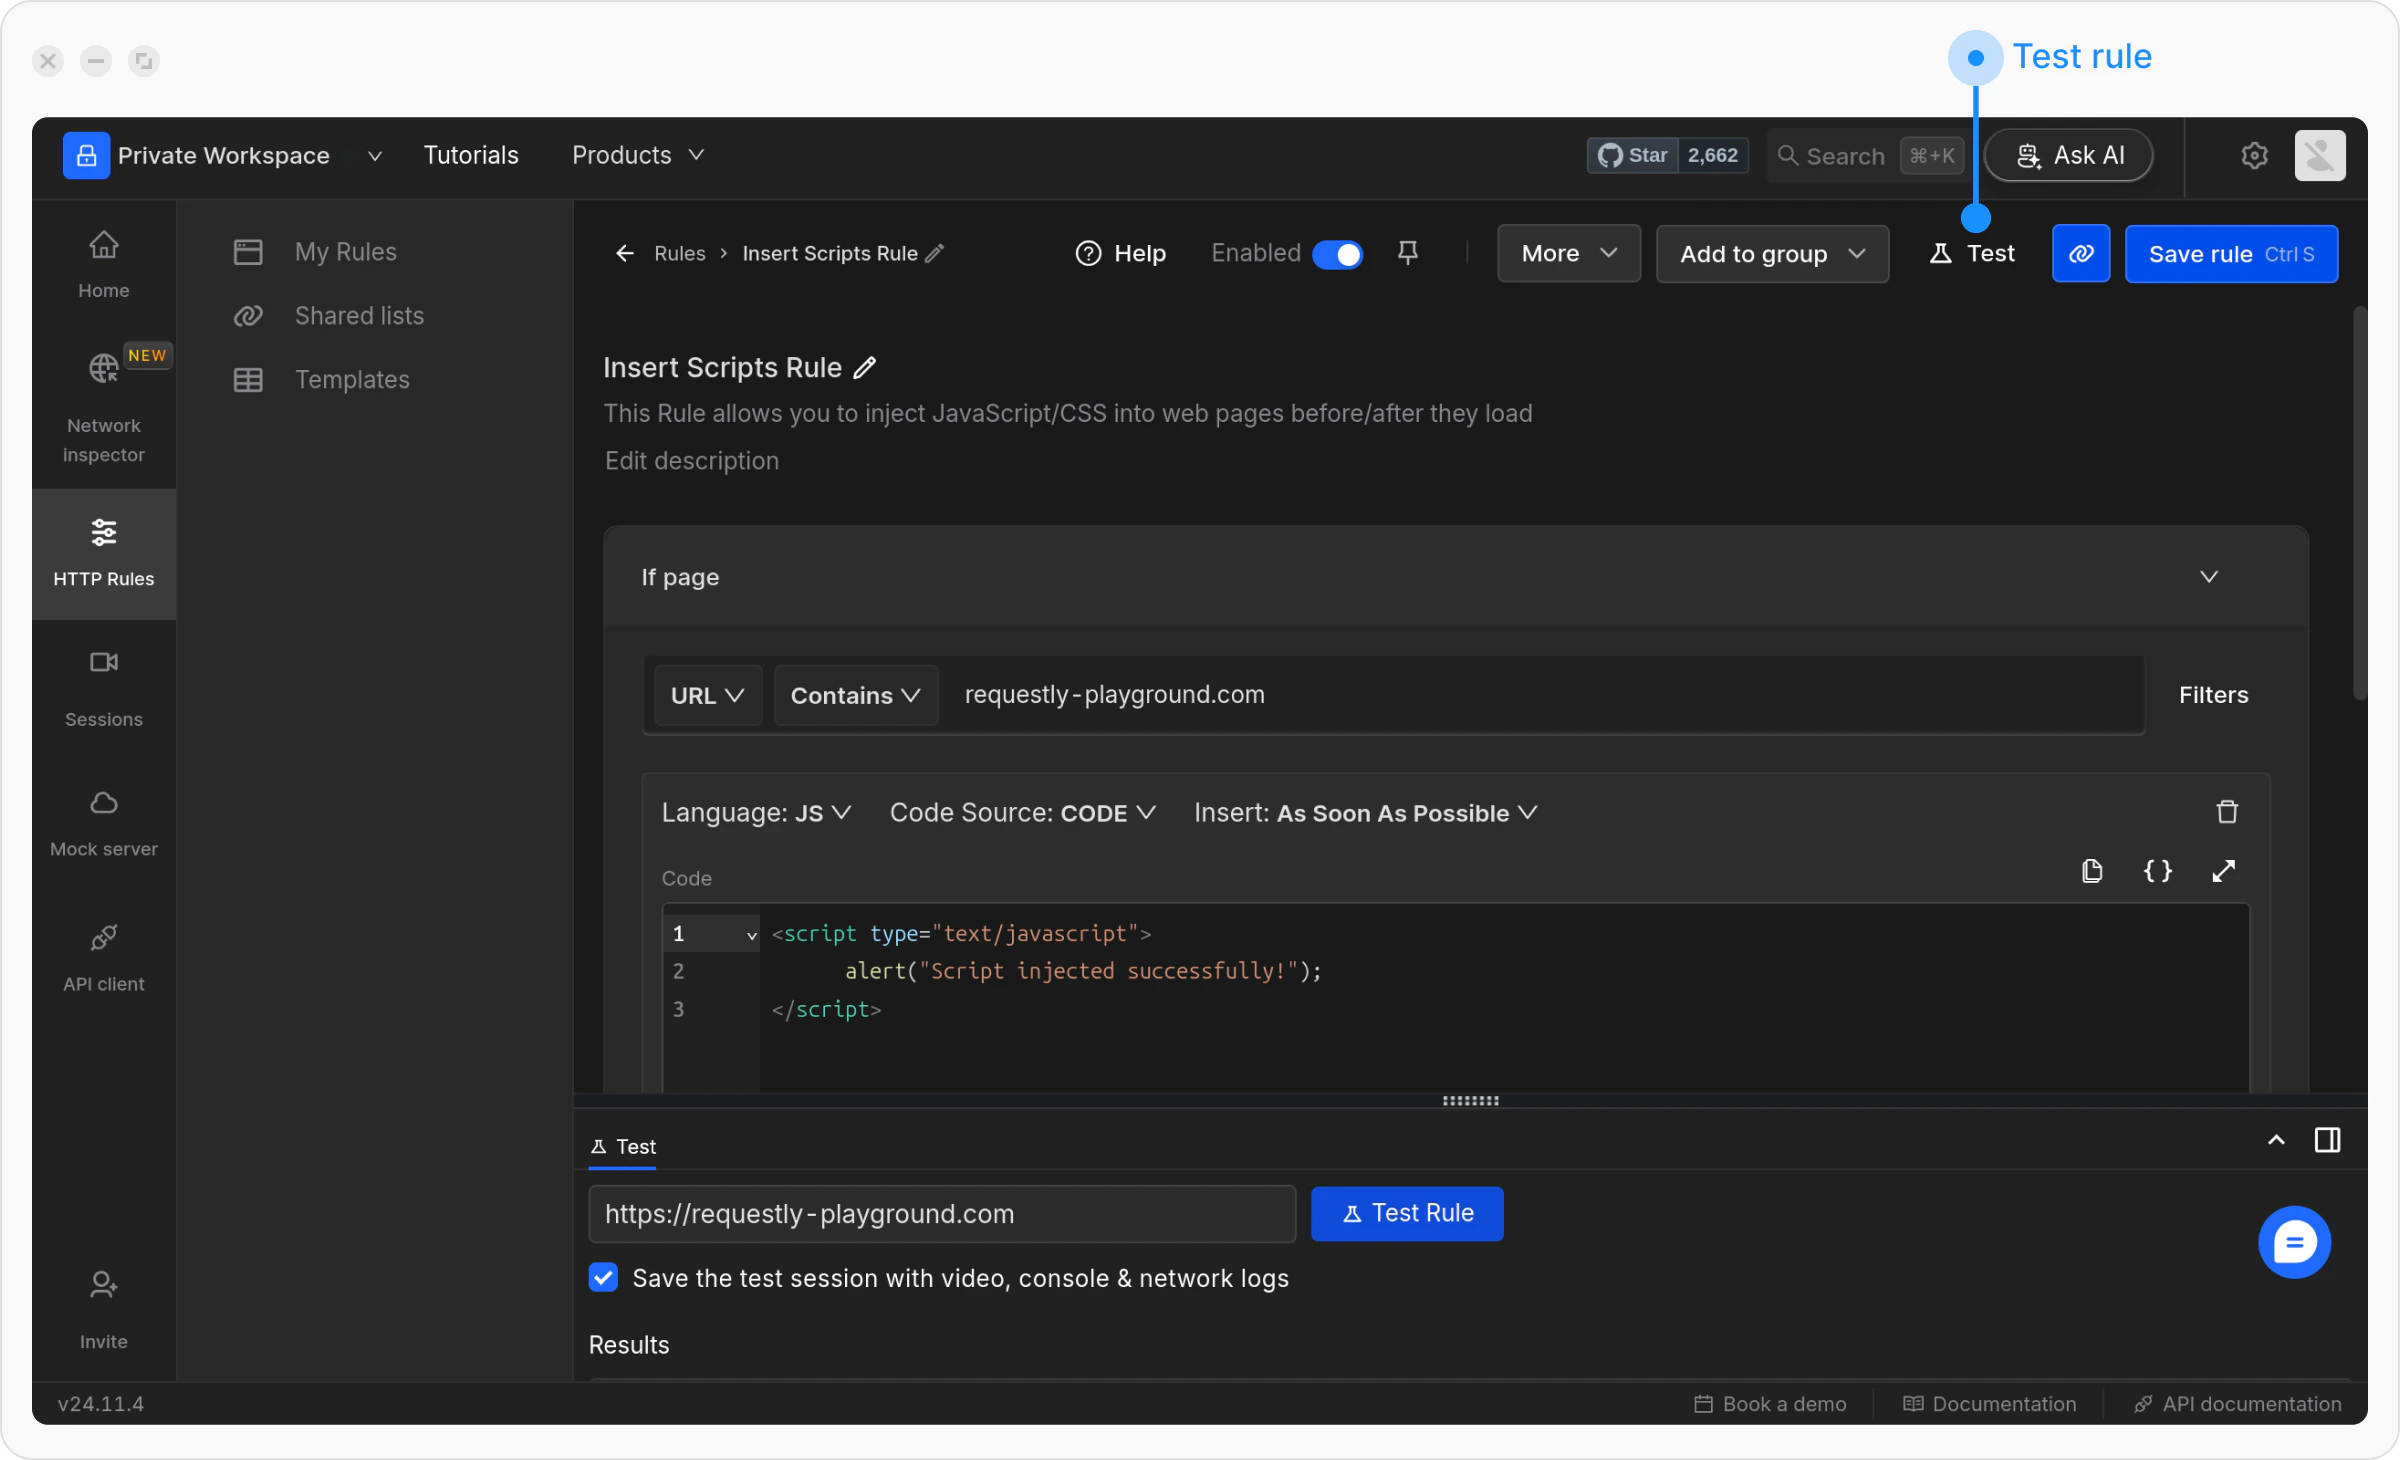
    To ensure the rule is working correctly, click the **Test** button and enter the URL of the page where you want to apply this rule.

    <img src="https://mintcdn.com/interceptor/fhZRboFseopn8ocm/images/insert-scripts/2d041415-481c-4df2-9f5f-5ee935f28cc0.png?fit=max&auto=format&n=fhZRboFseopn8ocm&q=85&s=741f25219f990d14f4f1656fe7cd197c" align="center" fullwidth="false" width="2400" height="1460" data-path="images/insert-scripts/2d041415-481c-4df2-9f5f-5ee935f28cc0.png" />

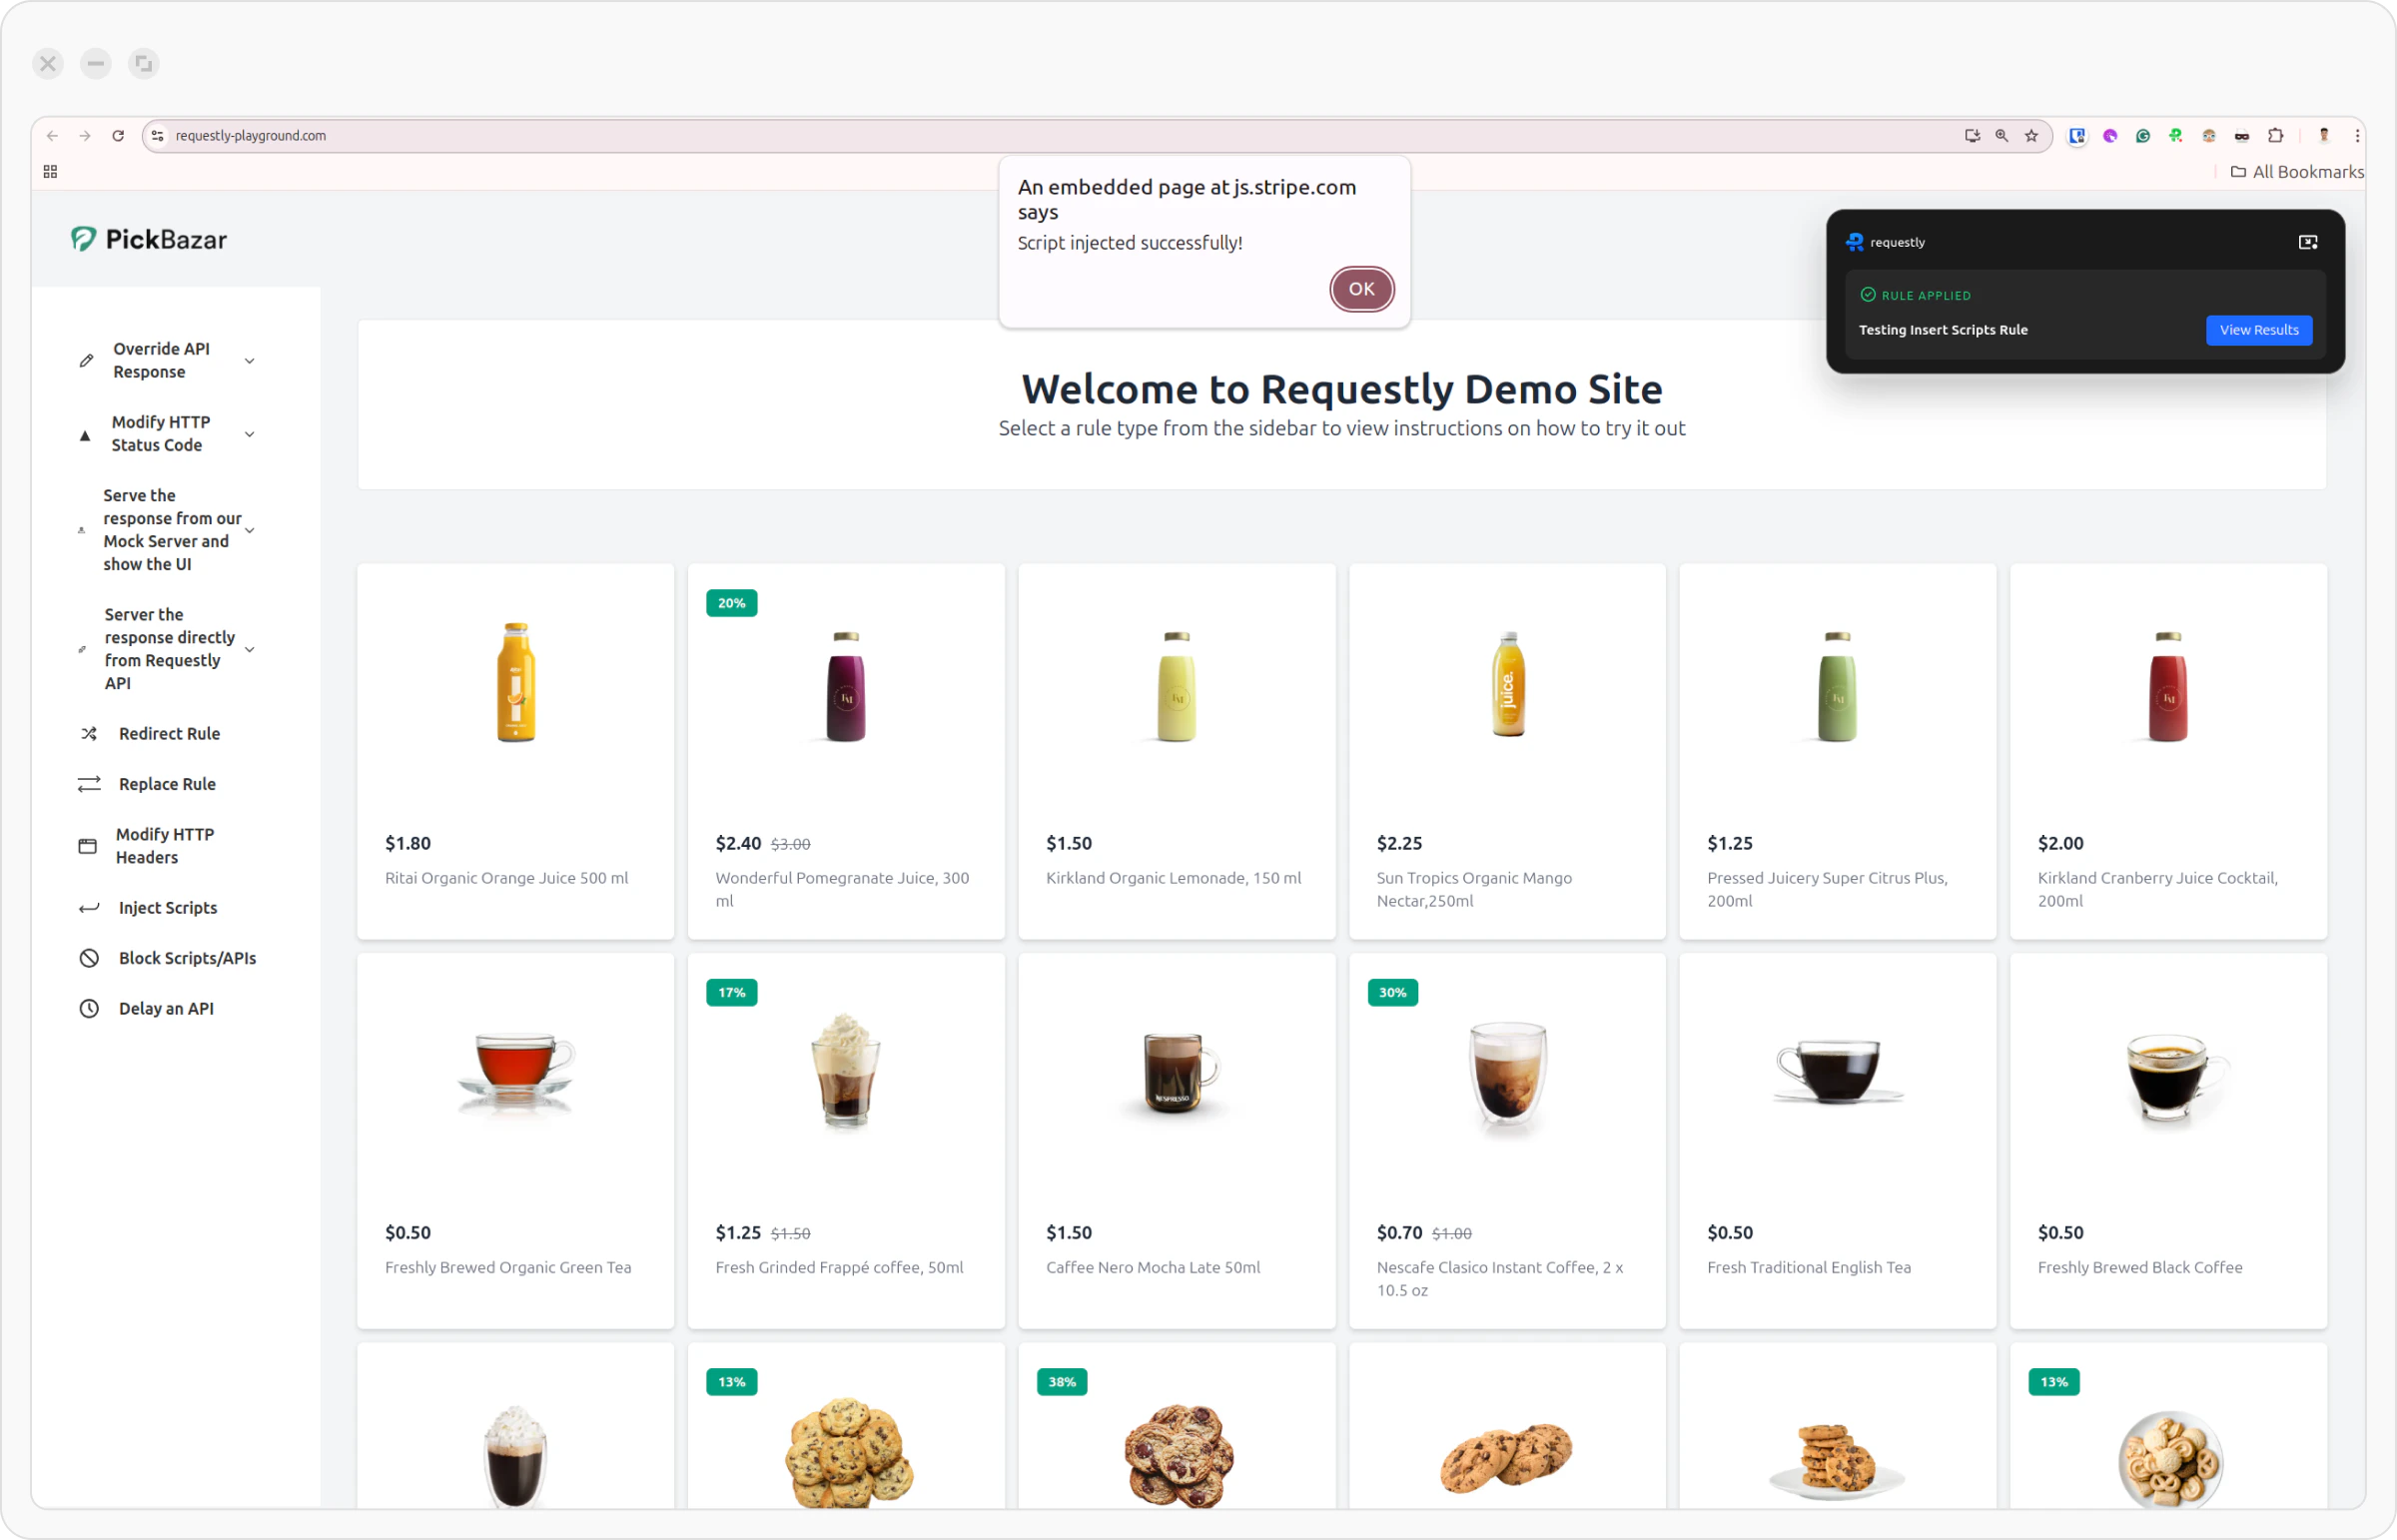
    A confirmation widget will appear to indicate if the rule has been successfully applied.

    <img src="https://mintcdn.com/interceptor/fhZRboFseopn8ocm/images/insert-scripts/6e063310-b049-4b5c-bd9f-c933ad1cf7ee.png?fit=max&auto=format&n=fhZRboFseopn8ocm&q=85&s=931c787165b04067285d0bf88f866312" align="center" fullwidth="false" width="2400" height="1542" data-path="images/insert-scripts/6e063310-b049-4b5c-bd9f-c933ad1cf7ee.png" />

    Here, you can see that the rule has been applied, and an alert displays the message **Script Injected Successfully.**

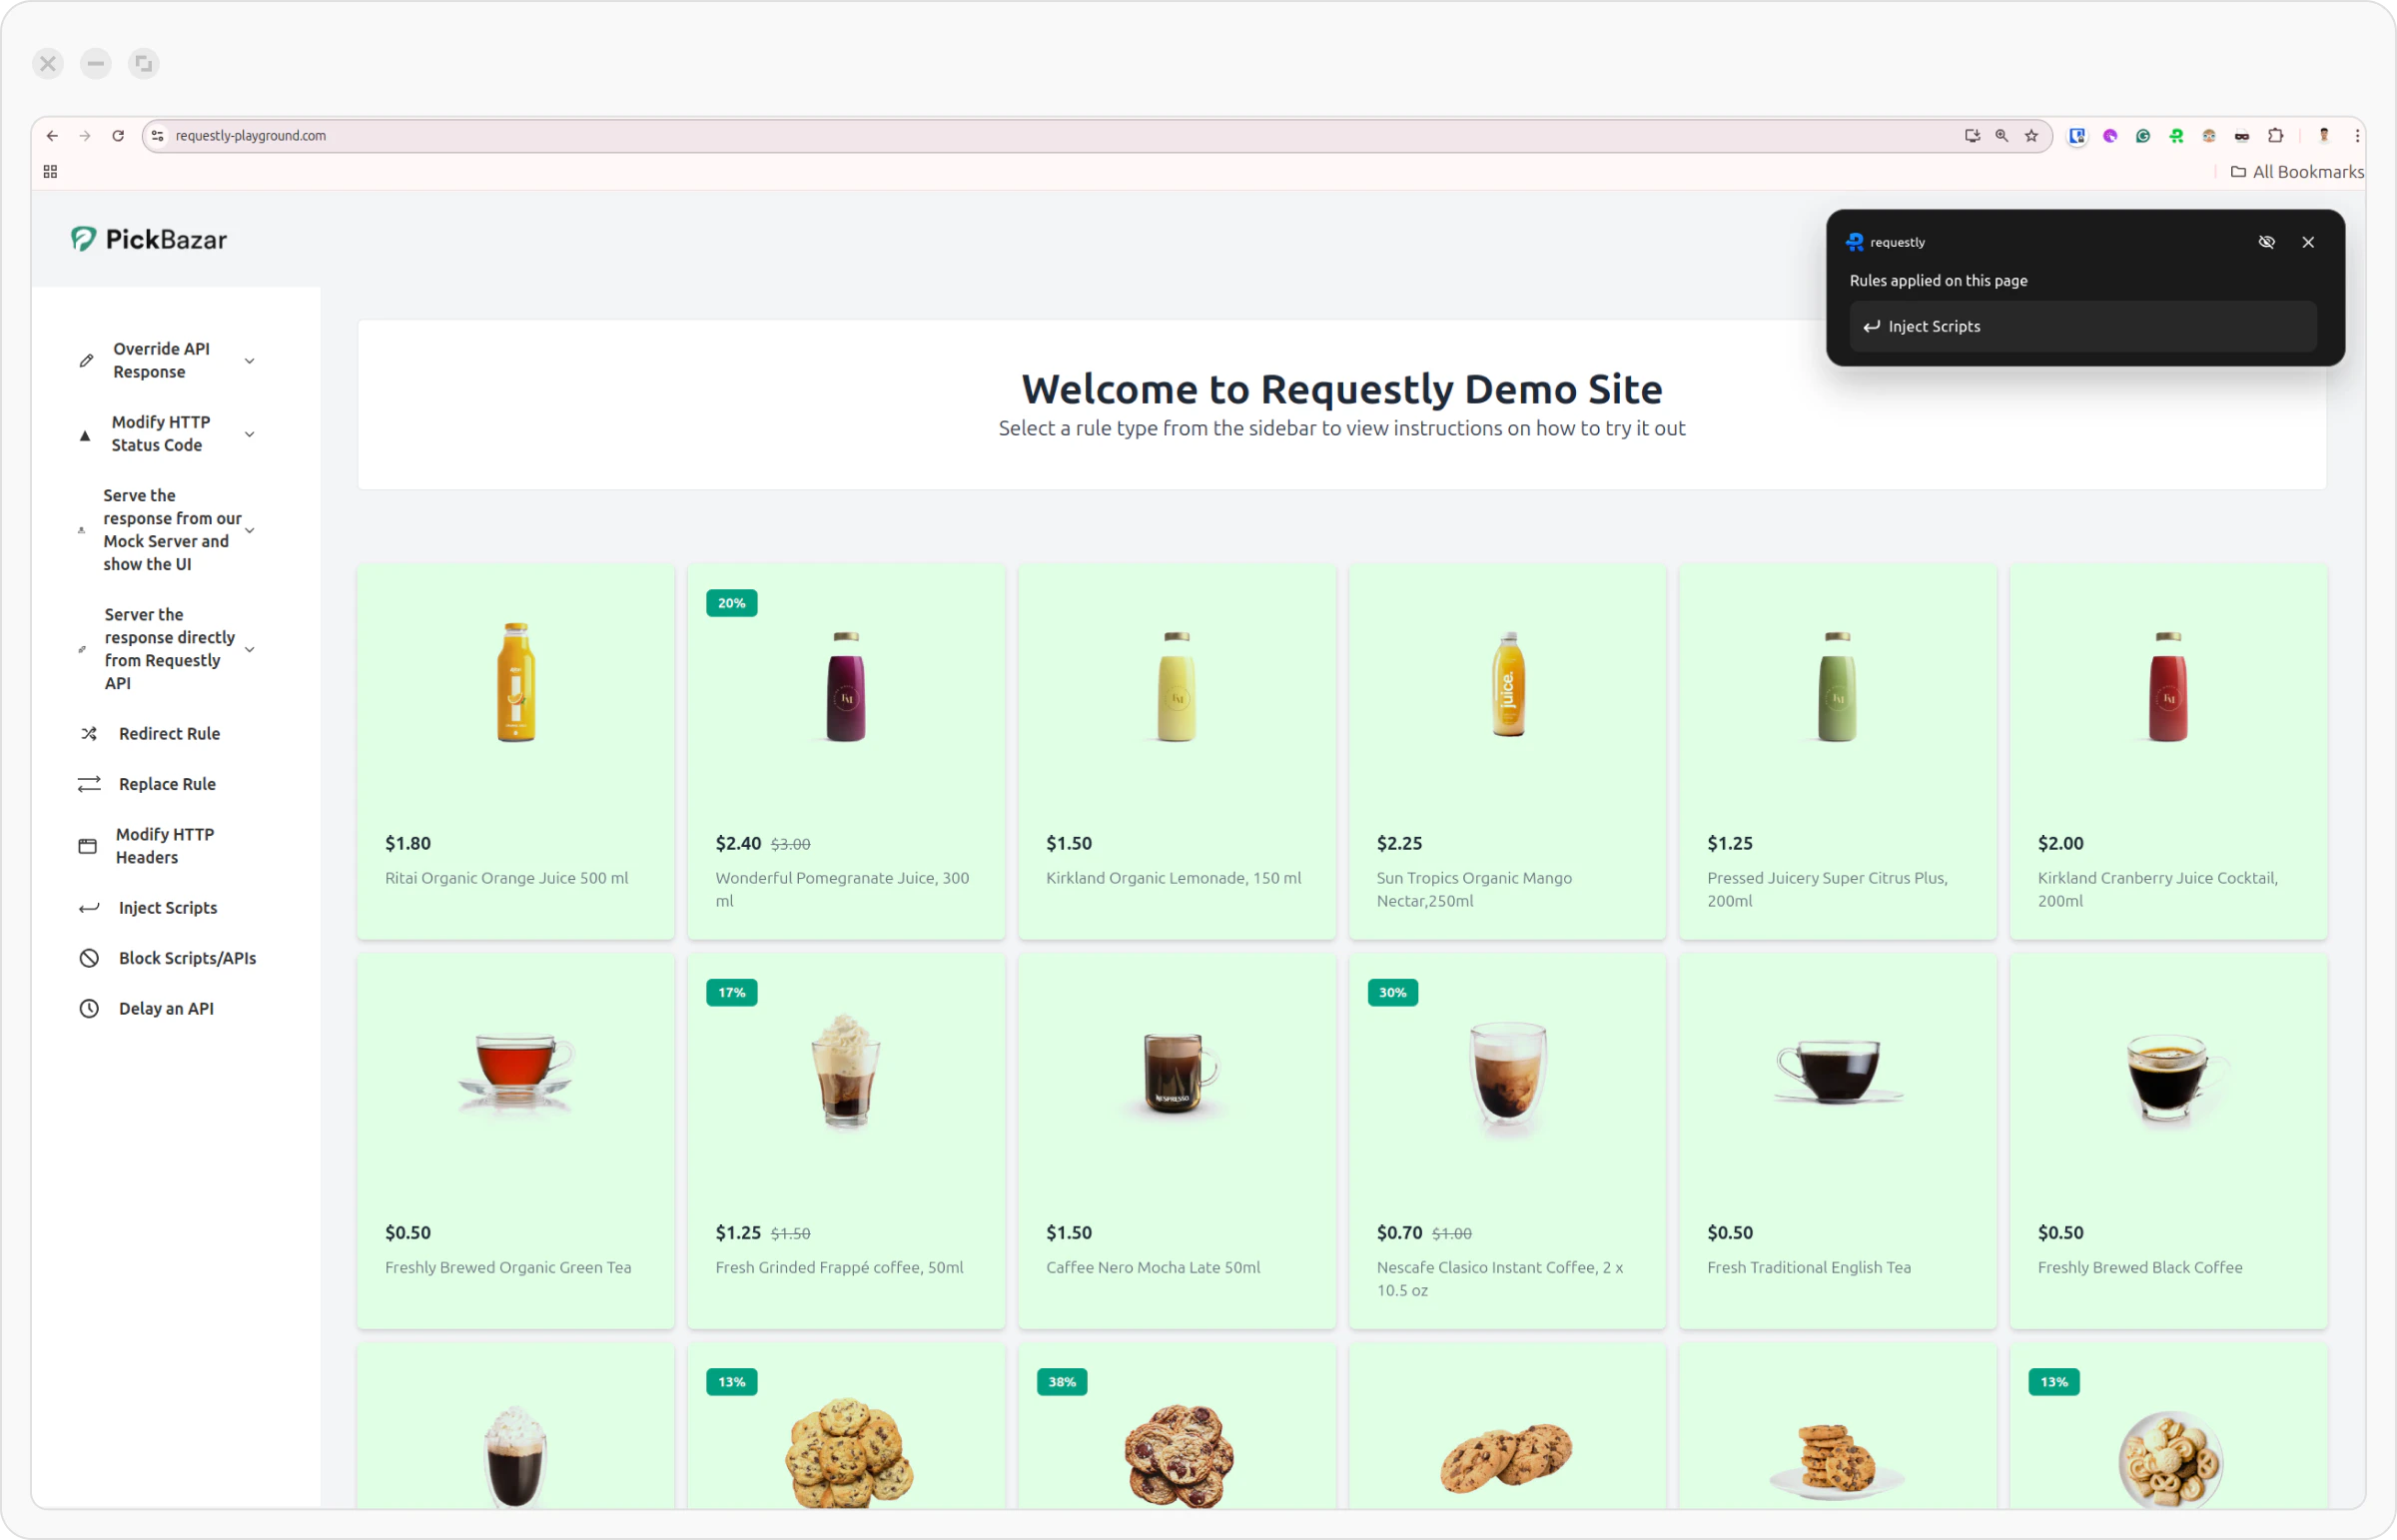
    `OR`

    <img src="https://mintcdn.com/interceptor/fhZRboFseopn8ocm/images/insert-scripts/06ffad28-431b-4af8-bea7-d1a0a5aa432f.png?fit=max&auto=format&n=fhZRboFseopn8ocm&q=85&s=3ccc8bcbb4d49c759686fc89f9bcd05c" align="center" fullwidth="false" width="2400" height="1542" data-path="images/insert-scripts/06ffad28-431b-4af8-bea7-d1a0a5aa432f.png" />

    Here, you can see that the rule has been applied, and the styles defined in the CSS are applied to the page.
  </Step>
</Steps>