> ## Documentation Index
> Fetch the complete documentation index at: https://interceptor-docs.requestly.com/llms.txt
> Use this file to discover all available pages before exploring further.
# Mastering Variables & Environments in Requestly Interceptor
> A comprehensive hands-on guide to using Variables and Environments in Requestly Interceptor's API Client for seamless multi-environment API testing and development.
## Introduction
When I first opened Requestly Interceptor's API Client, I expected the usual, a request builder, a few tabs, maybe a scripting panel. What I didn't expect was how powerful and convenient their Variables and Environments system would be.
If you've ever switched between dev, staging, and production APIs and found yourself constantly rewriting URLs, headers, or tokens, this feature will feel like a lifesaver.
While working on a recent contribution to Requestly Interceptor, I got the chance to dive deep into Variables and Environments, and it turned out to be far more powerful than I expected. So in this article, I'm breaking down everything I learned in a simple, practical way.
Think of this as your shortcut to mastering variables, with practical steps and screenshots that you can apply immediately in your own setup.
## Prerequisites
Before you begin, make sure you have:
* Requestly Interceptor app installed (desktop or browser extension)
* Basic understanding of APIs and HTTP requests
* Access to multiple API environments (dev, staging, prod) - or you can use the free APIs mentioned in this guide
* Familiarity with API testing concepts
## The Problem: Managing Multiple Environments
Most teams today maintain multiple environments:
* Development
* Staging
* QA / Sandbox
* Production
Each environment has different:
* Base URLs
* Auth tokens
* Keys / secrets
* Custom headers
* Feature flags
Hardcoding these values inside every request is painful. Updating them manually is even worse.
Requestly Interceptor solves all of this with a simple idea:
Define variables once → use them everywhere.
You reference any variable using:
```
{{variable_name}}
```
For example:
```
https://{{base_url}}/users/{{user_id}}
```
## Step-by-Step Guide
### Step 1: Exploring Global Variables
Global variables are available everywhere, across all requests and environments. They are ideal for constants or secrets that don't change frequently. I used them for things like API keys, common headers, or service base URLs.
#### How to Create Global Variables
1. Open the **Environments** panel in the sidebar
2. Click **Global Variables**
3. Add key/value pairs like `api_key`, `base_url`, or `content_type`
 The cool part?, Hovering on any `{{variable}}` in a request immediately shows the resolved value.
**Example Global Variables:**
```
api_key = your_secret_api_key
timeout = 5000
content_type = application/json
```
### Step 2: Creating Dev, Staging & Prod Environments
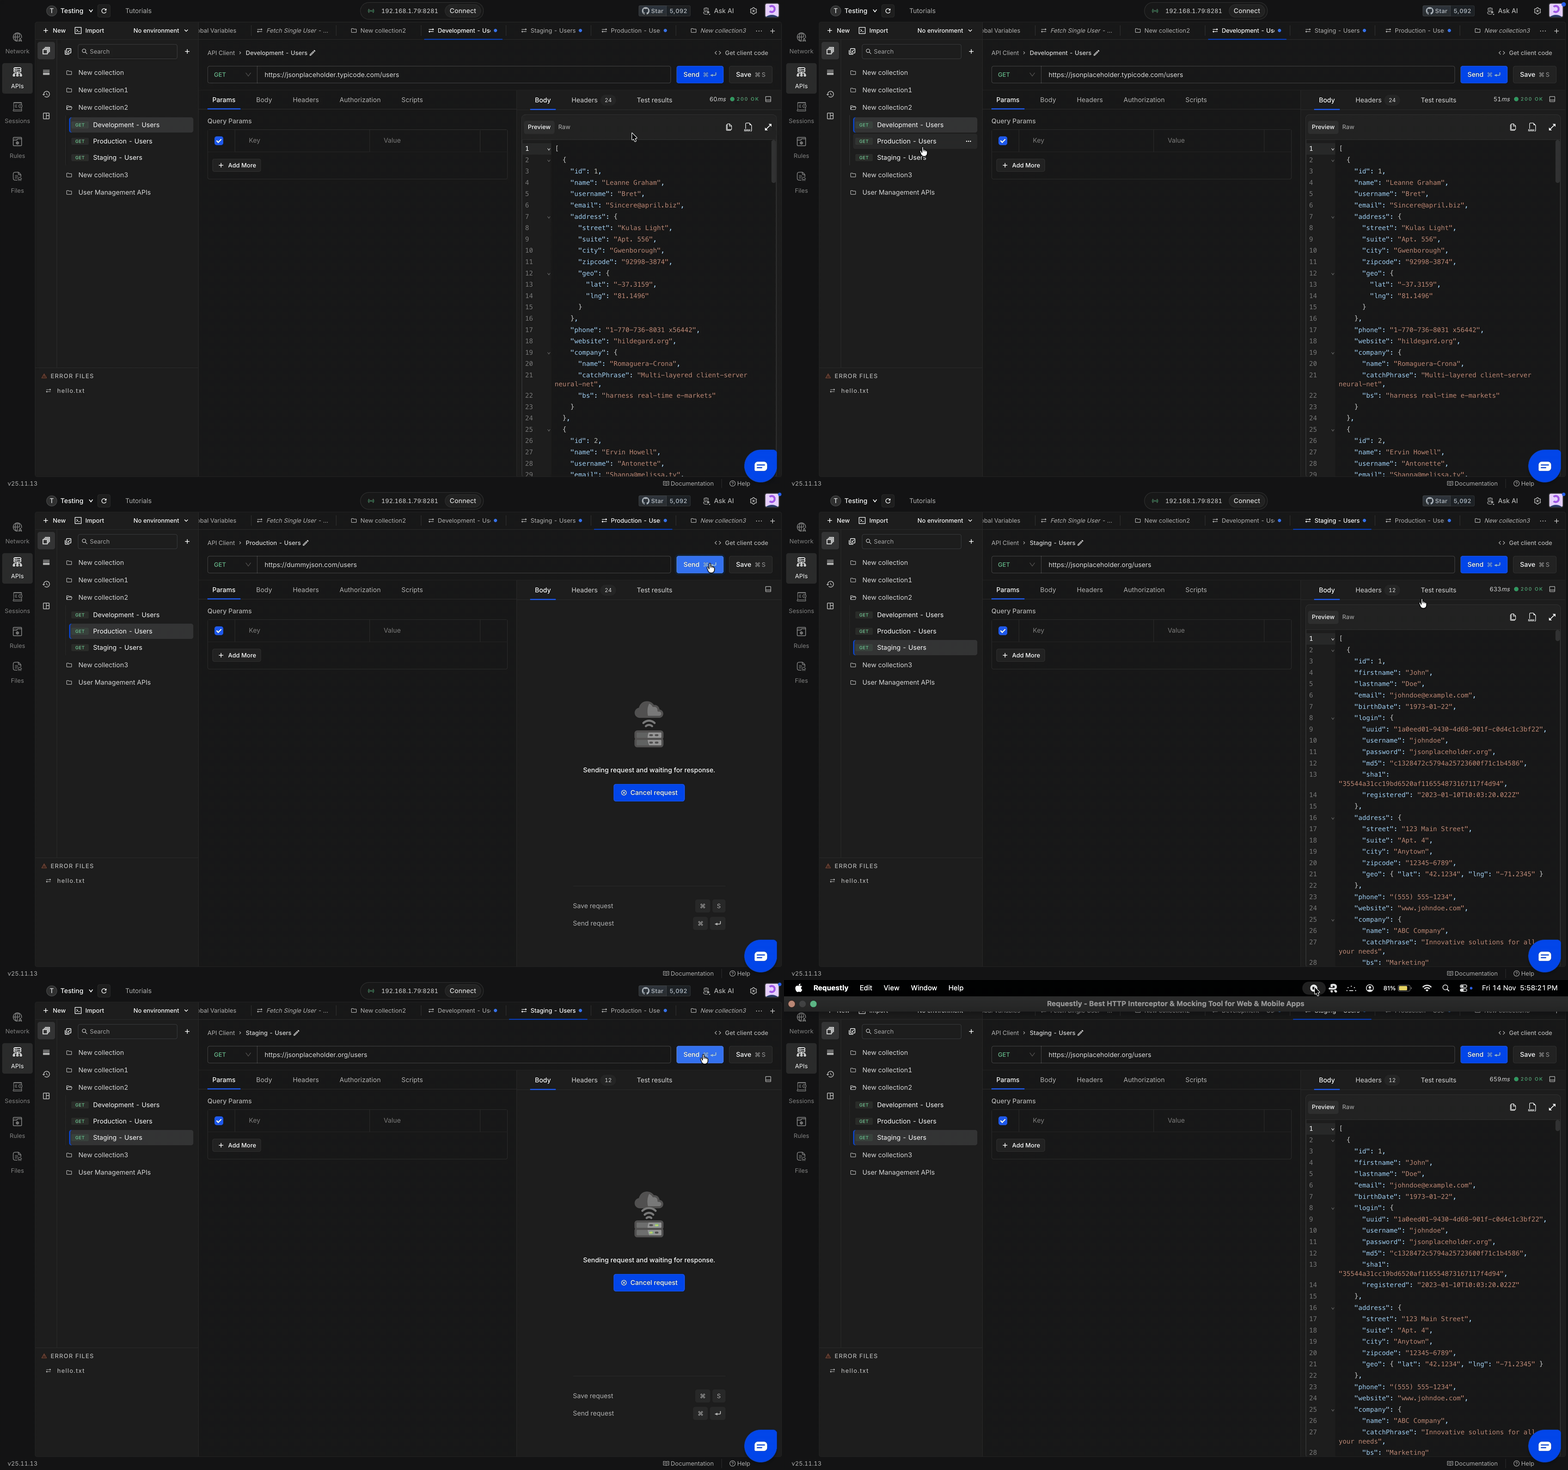
For my testing, I used three different APIs that all support the `/users` endpoint:
* **Development**, `https://jsonplaceholder.typicode.com`
* **Staging**, `https://jsonplaceholder.org`
* **Production**, `https://dummyjson.com`
#### Setting Up Environments
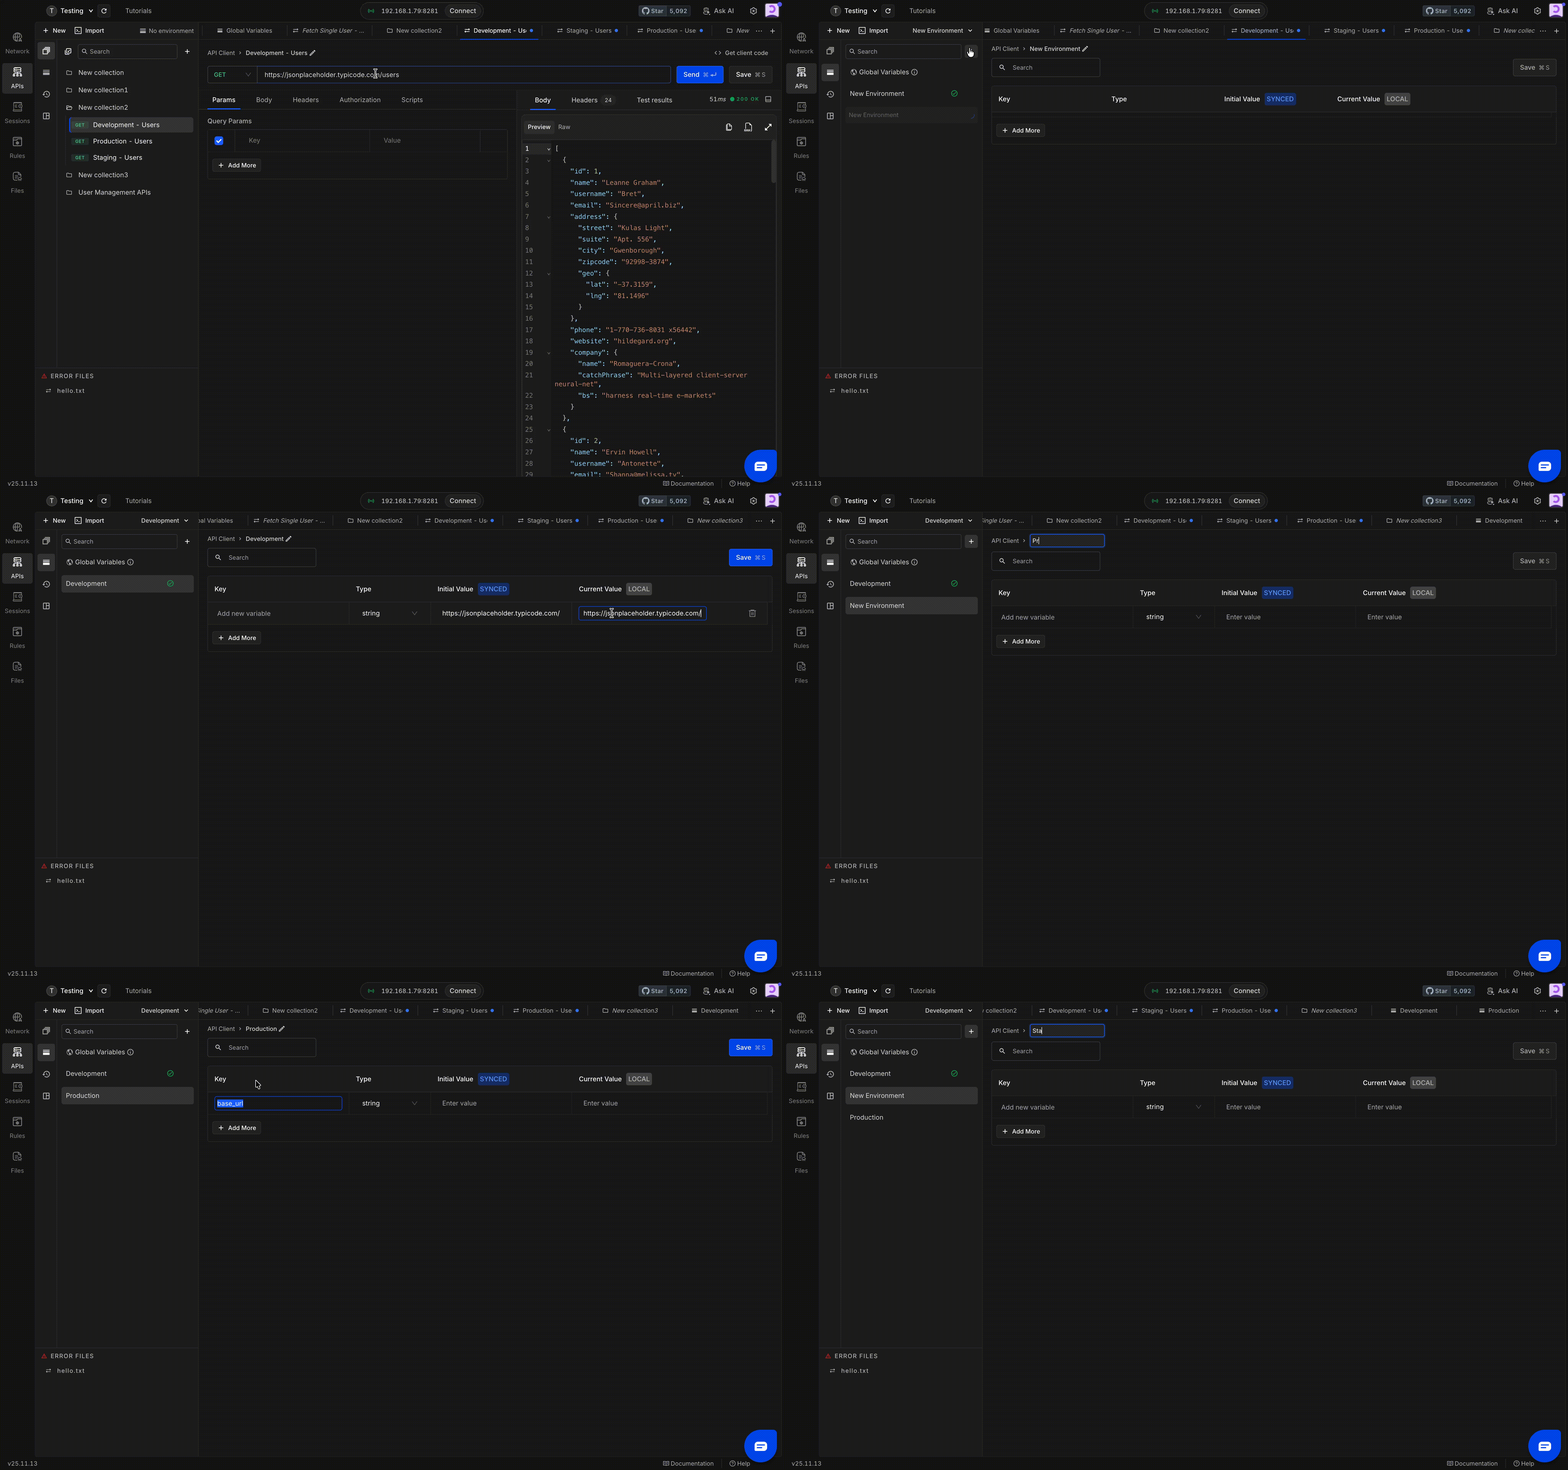
1. Open the **Environments** panel
2. Click **+ Create Environment**
3. Name your environment (e.g., "Development", "Staging", "Production")
4. Add variables specific to each environment
The cool part?, Hovering on any `{{variable}}` in a request immediately shows the resolved value.
**Example Global Variables:**
```
api_key = your_secret_api_key
timeout = 5000
content_type = application/json
```
### Step 2: Creating Dev, Staging & Prod Environments
For my testing, I used three different APIs that all support the `/users` endpoint:
* **Development**, `https://jsonplaceholder.typicode.com`
* **Staging**, `https://jsonplaceholder.org`
* **Production**, `https://dummyjson.com`
#### Setting Up Environments
1. Open the **Environments** panel
2. Click **+ Create Environment**
3. Name your environment (e.g., "Development", "Staging", "Production")
4. Add variables specific to each environment
 **Example Environment Configuration:**
**Development Environment:**
```
base_url = https://jsonplaceholder.typicode.com
environment = dev
```
**Staging Environment:**
```
base_url = https://jsonplaceholder.org
environment = staging
```
**Production Environment:**
```
base_url = https://dummyjson.com
environment = production
```
**Example Environment Configuration:**
**Development Environment:**
```
base_url = https://jsonplaceholder.typicode.com
environment = dev
```
**Staging Environment:**
```
base_url = https://jsonplaceholder.org
environment = staging
```
**Production Environment:**
```
base_url = https://dummyjson.com
environment = production
```
 #### Switching Between Environments
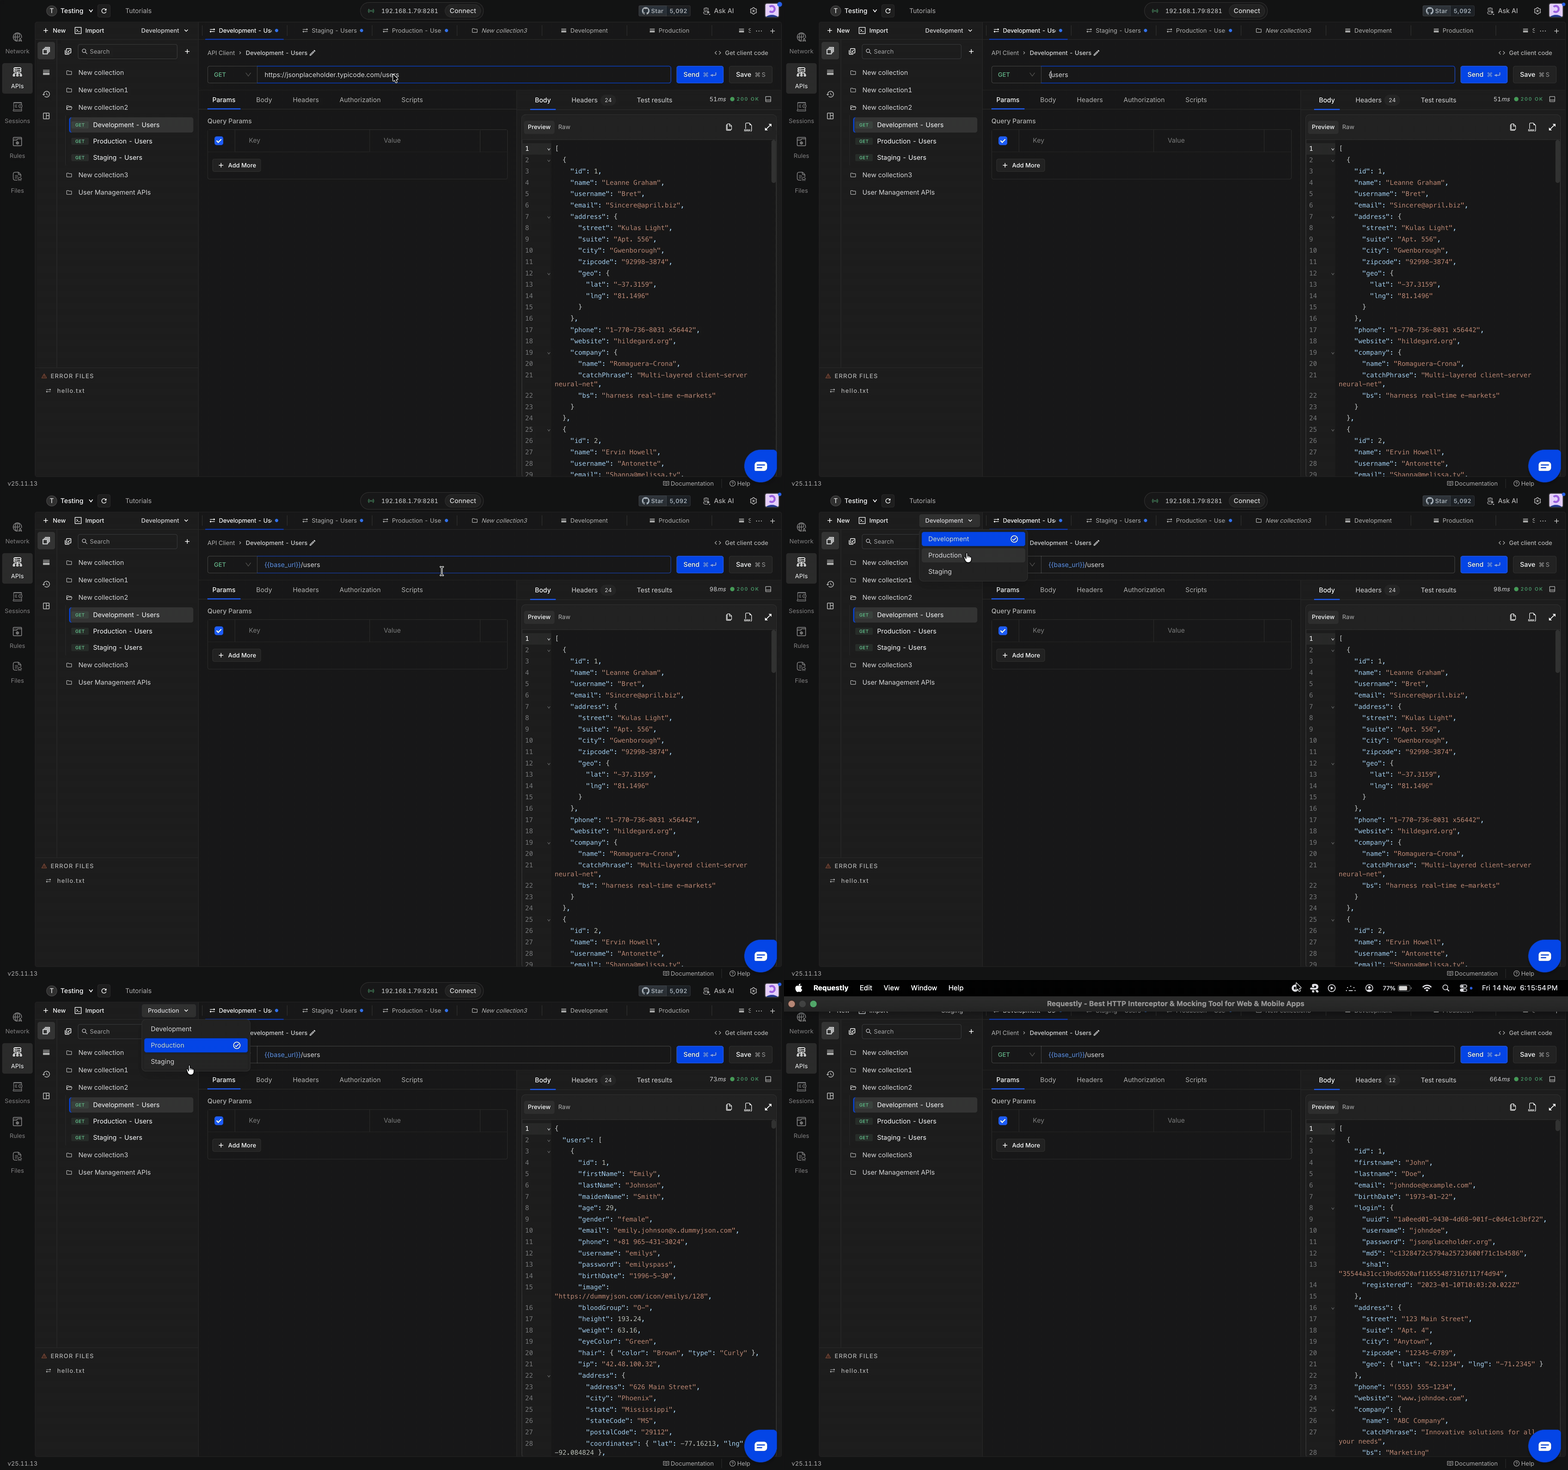
Now I can fetch users from all three environments simply by switching the active environment, no URL editing needed.
1. Look for the environment dropdown (usually in the top-right)
2. Select your desired environment (Dev, Staging, or Prod)
3. All `{{base_url}}` references automatically update
#### Switching Between Environments
Now I can fetch users from all three environments simply by switching the active environment, no URL editing needed.
1. Look for the environment dropdown (usually in the top-right)
2. Select your desired environment (Dev, Staging, or Prod)
3. All `{{base_url}}` references automatically update
 ### Step 3: Understanding Runtime Variables
By now, you've seen how Global and Environment variables help you standardize values across multiple requests. But what if you need something more temporary?
Maybe you're:
* Testing a login API and want to store a token for the next few calls
* Working across multiple workspaces and need a shared temporary value
* Debugging and want to store a session ID or a short-lived value
This is where Runtime Variables become incredibly useful.
Runtime variables are short-lived, local variables that exist only during your current session (unless you choose to make them persistent). They're perfect for storing things like:
* Temporary access tokens
* Session IDs
* Dynamic values generated during test runs
* One-time use values
#### How to Create Runtime Variables
1. Open **Runtime Variables** from the left sidebar
2. Click **+ Add More**
3. Add your variable fields (key and value)
### Step 3: Understanding Runtime Variables
By now, you've seen how Global and Environment variables help you standardize values across multiple requests. But what if you need something more temporary?
Maybe you're:
* Testing a login API and want to store a token for the next few calls
* Working across multiple workspaces and need a shared temporary value
* Debugging and want to store a session ID or a short-lived value
This is where Runtime Variables become incredibly useful.
Runtime variables are short-lived, local variables that exist only during your current session (unless you choose to make them persistent). They're perfect for storing things like:
* Temporary access tokens
* Session IDs
* Dynamic values generated during test runs
* One-time use values
#### How to Create Runtime Variables
1. Open **Runtime Variables** from the left sidebar
2. Click **+ Add More**
3. Add your variable fields (key and value)
 That's it. The variable instantly becomes available across all requests.
**Example Usage:**
```javascript theme={null}
// In a post-response script :
const newtoken = JSON.parse(rq.response.body).token;
rq.environment.set("token", newtoken);
// Then use in subsequent requests
```
That's it. The variable instantly becomes available across all requests.
**Example Usage:**
```javascript theme={null}
// In a post-response script :
const newtoken = JSON.parse(rq.response.body).token;
rq.environment.set("token", newtoken);
// Then use in subsequent requests
```
 ### Step 4: Collection & SubCollection Variables
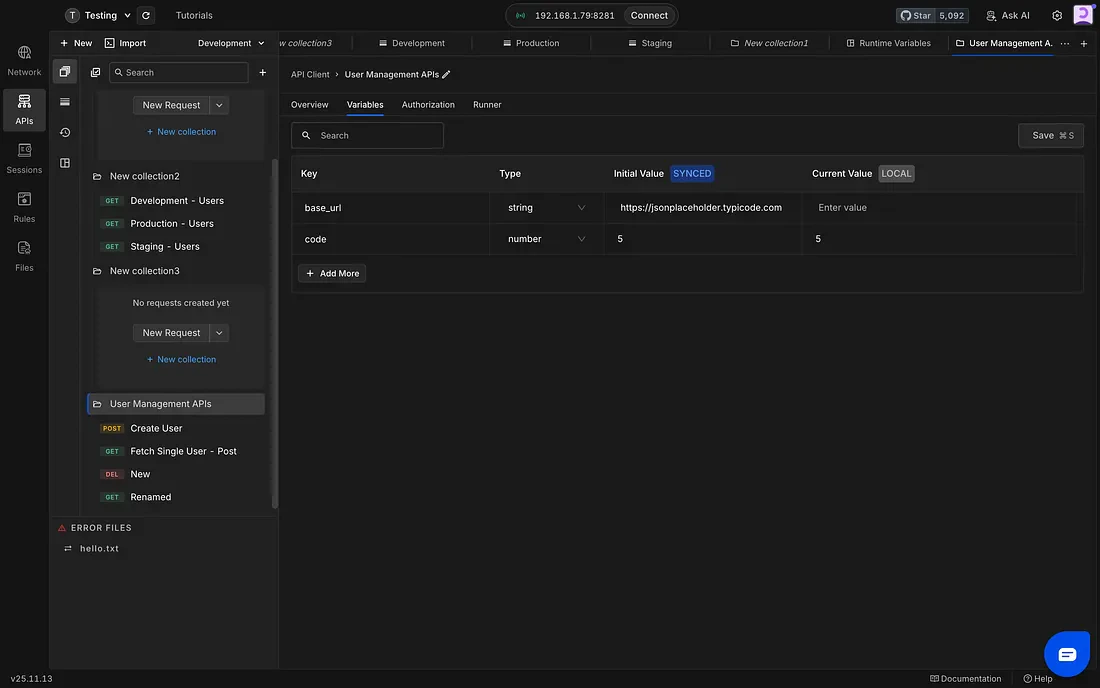
Until now, we've looked at Global, Environment, and Runtime variables. These cover most cases, but what if you want variables that belong only to a specific group of requests?
For example:
* A group of API calls related to **Auth**
* A group of APIs for a specific **microservice**
* A test set for **payments**, **notifications**, etc.
This is exactly where **Collection and SubCollection Variables** shine.
#### Setting Up Collection Variables
1. Open the collection from the left sidebar
2. Click on **Collections**
3. Choose the collection you want
4. Switch to the **Variables** tab
5. Add your collection-specific variables
### Step 4: Collection & SubCollection Variables
Until now, we've looked at Global, Environment, and Runtime variables. These cover most cases, but what if you want variables that belong only to a specific group of requests?
For example:
* A group of API calls related to **Auth**
* A group of APIs for a specific **microservice**
* A test set for **payments**, **notifications**, etc.
This is exactly where **Collection and SubCollection Variables** shine.
#### Setting Up Collection Variables
1. Open the collection from the left sidebar
2. Click on **Collections**
3. Choose the collection you want
4. Switch to the **Variables** tab
5. Add your collection-specific variables
 **Example Collection Variables:**
For an "Auth API" collection:
```
auth_endpoint = /api/v1/auth
token_expiry = 3600
refresh_endpoint = /api/v1/refresh
```
For a "Payment API" collection:
```
payment_endpoint = /api/v1/payments
currency = USD
payment_gateway = stripe
```
### Understanding Variable Precedence in Requestly Interceptor
Requestly Interceptor resolves variables based on the most specific scope first. If the same variable name exists in multiple places, this is the priority:
```
Environment → SubCollection → Collection → Global
```
**Meaning:**
1. **Environment variables** override everything
2. If not found, Requestly Interceptor checks **SubCollection**, then **Collection**
3. **Global variables** act as the final fallback
This makes configuration predictable and ensures environment-specific values always take priority without breaking your global or shared setup.
**Example Precedence:**
If you have `base_url` defined in all scopes:
* Global: `https://api.example.com`
* Collection: `https://api-v2.example.com`
* Environment (Production): `https://prod.example.com`
When Production environment is active, Requestly Interceptor will use: `https://prod.example.com`
## Examples
### Using Variables in API Requests
Once you've defined variables in Requestly Interceptor, whether global, environment, collection, or subcollection, you can reference them anywhere inside your API requests. This includes:
* URLs
* Headers
* Query parameters
* Request bodies
* Pre-request scripts
* Post-response scripts
This keeps your workspace clean, avoids repetition, and makes switching environments effortless.
**Example Collection Variables:**
For an "Auth API" collection:
```
auth_endpoint = /api/v1/auth
token_expiry = 3600
refresh_endpoint = /api/v1/refresh
```
For a "Payment API" collection:
```
payment_endpoint = /api/v1/payments
currency = USD
payment_gateway = stripe
```
### Understanding Variable Precedence in Requestly Interceptor
Requestly Interceptor resolves variables based on the most specific scope first. If the same variable name exists in multiple places, this is the priority:
```
Environment → SubCollection → Collection → Global
```
**Meaning:**
1. **Environment variables** override everything
2. If not found, Requestly Interceptor checks **SubCollection**, then **Collection**
3. **Global variables** act as the final fallback
This makes configuration predictable and ensures environment-specific values always take priority without breaking your global or shared setup.
**Example Precedence:**
If you have `base_url` defined in all scopes:
* Global: `https://api.example.com`
* Collection: `https://api-v2.example.com`
* Environment (Production): `https://prod.example.com`
When Production environment is active, Requestly Interceptor will use: `https://prod.example.com`
## Examples
### Using Variables in API Requests
Once you've defined variables in Requestly Interceptor, whether global, environment, collection, or subcollection, you can reference them anywhere inside your API requests. This includes:
* URLs
* Headers
* Query parameters
* Request bodies
* Pre-request scripts
* Post-response scripts
This keeps your workspace clean, avoids repetition, and makes switching environments effortless.
 #### Example 1: Using Variables in URLs
```
GET {{base_url}}/users/{{user_id}}
```
#### Example 2: Using Variables in Headers
```
Authorization: Bearer {{auth_token}}
Content-Type: {{content_type}}
X-API-Key: {{api_key}}
```
#### Example 3: Using Variables in Request Body
```json theme={null}
{
"email": "{{test_email}}",
"environment": "{{environment}}",
"api_version": "{{api_version}}"
}
```
#### Example 1: Using Variables in URLs
```
GET {{base_url}}/users/{{user_id}}
```
#### Example 2: Using Variables in Headers
```
Authorization: Bearer {{auth_token}}
Content-Type: {{content_type}}
X-API-Key: {{api_key}}
```
#### Example 3: Using Variables in Request Body
```json theme={null}
{
"email": "{{test_email}}",
"environment": "{{environment}}",
"api_version": "{{api_version}}"
}
```
 #### Example 4: Dynamic Variables in Scripts
```javascript theme={null}
// Pre-request script
const timestamp = Date.now();
rq.environment.set("request_timestamp", timestamp);
// Use in request body or headers
// Body: { "timestamp": "{{request_timestamp}}" }
```
### Real-World Workflow Example
Here's a complete workflow using all variable types:
1. **Global Variables**: Store API key and common headers
2. **Environment Variables**: Define different `base_url` for dev/staging/prod
3. **Collection Variables**: Set endpoint paths for Auth collection
4. **Runtime Variables**: Store login token from response
5. **Make Authenticated Requests**: Use stored token in headers
```javascript theme={null}
// Step 1: Login Request
POST {{base_url}}{{auth_endpoint}}/login
// Step 2: Store token (post-response script)
const token = JSON.parse(rq.response.body).access_token;
rq.environment.set("auth_token", token);
// Step 3: Use token in subsequent requests
GET {{base_url}}/users/me
Headers: Authorization: Bearer {{auth_token}}
```
## Conclusion
After working with Requestly Interceptor's Variables & Environments, it's clear how much they simplify everyday API work. No more editing URLs or tokens by hand, no more messy requests, and no more switching values manually across environments.
**Key Takeaways:**
* **Global Variables**: Use for constants shared across all requests
* **Environment Variables**: Essential for managing multiple deployment environments
* **Runtime Variables**: Perfect for temporary, session-based values
* **Collection Variables**: Organize variables by feature or service
* **Variable Precedence**: Environment → SubCollection → Collection → Global
Everything becomes cleaner, faster, and far easier to manage, whether you're a backend developer, tester, or someone who works with multiple APIs.
Once you start using variables properly, your entire workflow becomes smoother and more organized. It's a small feature that makes a big difference, and honestly, it's hard to work without it once you get used to it.
## Additional Resources
* [Try Requestly Interceptor App](https://app.requestly.io)
* [Requestly Interceptor Documentation, Environment and Variables](https://docs.requestly.com)
* [JSONPlaceholder Fake REST API](https://jsonplaceholder.typicode.com)
* [DummyJSON API](https://dummyjson.com)
* [Join Requestly Interceptor Discord Community](https://rqst.ly/join-community)
***
**Have questions about variables or want to share your setup?** Join the [Requestly Interceptor community](https://rqst.ly/join-community) or reach out at [contact@requestly.io](mailto:contact@requestly.io)
#### Example 4: Dynamic Variables in Scripts
```javascript theme={null}
// Pre-request script
const timestamp = Date.now();
rq.environment.set("request_timestamp", timestamp);
// Use in request body or headers
// Body: { "timestamp": "{{request_timestamp}}" }
```
### Real-World Workflow Example
Here's a complete workflow using all variable types:
1. **Global Variables**: Store API key and common headers
2. **Environment Variables**: Define different `base_url` for dev/staging/prod
3. **Collection Variables**: Set endpoint paths for Auth collection
4. **Runtime Variables**: Store login token from response
5. **Make Authenticated Requests**: Use stored token in headers
```javascript theme={null}
// Step 1: Login Request
POST {{base_url}}{{auth_endpoint}}/login
// Step 2: Store token (post-response script)
const token = JSON.parse(rq.response.body).access_token;
rq.environment.set("auth_token", token);
// Step 3: Use token in subsequent requests
GET {{base_url}}/users/me
Headers: Authorization: Bearer {{auth_token}}
```
## Conclusion
After working with Requestly Interceptor's Variables & Environments, it's clear how much they simplify everyday API work. No more editing URLs or tokens by hand, no more messy requests, and no more switching values manually across environments.
**Key Takeaways:**
* **Global Variables**: Use for constants shared across all requests
* **Environment Variables**: Essential for managing multiple deployment environments
* **Runtime Variables**: Perfect for temporary, session-based values
* **Collection Variables**: Organize variables by feature or service
* **Variable Precedence**: Environment → SubCollection → Collection → Global
Everything becomes cleaner, faster, and far easier to manage, whether you're a backend developer, tester, or someone who works with multiple APIs.
Once you start using variables properly, your entire workflow becomes smoother and more organized. It's a small feature that makes a big difference, and honestly, it's hard to work without it once you get used to it.
## Additional Resources
* [Try Requestly Interceptor App](https://app.requestly.io)
* [Requestly Interceptor Documentation, Environment and Variables](https://docs.requestly.com)
* [JSONPlaceholder Fake REST API](https://jsonplaceholder.typicode.com)
* [DummyJSON API](https://dummyjson.com)
* [Join Requestly Interceptor Discord Community](https://rqst.ly/join-community)
***
**Have questions about variables or want to share your setup?** Join the [Requestly Interceptor community](https://rqst.ly/join-community) or reach out at [contact@requestly.io](mailto:contact@requestly.io)